Introduction
A fragment is a citizen of many Android applications. When fragment class was introduced as part of the Android SDK, many people had doubts about using it in an Android app, especially after a complicated life cycle. Many applications used different approaches: "Multiple Activities" vs "One Activity with multiple fragments" vs "Mixed approach (multiple Activities and multiple Fragments". Nowadays, many issues with Fragments have been fixed in the AndroidX version of a fragment and the approach with one Activity and many fragments has become more and more popular. When we take a look at the Jetpack Navigation component, the main idea is using multiple fragments and the Jetpack Navigation component helps to navigate between them.
Testing Android application from the very beginning was not an easy task, but later on, the UiAutomator and Espresso frameworks were introduced which simplify UI testing and many developers, and QA engineers started creating many UI test cases, but from the start all UI test cases tested applications; as a result, we had multiple "End to End" tests. These tests were slow, fragile and unstable. Right now, more and more people prefer tests components in isolation. Let's talk today about testing Android fragments in isolation and speeding up Espresso test cases.
Efficient UI testing series:
- Introduction
- Local and Instrumentation tests in Android
- Android Studio and Android SDK tools
- UI Testing Frameworks
- Exploring "Espresso Test Recorder"
- First test case with Kakao framework
- Testing Android Fragment in isolation
- Exploring test application and first test cases
- A domain-specific language for testing
- Introducing UI tests with mocking
- Flaky tests
- Achieving efficiency in tests
The article was updated on 29 November 2020.
Project configuration
I want to start with a project set up for a "fragment-testing" library. This library can be used with Local and Instrumentation tests. We need a Robolectric library for local tests and device or emulator for running Instrumentation test cases.
Let's add dependencies for local and instrumentation tests.
dependencies {
   ...

   // Fragment
   implementation "androidx.fragment:fragment-ktx:1.2.5"
   debugImplementation "androidx.fragment:fragment-testing:1.3.0-beta01"

   // Robolectric
   testImplementation "org.robolectric:robolectric:4.4"

   // Espresso and tests utilities for local and instrumentation tests
   testImplementation "androidx.test.ext:unit:1.1.2"
   testImplementation "androidx.test:runner:1.3.0"
   testImplementation "androidx.test:core:1.3.0"
   testImplementation "androidx.test:rules:1.3.0"
   testImplementation "androidx.test.espresso:espresso-core:3.3.0"
   testImplementation "androidx.test.espresso:espresso-intents:3.3.0"
   androidTestImplementation "androidx.test.ext:junit:1.1.2"
   androidTestImplementation "androidx.test:runner:1.3.0"
   androidTestImplementation "androidx.test:core:1.3.0"
   androidTestImplementation "androidx.test:rules:1.3.0"
   androidTestImplementation "androidx.test.espresso:espresso-core:3.3.0"
   androidTestImplementation "androidx.test.espresso:espresso-intents:3.3.0"
}
Note: The fragment-testing library uses a different version than the fragment-ktx one because we use the androidx.test:core:1.3.0, and the fragment-ktx uses an old version of the androidx.test:core library. Once the fragment-ktx library is updated, we can use a similar versions for fragment-ktx and fragment-testing libraries.
We can also create shared tests which can be run as Local and Instrumentation tests (read more here: "Sharing code between local and instrumentation tests").
Testing fragments with local and instrumentation tests
Local tests can be run on Android JVM. The Robolectric library can help with it. (We should use Robolectric 4.0+). These tests are fast; we can use Espresso syntax for creating such test cases, but on the other hand, we cannot run these test cases on different devices. From time to time, you can face a situation when the application doesn't work correctly on different devices. In this case, the Instrumentation UI tests can be beneficial.
Instrumentation test cases require device or emulation, and they are slow, but we can run them on different devices simultaneously. However, often you can face a situation when all instrumentation test cases are written in the "End to End" approach. It means we always start the test from the initial screen of or application, like the Login or Splash screen. As a result, our End-To-End test cases are slow because we should spend some time on the navigation to the required screen, and only after it, we can start to verify the screen.
Fortunately, we can verify each fragment in isolation, and it speeds up instrumentation testing.
Use case
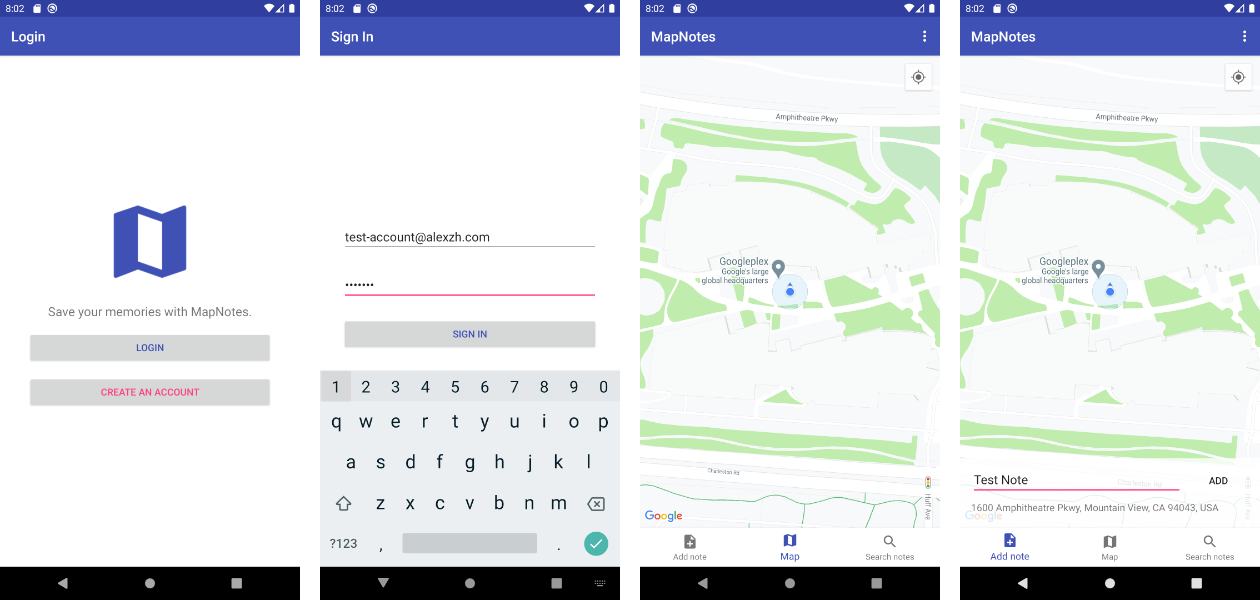
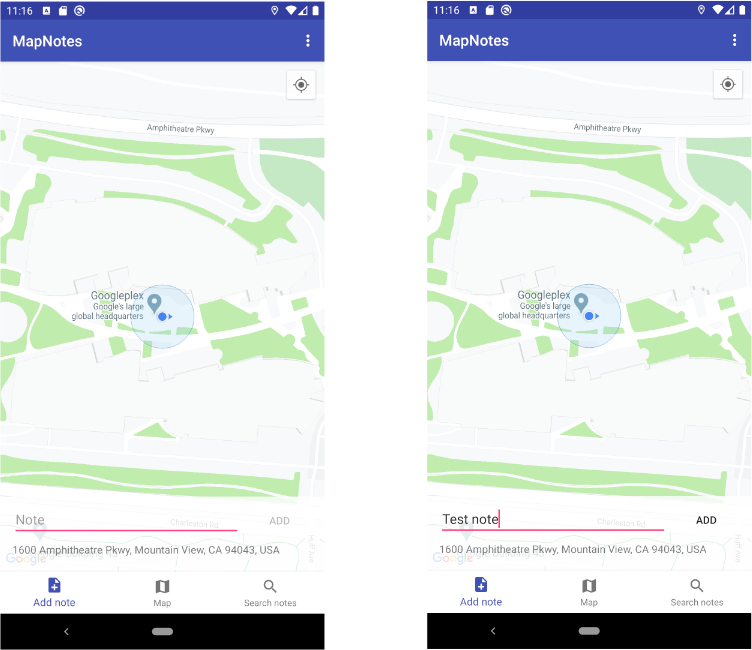
I propose to create test cases for "Add note" fragment from MapNotes application. This fragment allows us to add notes connected with current latitude and longitude.
So, let's take a look at UI possibilities of the fragment:
- "ADD" button disabled by default;
- "ADD" button enabled when the text of the note exists.
Let's visualize the screen of application:
Testing fragments
I want to start with a way of testing a fragment without a fragment-testing library. It can be useful if you don't use a Fragment from androidx.fragment package.
First of all, we should start an Activity and afterward, add a Fragment to it. A FragmentTestActivity is a simple Activity with a container for the Fragment.
@RunWith(AndroidJUnit4::class)
class AddNoteFragmentTest {

   @Before
   fun setUp() {
      ActivityScenario.launch(FragmentTestActivity::class.java)
   }

   ...
}
The first step of any test case where we want to test a Fragment in isolation is adding the required fragment to this Activity. (A setFragment is a custom method which adds required Fragment to the Activity.)
@RunWith(AndroidJUnit4::class)
class AddNoteFragmentTest {

   @Before
   fun setUp() {
      ActivityScenario.launch(FragmentTestActivity::class.java)
         .onActivity { it.setFragment(AddNoteFragment()) }
   }

   ...
}
Finally, we can add test cases:
@RunWith(AndroidJUnit4::class)
class AddNoteFragmentTest {
   private val testNoteText = "test note"

   @Before
   fun setUp() {
      ActivityScenario.launch(FragmentTestActivity::class.java)
         .onActivity { it.setFragment(AddNoteFragment()) }
   }

   @Test
   fun shouldDisplayNoteHintForANewNote() {
      onView(withId(R.id.note))
         .check(matches(withHint(R.string.add_note_hint)))
   }

   @Test
   fun shouldChangeAddButtonEnableAfterChangingNoteText() {
      onView(withId(R.id.add))
         .check(matches(not(isEnabled())))

      onView(withId(R.id.note))
         .perform(replaceText(testNoteText))

      onView(withId(R.id.add))
         .check(matches(isEnabled()))
   }
}
With this approach, you can test a fragment in isolation without any problems, but you need to manually create an empty Activity for attaching the required Fragment.
So, let's take a look at a new approach of the testing fragments in isolation with a "androidx.fragment:fragment-testing" library.
The launchFragmentInContainer method allows us to launch a fragment which contains UI. Afterwards, your fragment will be attached to the Activity root's view.
@RunWith(AndroidJUnit4::class)
class AddNoteFragmentTest {

   @Before
   fun setUp() {
      // detailed version
      launchFragmentInContainer<AddNoteFragment>(
         fragmentArgs = null, // Bundle
         themeResId = R.style.AppTheme,
         initialState = Lifecycle.State.RESUMED, // Lifecycle.State
         factory = null // FragmentFactory
      )
      // or
      // short version
      launchFragmentInContainer<AddNoteFragment>(
         themeResId = R.style.AppTheme
      )
   }

   ...
}
If we want to use custom FragmentFactory for initializing our fragment, we can use the factory parameter.
We can customize parametrs of the Fragment using the fragmentArgs parameter.
@RunWith(AndroidJUnit4::class)
class AddNoteFragmentTest {

   @Before
   fun setUp() {
      val arguments = Bundle().also {
         it.putString(ARGUMENT_KEY, ARGUMENT_VALUE)
      }

      launchFragmentInContainer<AddNoteFragment>(
         fragmentArgs = arguments,
         themeResId = R.style.AppTheme
      )
   }

   ...
}
In addition to that, we can run a fragment in the required state. Let's imagine that we want to test fragment in ON_START state:
@RunWith(AndroidJUnit4::class)
class AddNoteFragmentTest {
   @Test
   fun shouldChangeSomethingWhenFragmentOnPauseState() {
      launchFragmentInContainer<AddNoteFragment>(
         initialState = Lifecycle.State.STARTED,
         themeResId = R.style.AppTheme
      )
      // or
      val scenario = launchFragmentInContainer<AddNoteFragment>()
      scenario.moveToState(State.STARTED)
   }
}
Note: We can test non-graphical Fragments with the launchFragment method. The fragment will be attached to the empty Activity.
launchFragment<AddNoteFragment>(
   fragmentArgs = null, // Bundle
   themeResId = R.style.AppTheme,
   factory = null // FragmentFactory
)
Instrumentation UI tests
The launchFragmentInContainer method creates an empty FragmentActivity with required fragment under the hood. As you can see, this approach is similar to the previous approach, which was popular before because we had an activity with the required fragment.
So, let's cover the following scenario with a test case:
- "ADD" button is disabled by default;
- Enter the "test note" test into the note EditText;
- "ADD" button is enabled.
@RunWith(AndroidJUnit4::class)
class AddNoteFragmentEspressoTest {
   private val testNoteText = "test note"

   @Before
   fun setUp() {
      loadKoinModules(listOf(testAppModule))
      launchFragmentInContainer<AddNoteFragment>()
   }

   @Test
   fun shouldChangeAddButtonEnableAfterChangingNoteText() {
      onView(withId(R.id.add))
         .check(matches(not(isEnabled())))

      onView(withId(R.id.note))
         .perform(replaceText(testNoteText))

      onView(withId(R.id.add))
         .check(matches(isEnabled()))
   }
}
As you can see, we can avoid the ActivityTestRule in the test suite and have more possibilities, like:
- Test fragment with the required state;
- Customize bundle for the fragment;
- Clean API for testing fragment in isolation.
Local UI tests
The main benefit of this approach is that we can execute the same test cases with Robolectric without any changes. I recommend checking "Sharing code between local and instrumentation tests" which describe an approach of storing test cases with the possibility to run them as local and instrumentation test cases.
Summary
The fragment-testing library allows us to test graphical and non-graphical fragments in isolation without additional preparation. Of course, the fragment will be attached to the test Activity. This tool allows us to test fragments with local and instrumentation test cases. We can use Robolectric for local tests.
So, let's try to compare the execution time of the same scenarios for local and instrumentation test cases. We spend around 18 seconds for local tests and 30 seconds for instrumentation tests because we should install 2 apks to external devices. When the test finishes we should also copy a test report from an external device to your workstation. However, instrumentation tests can be executed on different devices simultaneously. If you have issues on various devices, I recommend using instrumentation tests. In general, I recommend using a shared test module where you can store test cases with the possibility of running them as local and instrumentation tests. Local tests can be executed in the pipeline, and you can use instrumentation tests on different devices before release).