Introduction
Typically, when we think of UI testing, we think of simulating user behavior, such as when a user enters their email and password and clicks the login button. However, modern UI testing can do much more than just emulate user behavior.
In this article, we will explore the following topics:
- Different types of UI tests
- Understanding what different UI tests CAN and CANNOT verify
- What to check with each type of UI tests
- How to start with UI testing
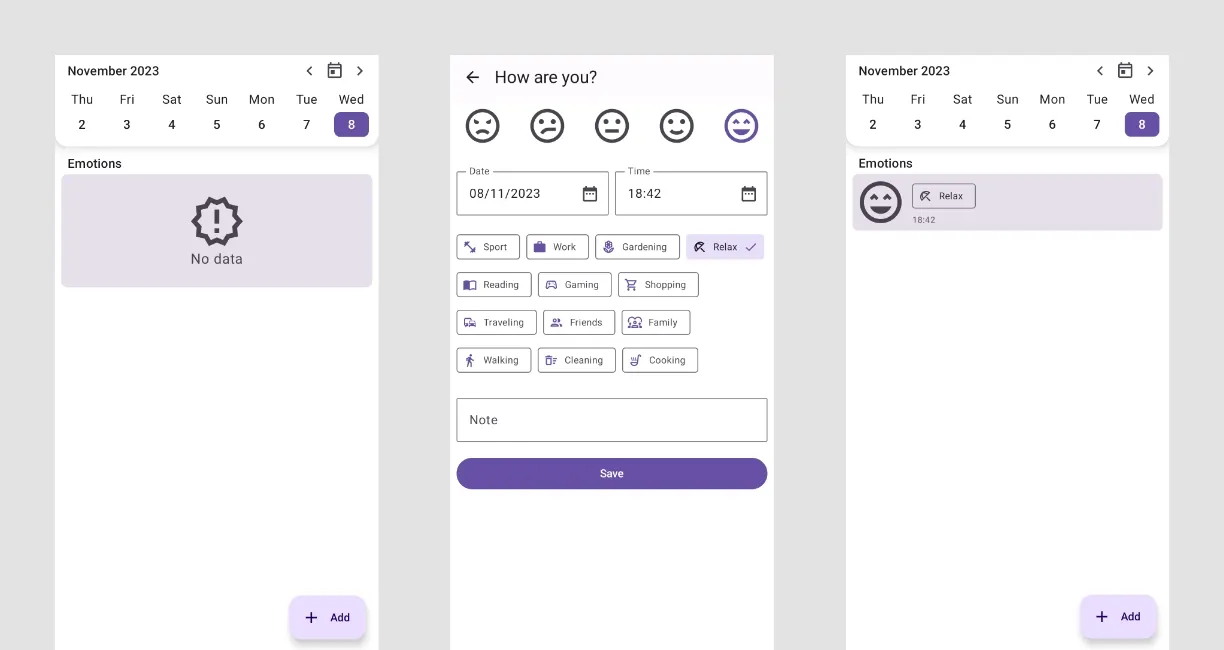
All examples will be based on the "Mood Tracker" application. Let's explore 3 screens, as all our test cases will be based on these screens.
Different types of UI tests
End-To-End tests ensure that the application works with the production environment. This means that all application layers work correctly.
UI tests with fake data verify different states of the screen (no data, successfully loaded data, network is unavailable, and much more).
Screenshot tests ensure that a component or screen looks correct in different states.
Accessibility tests check if everyone can use a user interface, including people with disabilities.
End-To-End tests
End-to-end tests verify the interaction between the UI, back-end, database, and other application layers.
Let's explore the main characteristics of such tests:
- Entry point: This is similar to the entry point of the application (we often start such tests from the splash or home screen).
- Navigation: They usually navigate through several screens starting from the entry point.
- Data: We use the production or staging environment (staging environment: replica or copy of the production environment) to ensure interaction verification with the production environment.
| Pros | Cons |
|---|---|
| E2E tests emulate real-world user scenarios and provide a realistic assessment of how the application will behave in a production environment. | E2E tests are slow because of interaction with the real environment and a lot of navigating is required. |
| We make sure that our application works well with the real environment. | They can be flaky as they have multiple dependencies (network access, network speed, VPN access, etc.). |
| These tests effectively detect integration issues and other complex defects that are not easily detected by unit or integration testing. | It is not possible to test all cases because it is not always possible to reproduce all types of issues within the real environment. |
| E2E tests update data in the prod/staging environment and can affect other tests that use the same environment. |
Steps:
• [Action]: Open the application.
• [Assertion]: The "No data" text is displayed on the home screen.
• [Action]: Tap on the "Add" button.
• [Action]: Select the "Excited" emotion.
• [Action]: Select the specific date and time.
• [Action]: Select "Relax" activity.
• [Action]: Tap on the "Save" button.
• [Assertion]: Check that the emotion item (with "Excited" emotion, "Relax" activity, and a specific time) is displayed on the screen.
UI tests with fake data
As we all know, naming is a complicated topic in software development, and we have the same situation with UI testing. This type of test has different names in different articles:
• Component UI tests
• Functional tests
• Integration tests
• Isolated UI tests
• UI tests
UI tests with fake data verify the different states of the components or screens of the application and use the fake data to simulate all cases.
Main characteristics:
- Entry point: Required screen (if the UI testing framework allows us to do it)
- Navigation: Depends on the goal of the test case (they use fake data):
- Screen tests (Screen component verification): No navigation needed
- Navigation tests (Navigation verification): Navigation needed
- Data: Fake data
| Pros | Cons |
|---|---|
| These tests are fast and stable. | These tests use fake data and we need to synchronize fake responses with responses from a real server. |
| We can emulate all cases. | Testing with fake data may not fully represent the complexity and variability of real-world data. |
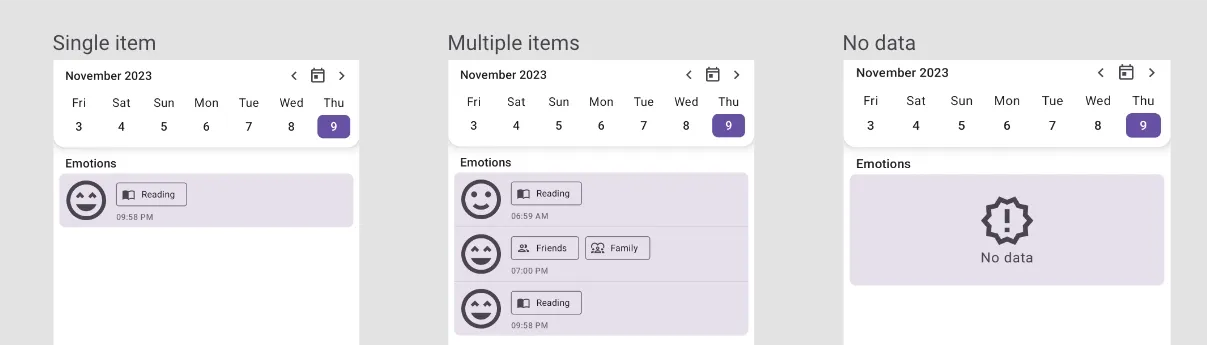
Single item on the screens
• [Action]: Load the screen with predefined data.
• [Assertion]: Check that the emotion item is displayed on the screen (with emotion, activity and a specific time).
Multiple items on the screens
• [Action]: Load the screen with predefined data.
• [Assertion]: Check that emotion items are displayed on the screen (with emotion, activity, and a specific time).
No data
• [Action]: Load the screen with predefined data.
• [Assertion]: Check that "No data" text is displayed on the screen.
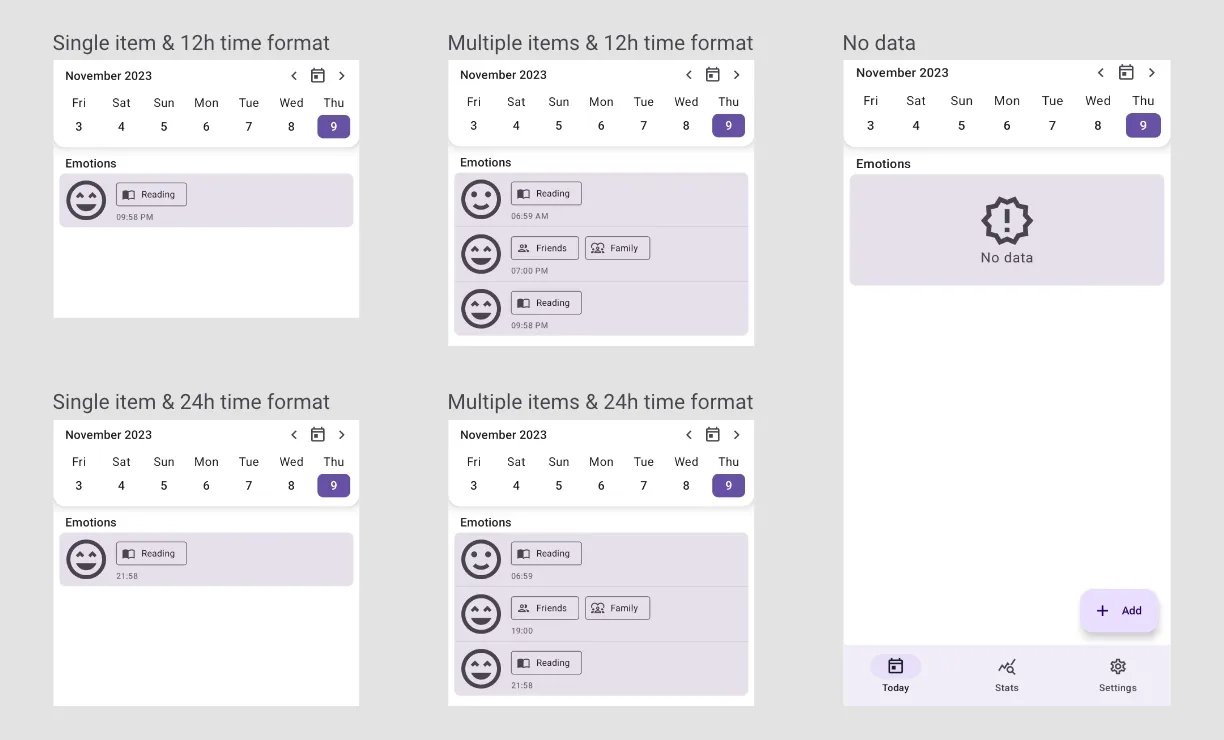
This screen displays the time and we can verify that the time is displayed in the correct time format without updating the values in the "Settings" screen. So, let's update our scenarios.
Single item on the screens with 12h time format
• [Action]: Load the screen with predefined data.
• [Assertion]: Check that the emotion item is displayed on the screen (with emotion, activity, and a specific time in 12h format).
Single item on the screens with 24h time format
• [Action]: Load the screen with predefined data.
• [Assertion]: Check that the emotion item is displayed on the screen (with emotion, activity, and a specific time in 24h format).
Multiple items on the screens with 12h time format
• [Action]: Load the screen with predefined data.
• [Assertion]: Check that emotion items are displayed on the screen (with emotion, activity, and a specific time in 12h format).
Multiple items on the screens with 24h time format
• [Action]: Load the screen with predefined data
• [Assertion]: Check that emotion items are displayed on the screen (with emotion, activity, and a specific time in 24h format).
No data
• [Action]: Load the screen with predefined data.
• [Assertion]: Check that "No data" text is displayed on the screen.
Screenshot tests
These tests are also commonly called:
• Visual Tests
• Snapshot Tests
• Pixel Perfectness Tests
End-To-End and UI tests with fake data can find many issues in the app. However, they cannot find pixel perfectness issues because they verify that data is displayed on the screen, but they don't check that data is displayed in the right place, that views don't overlap each other, that text doesn't cut off, that UI elements use the right color, font size, and much more.
If we look at this image, we can find the difference even if both screens have similar data.
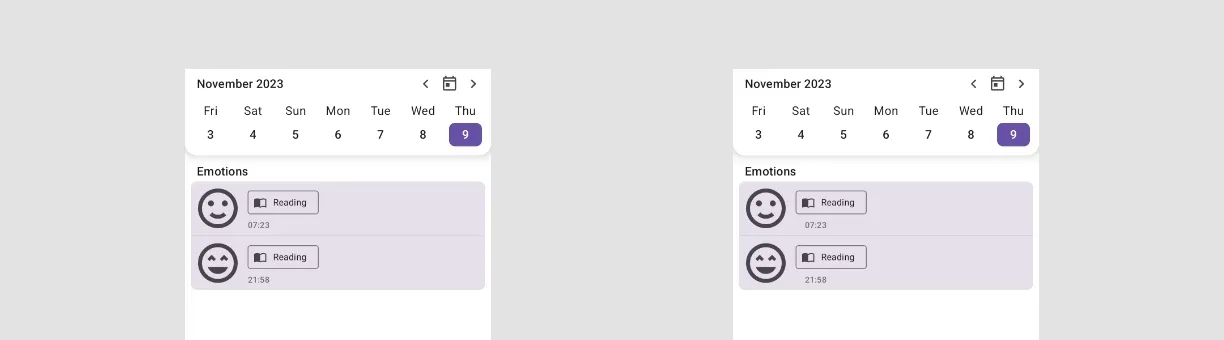
So, screenshot tests verify how content is rendered on the screen. We test components and screens with static data using this type of tests. When the UI is changed, the screenshots should be updated (usually it's done with a single command).
| Pros | Cons |
|---|---|
| These tests provide a visual validation of the user interface. | The maintenance of screenshot tests can be challenging, especially if the UI changes frequently. |
| Visual changes are easily detected in reports after test case execution. | These tests focus on the visual aspect only and will not detect any functional issues. |
Custom components:
• Weekly Calendar
• Date Picker
• Time Picker
Screen configurations:
• Color Mode (light and dark modes)
• Font Sizes
• Layout Direction
• Translations into Different Languages
So, let's choose a few basic test scenarios which can be covered for the home screen with screenshot tests:
Home screen without emotions
• Light mode & small font size
• Light mode & large font size
• Dark mode & small font size
• Dark mode & large font size
Home screen with multiple emotions
• Light mode & small font size
• Light mode & large font size
• Dark mode & small font size
• Dark mode & large font size
Often you can find a situation where a UI component or screen works with the default font size, but when the font size is large, you can see some problems in the UI. In this example, when the font size is large, some of the day abbreviations contain 2 symbols instead of 3 (e.g. "Mo" instead of "Mon").
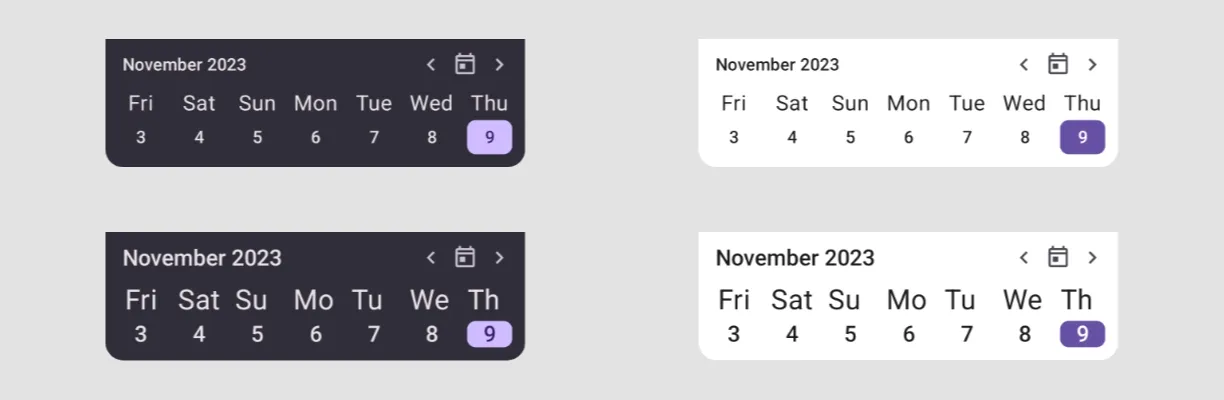
I highly recommend checking screens with different font sizes and scales. I saw such issues in many apps.
Accessibility tests
The application may function well and have a good design, but that doesn't make it accessible for everyone. Often accessibility has a low priority and people with disabilities do not have the best experience when using various applications. Accessibility tests verify that our application is accessible to everyone.
Here are the common issues that can be verified with accessibility tests:
- Incorrect screen structure
- Missing labels for UI components
- Incorrect labels for complex components
- Small clickable elements, such as buttons and icons
| Pros | Cons |
|---|---|
| These tests make sure the app is accessible to a broader audience, including people with disabilities. | Accessibility testing often requires specialized knowledge and skills, and it may be that not all members of the team are familiar with the best practices and guidelines. |
Android recommendations:
- Before creating UI tests, I recommend verifying your application with the "Accessibility Scanner" app.
- Recently, the "Smart UI Check Mode" feature was added to the Android Studio Iguana, and you can verify if your composable functions are accessible without running the application.
Not sure if your composable function is accessible?
— Alex Zhukovich (@Alex_Zhukovich) November 1, 2023
The "Smart UI Check Mode" feature of Android Studio Iguana allows you to verify your composable for common accessibility issues.#JetpackCompose #AndroidDev #AndroidStudio pic.twitter.com/C2a25yFFIZ
I recommend covering all custom components (components from the design system) with accessibility tests.
How to start UI testing?
As you can see, the different types of tests have their advantages and disadvantages. If your application already has had UI tests, you will see what needs to be improved or which types of tests you can introduce to your project. However, if you are new to UI testing, you may have the question, "What is a good way to introduce UI testing to the project?".
Here are a few recommendations:
- First, we should prioritize E2E testing for the most critical use cases to ensure that the features work correctly and interact smoothly with the production/staging environment. Keep in mind that E2E testing tends to be slow and flaky. So it's a good place to start, but I recommend focusing more on other types of tests.
- Next, you can start adding UI tests with fake data and Screenshot tests, as they both check components/screens in isolation, and you can check all states and errors for your screens.
- To find the important screens to test, I suggest looking at the analytics. It will show you which screens and scenarios are used more than others in your application.
Conclusion
There are several types of UI tests:
- End-To-End tests ensure that your application works properly with the production/staging environment, but they are slower and less reliable than other types of test.
- UI tests with fake data check various states of your screens and use fake data; this makes these tests fast, but you cannot be sure that your application works well with the real environment using only this type of test.
- Screenshot tests verify that all your components and screens are rendered properly and placed correctly on the screen. You can also check your screen with different configurations like color modes, font sizes, display scales, layout directions, etc.
- Accessibility tests checks that everyone can use your application using gestures, voice, or special devices.
As you can see, if we want to make sure that your application works correctly, we need to check many scenarios:
- Verify that your application has no problems interacting with the production environment
- Check all states and errors for components and screens
- Verify that everything is correctly rendered and positioned on the screen
- Make sure that your application is accessible to everyone
This requires us to combine different types of UI testing.
I would like to thank Alexey Alter-Pesotskiy, Alexey Bykov, Ekaterina Basova, Evgenii Matsiuk, Jovche Mitrejchevski, and Sergio Sastre Florez for reviewing the article.