Introduction
Nowadays, mobile apps have many screens so that projects can have many UI tests. When a project is large, we can have hundreds or thousands of UI tests, and running them locally can be time-consuming. The majority of developers often focus on one specific feature at a time and run all test cases related to a particular part of the project before committing changes. This is a simple task when feature-related tests are located in a single file, but in real life, many features have multiple entry points, and as a result, test cases are dispersed throughout the test codebase.
We can have test cases for the following scenarios:
- verification of the feature in isolation
- verification of the whole application with E2E tests
- navigation verification in the application
- and many others
In this case, it is not easy to run all test cases related to a specific feature without running all test cases. In addition to that, we may want to run only screenshot tests in our project.
In this article, we will explore the following:
- how to group tests based on size and custom tags
- how to group tests into test suites
- how to execute a specific group of instrumentation tests via IDE, Gradle, and ADB command
- how to exclude tests with a specific size or custom annotation from an execution
- widespread use cases of grouping test cases
How to run Android tests?
We can run instrumentation test cases using different approaches, such as the following:
- IDE (Android Studio, IntelliJ Idea, etc.)
- Gradle tasks
- ADB commands
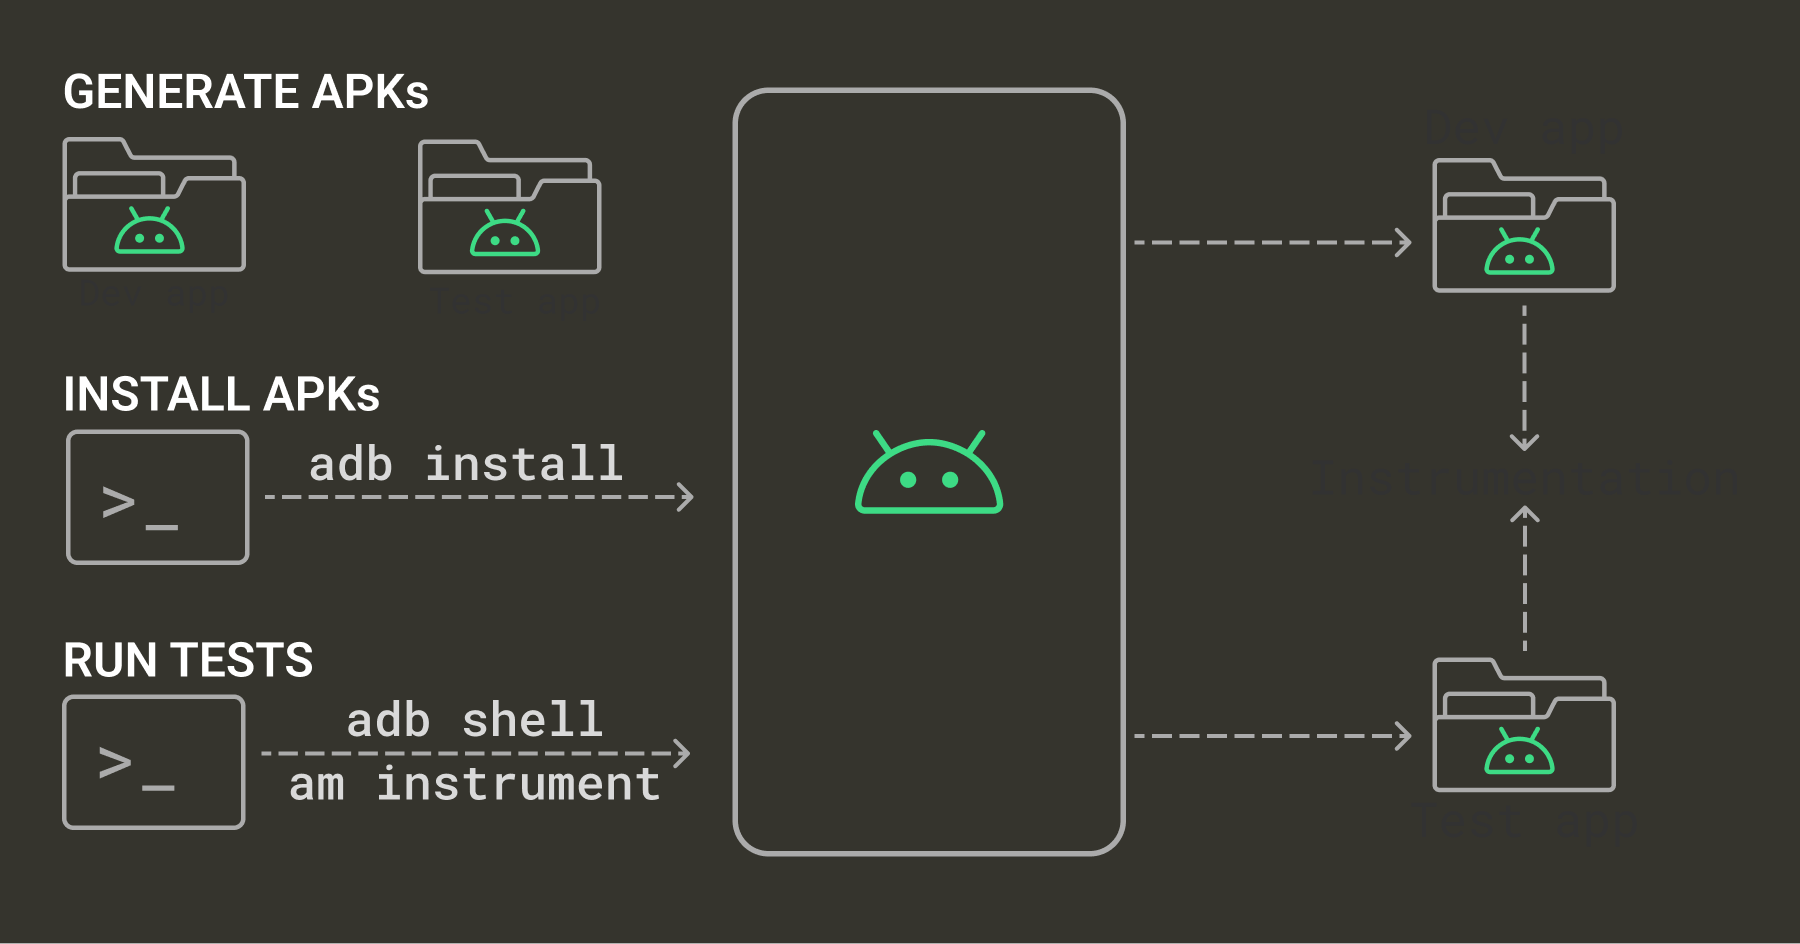
Internally, instrumentation tests are executed via ADB command. However, before execution, two "APK" files will be installed on the device/emulator (APK file with application and APK file with tests).
We can use parameters to run specific test cases with these approaches. Let's look at examples of running test cases from a particular file using all approaches.
The instrumentation tests are located in the "androidTest" folder by default.
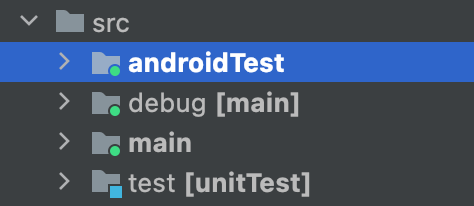
IDE (Android Studio, IntelliJ IDEA)
To create a new instrumentation test configuration, we can select "Run CLASS_NAME" next to the test class name or near the test case. You can also run test cases from a specific package or test class from the "Project" view.
Gradle
We may execute instrumentation tests with the ./gradlew :MODULE:connectedAndroidTest command. You can specify a "build type" on which you can execute instrumentation tests (by default: debug, release) and provide a name of build type as part of the command name: ./gradlew :MODULE:connected{BUILD_TYPE}AndroidTest.
If your application has multiple build flavors, the Gradle task will include a build flavor: ./gradlew :MODULE:connected{BUILD_FLAVOR}{BUILD_TYPE}AndroidTest.
Let's imagine that we want to run instrumentation tests for the following:
- Build type: Debug
- Build flavor: Free
The Gradle task is ./gradlew :MODULE:connectedFreeDebugAndroidTest .
ADB
The ADB (Android Debug Bridge) is a tool that allows us to communicate with Android devices/emulators. The ADB is used internally when we run test cases using Android Studio or Gradle tasks.
To run instrumentation tests via ADB, we need to create two APK files (an "APK" file with the app and an "APK" file with test cases), install them on a device, and run a command for executing test cases.
Let's explore a sequence of steps to run instrumentation tests with ADB commands.
Let's assume that our app has the "com.alexzh.testapp" package, and the application doesn't use any custom flavors. We want to run test cases for the debug version of the app.
Create an APK file for the app. The generated APK file is located in the "app/build/outputs/apk/debug/" folder.
./gradlew :app:assembleDebug
Create an APK for tests. The generated APK file is located in the "app/build/outputs/apk/androidTest/debug/" folder.
./gradlew :app:assembleDebugAndroidTest
Install the APKs.
# Install the APK with app
adb install -r app/build/outputs/apk/debug/app-debug.apk

# Install the APK with tests
adb install -r app/build/outputs/apk/androidTest/debug/app-debug-androidTest.apk
Run the instrumentation tests.
adb shell am instrument -w com.alexzh.testapp.test/android.support.test.runner.AndroidJUnitRunner
How to group tests?
There are multiple ways of grouping test cases:
- group test classes in the same package
- group test classes into "Test Suites"
- group test cases by size (small, medium, large)
- group tests by custom annotations
By default, theAndroidJUnitRunneris used as a runner for instrumentation tests. Internally, it uses the JUnit 4 framework. This article will explore approaches for grouping tests available in JUnit 4.
If you are using JUnit 5, you can use an additional option: @Tag.
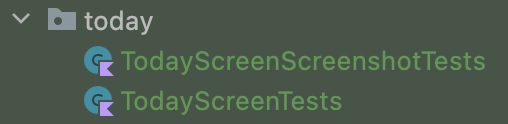
Group tests by test classes and packages
The most obvious way of grouping test cases is to put them into a single test class.
The easiest approach to organize test cases is to add them to one test class.
class TodayScreenTest {

    @Test
    fun displaySuccessWithSimpleItem_whenDataIsAvailable() { ... }

    @Test
    fun displaySuccessWithMultipleItems_whenDataIsAvailable() { ... }

    @Test
    fun displayEmptyState_whenDataIsNotAvailable() { ... }

    ...
}
I recommend using it when we want to group tests of one specific type, like "Functional tests", "Screenshot tests", or "End-To-End tests". In this case, you can easily find the required test cases if you want to fix them or add a new one. The same package can have many test classes for the same feature.
This approach has limitations:
- If you include several test cases of different types in a single file, the test class will become too huge and difficult to support
- It is hard to decide where to add test cases that start from one screen and go to a few other screens (End-To-End test cases) because the test cases go through many features
Run test cases from a test class or package
Let's explore how we can execute test cases from a single test class or package using different approaches.
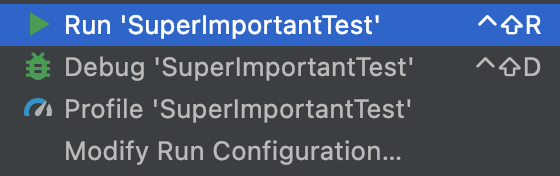
Run tests using Android Studio
To create a new instrumentation test configuration, we can select "Run CLASS_NAME" next to the test class name or near the test case.
You can do the same for running all test cases from a package, but you must select the package instead of a file.
Run tests using the Gradle task
We can execute all tests from a specific class using the Gradle task:
# package: com.alexzh.testapp
# test class: SuperImportantTest
./gradlew :app:connectedDebugAndroidTest -Pandroid.testInstrumentationRunnerArguments.class=com.alexzh.testapp.SuperImportantTest
To run all test cases from a package:
# package: com.alexzh.testapp
./gradlew :app:connectedDebugAndroidTest -Pandroid.testInstrumentationRunnerArguments.package=com.alexzh.testapp
Run tests using the ADB command
To execute any instrumentation tests on a device, you need to generate the latest version of both APK files (the APK file with the app and the APK file with test cases), install them on the device/emulator, and execute test cases.
You can find more details here.
To run test cases from a specific test class, we can execute the ADB command:
# package: com.alexzh.testapp
# test class: SuperImportantTest
# runner: android.support.test.runner.AndroidJUnitRunner
adb shell am instrument -w -e class com.alexzh.testapp. SuperImportantTest com.alexzh.testapp.test/android.support.test.runner.AndroidJUnitRunner
To run all test cases from a package:
# package: com.alexzh.testapp
# runner: android.support.test.runner.AndroidJUnitRunner
adb shell am instrument -w -e package com.alexzh.testapp com.alexzh.testapp.test/android.support.test.runner.AndroidJUnitRunner
Run all tests from the package without given classes
Sometimes, you can have a situation where you want to execute all test cases from the package without a specific test class (for instance, a class with E2E test cases). You can easily do this using the notClass parameter for a runner.
Run tests using Android Studio
To run all test cases without a given test class, we can add an instrumentation parameter to the configuration:
- "notClass" : "com.alexzh.testapp.E2ETest"
Run tests using Gradle task
We can execute all tests from a specific package without a given test class using Gradle task:
# package: com.alexzh.testapp
# test class: SuperImportantTest
./gradlew :app:connectedDebugAndroidTest -Pandroid.testInstrumentationRunnerArguments.notClass=com.alexzh.testapp.E2ETest
Run tests using the ADB command
To execute any instrumentation tests on a device, you need to generate the latest version of both APK files (the APK file with the app and the APK file with test cases), install them on the device/emulator, and execute test cases.
You can find more details here.
To run test cases from a package without a specific test class, we can execute the ADB command:
# package: com.alexzh.testapp
# test class: E2ETest
# runner: android.support.test.runner.AndroidJUnitRunner
adb shell am instrument -w -e notClass com.alexzh.testapp.E2ETest -e package com.alexzh.testapp com.alexzh.testapp.test/android.support.test.runner.AndroidJUnitRunner
Group tests into Test Suites
We can group multiple test cases in a "Test Suite" and run all test cases from the suite at once. In this scenario, all test cases from test classes added to the suite will be executed. Let's imagine that we have the following features:
- Dashboard
- Notes search
- Add a note
- Edit a note
- Synchronization
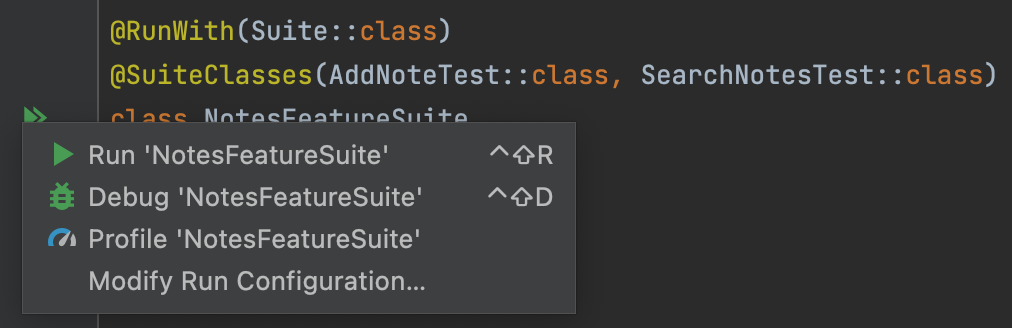
As you can see, we have many note-related features. We can group them into the "Notes Test Suite". To create a test suite, we need to create a class:
@RunWith(Suite::class)
@SuiteClasses(AddNoteTest::class, EditNoteTest::class, SearchNotesTest::class)
class NotesFeatureSuite
The @SuiteClasses annotation allows us to add all test classes that will be added to the suite. In our case, when we run tests from the NoteFeatureSuite suite, all tests from AddNoteTest, SearchNotesTest, and EditNoteTest classes will be executed.
Run tests from a "Test Suite"
Let's explore how we can run test cases from a test suite using different approaches.
Run tests using Android Studio
To create a new instrumentation test configuration, we can select "Run CLASS_NAME" next to execute all test cases from the "Test Suite".
The alternative approach is to add instrumentation parameters to the configuration:
- "class" : "com.alexzh.testapp.NotesFeatureSuite"
Run tests using the Gradle task
We can add the "class" parameter to the runner to run instrumentation tests from a specific test suite, use the Gradle task:
./gradlew :app:connectedDebugAndroidTest -Pandroid.testInstrumentationRunnerArguments.class=com.alexzh.testapp.NotesFeatureSuite
Run tests using the ADB command
To execute any instrumentation tests on a device, you need to generate the latest version of both APK files (APK file with the app and APK file with test cases), install them on the device/emulator, and execute test cases.
You can find more details here.
The "class" option can be used to execute instrumentation tests from a certain test suite using the ADB command.
adb shell am instrument -w -e class com.alexzh.testapp. NotesFeatureSuite com.alexzh.testapp.test/android.support.test.runner.AndroidJUnitRunner
Group tests by size
The Default Android test runner allows us to group tests by size, and we can use one of the predefined annotations: @SmallTest, @MediumTest, or @LargeSize.
class SuperImportantTest {

    @LargeTest @Test
    fun superImportantUiTest() {
        ...
    }
}
This article from the "Google Testing Blog" explains when Google recommends using these annotations.
Based on this article, we have the following definitions:
- Small: No interaction with the network, no interaction with the database or preferences
- Medium: Interaction with device environment (database, files, etc.), but no interaction with network
- Large: Interaction with the external environment (device environment, external API, etc.)
I have never seen such separations in practice. Usually, Android developers try to limit using instrumentation tests and, as a result, developers try to test as many of these cases with Robolectric if possible. I have seen people mark different types of tests with one of the predefined size annotations (all screenshot tests are marked with the LargeTest). This is helpful because when we want to run a specific test case, we can filter them out and execute tests with a particular size.| Annotation | Parameter |
|---|---|
| @SmallTest | small |
| @MediumTest | medium |
| @LargeSize | large |
Run tests with a specific size
Using different approaches, let's run instrumentation tests with the @LargeSize annotation. You can use the parameter value from the table above to run tests with other size annotations.
Run tests using Android Studio
We need to create a test configuration to execute test cases for a specific size using Android Studio/IntelliJ IDEA.
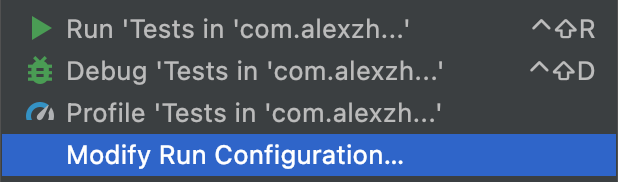
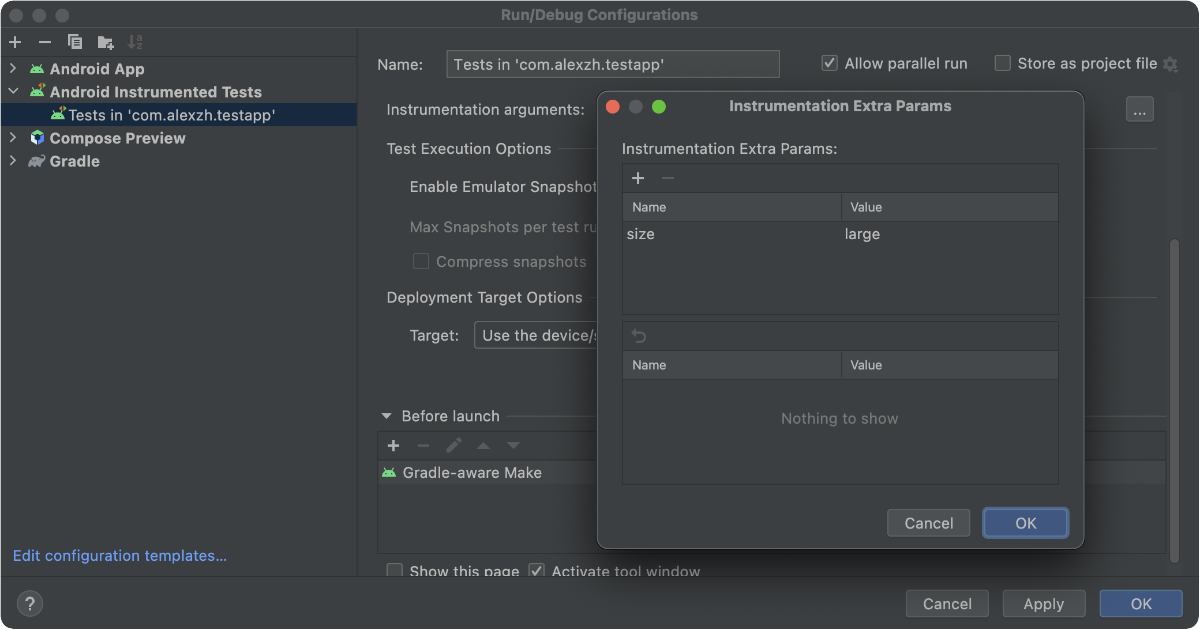
Let's imagine we want to create a configuration for a package. In the Project Tree, we must choose a package and then "Modify Run Configuration."
The next step is to add "Instrumentation arguments" for running all tests with @LargeTest annotation:
- "size" : "large"
Run tests using the Gradle task
We can add a size argument to the test instrumentation runner to execute test cases with a specific size annotation.
./gradlew :app:connectedDebugAndroidTest -Pandroid.testInstrumentationRunnerArguments.size=large
Run tests using the ADB command
To execute any instrumentation tests on a device, you need to generate the latest version of both APK files (APK file with the app and APK file with test cases), install them on the device/emulator, and execute test cases.
You can find more details here.
We can specify size using the ADB command to run instrumentation tests with the predefined size annotation.
# size: large
# package: com.alexzh.testapp
# runner: android.support.test.runner.AndroidJUnitRunner
adb shell am instrument -w -e size large com.alexzh.testapp.test/android.support.test.runner.AndroidJUnitRunner
Run tests without a given size
We can also run all tests except test cases that have a given annotation. Let's imagine that we want to run all tests without the @LargeTest annotation.
Run tests using Android Studio
To run all test cases without the @LargeTest annotation, use Android Studio by adding "Instrumentation arguments":
- "notAnnotation" : "androidx.test.filters.LargeTest"
Run tests using the Gradle task
We can run all tests without the @LargeTest annotation using the Gradle task.
./gradlew :app:connectedDebugAndroidTest -Pandroid.testInstrumentationRunnerArguments.notAnnotation=androidx.test.filters.LargeTest
Run tests using the ADB command
To execute any instrumentation tests on a device, you need to generate the latest version of both APK files (APK file with the app and APK file with test cases), install them on the device/emulator, and execute test cases.
You can find more details here.
To run all test cases without the "@LargeTest" annotation, use the ADB command below.
# size: large (androidx.test.filters.LargeTest)
# package: com.alexzh.testapp
# runner: android.support.test.runner.AndroidJUnitRunner
adb shell am instrument -w -e notAnnotation androidx.test.filters.LargeTest com.alexzh.testapp.test/android.support.test.runner.AndroidJUnitRunner
Group tests by custom tag (annotation)
If we want to implement custom grouping, we can create custom annotations and execute only test cases with these custom annotations. This can be helpful when we have a test file with E2E tests, but we want to run only test cases for a specific feature.
class AppE2ETest {
    ...

    @Test
    fun todayScreenDisplayEmotions_whenEmotionHistoryWasAddedInAddMoodScreen() {
        ...
    }

    @Test
    fun statisticsScreenHasCorrectData_whenDataAvailableForCurrentWeek() {
        ...
    }

    @Test
    fun statisticsScreenHasCorrectData_whenDataAvailableForPreviewsWeek() {
        ...
    }

    @Test
    fun statisticsScreenDisplayMessage_whenNoDataAvailableForNextWeek() {
        ...
    }

    ...
}
We can create custom annotations and mark test cases with these annotations. To create a custom @StatisticsScreen annotation, we can use the following code:
@Target(AnnotationTarget.FUNCTION)
@Retention(AnnotationRetention.RUNTIME)
annotation class StatisticsScreen
Afterward, we can mark existing test cases with the created annotation. Let's imagine we created the @TodayScreen and @StatisticsScreen annotations.
class AppE2ETest {
    ...

    @TodayScreen @Test
    fun todayScreenDisplayEmotions_WhenEmotionHistoryWasAddedInAddMoodScreen() {
        ...
    }

    @StatisticsScreen @Test
    fun statisticsScreenHasCorrectData_whenDataAvailableForCurrentWeek() {
        ...
    }

    @StatisticsScreen @Test
    fun statisticsScreenHasCorrectData_whenDataAvailableForPreviewsWeek() {
        ...
    }

    @StatisticsScreen @Test
    fun statisticsScreenDisplayMessage_whenNoDataAvailableForNextWeek() {
        ...
    }

    ...
}
Run tests with custom annotations
Let's explore how we can execute test cases with the StatisticsScreen annotation using IDE, Gradle task, and ADB command.
Run tests using Android Studio
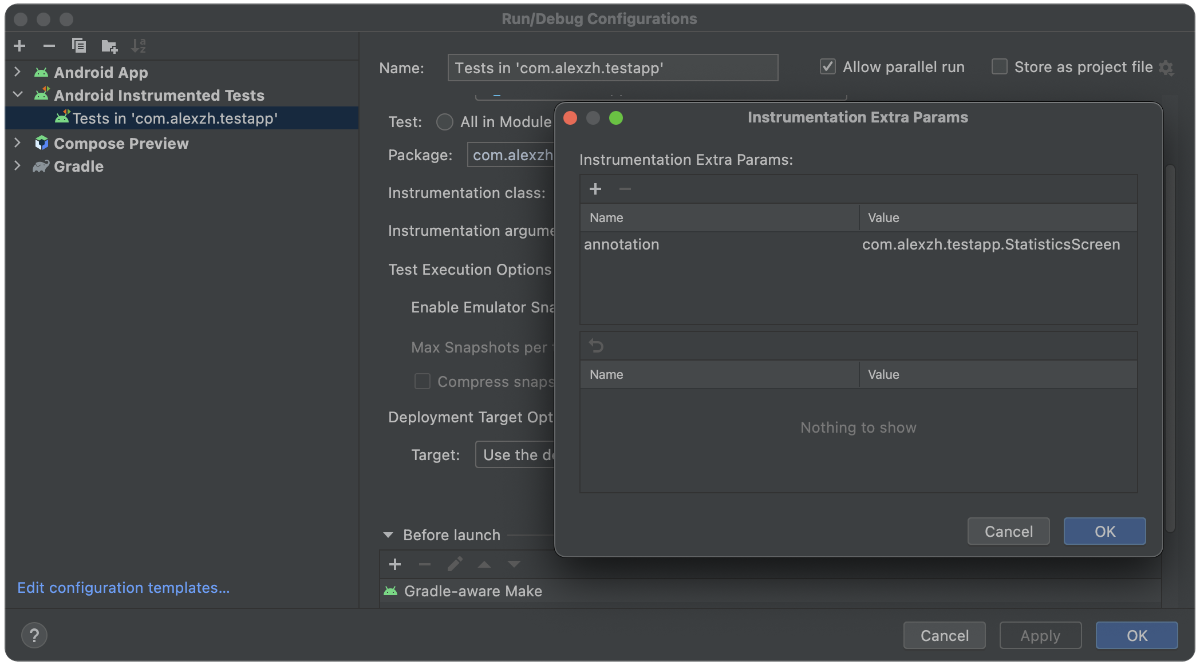
To run instrumentation test cases with a custom annotation, we need to add an "Instrumentation argument":
- "annotation" : "com.alexzh.testapp.StatisticsScreen"
Run tests using the Gradle task
To run tests with a specific annotation, we can add the "annotation" parameter to a runner.
./gradlew :app:connectedDebugAndroidTest -Pandroid.testInstrumentationRunnerArguments.annotation=com.alexzh.testapp.StatisticsScreen
Run tests using the ADB command
To execute any instrumentation tests on a device, you need to generate the latest version of both APK files (APK file with the app and APK file with test cases), install them on the device/emulator, and execute test cases.
You can find more details here.
We can specify custom annotation and use the ADB command to run instrumentation tests with the custom annotation.
# annotation: com.alexzh.testapp.StatisticsScreen
# package: com.alexzh.testapp
# runner: android.support.test.runner.AndroidJUnitRunner
adb shell am instrument -w -e annotation com.alexzh.testapp.StatisticsScreen com.alexzh.testapp.test/android.support.test.runner.AndroidJUnitRunner
Run tests without a given annotation
If we want to run all test cases without a given annotation, we can do so using the "notAnnotation" parameter. Let's imagine we want to run all tests without test cases with the @StatisticsScreen annotation.
Run tests using Android Studio
To run instrumentation test cases without a custom annotation, we need to add an "Instrumentation argument":
- "notAnnotation" : "com.alexzh.testapp.StatisticsScreen"
Run tests using the Gradle task
To run tests without a specific annotation, we can add the "notAnnotation" parameter to a runner.
./gradlew :app:connectedDebugAndroidTest -Pandroid.testInstrumentationRunnerArguments.notAnnotation=com.alexzh.testapp.StatisticsScreen
Run tests using the ADB command
To execute any instrumentation tests on a device, you need to generate the latest version of both APK files (APK file with the app and APK file with test cases), install them on the device/emulator, and execute test cases.
You can find more details here.
We can run all tests without given annotation using the ADB command:
# annotation: com.alexzh.testapp.StatisticsScreen
# package: com.alexzh.testapp
# runner: android.support.test.runner.AndroidJUnitRunner
adb shell am instrument -w -e notAnnotation com.alexzh.testapp.StatisticsScreen com.alexzh.testapp.test/android.support.test.runner.AndroidJUnitRunner
Use Cases
Let's explore a couple of widespread use cases when splitting test cases into different groups can be beneficial.
Running interaction and screenshot tests
Multiple test types are used in many projects (interaction tests, screenshot tests, etc.). When we run screenshot tests, we execute all instrumentation tests. To avoid this situation and run only instrumentation tests, we can use one of the following approaches:
- Create custom annotations for different types of tests and use them for both interaction and screenshot tests
- Mark test cases of one type (ex: screenshot) with custom annotation and exclude them when we run another type of test
We already explored how to create custom annotations and run test cases with them and how to run test cases without a given annotation. Below you can find implementation details for creating the @ScreenshotTest annotation and excluding screenshot tests from the instrumentation test run.
Implementation details
First of all, we need to create a @ScreenshotTest annotation.
@Target(AnnotationTarget.FUNCTION)
@Retention(AnnotationRetention.RUNTIME)
annotation class ScreenshotTest
The next step is to add this annotation to all screenshot test cases. Afterward, we can run all tests which do not include tests marked with the @ScreenshotTest annotation.
Let's look at how we can run such test cases with all approaches. In all cases, we need to add two parameters: "notAnnotation" and "package" (the package can be optional if you want to run all test cases).
Run tests using Android Studio
To run tests from a given package that don't have the @ScreenshotTest annotation using Android Studio, we need to add two instrumentation parameters to the configuration:
- "notAnnotation" : "com.alexzh.testapp.ScreenshotTest"
- "package" : "com.alexzh.testapp"
Run tests using the Gradle task
Use the Gradle task to run tests from a given package that doesn't have the @ScreenshotTest annotation. We need to add two arguments for the test runner:
./gradlew :app:connectedDebugAndroidTest -Pandroid.testInstrumentationRunnerArguments.package=com.alexzh.testapp -Pandroid.testInstrumentationRunnerArguments.notAnnotation=com.alexzh.testapp.ScreenshotTest
Run tests using the ADB command
To execute any instrumentation tests on a device, you need to generate the latest version of both APK files (the APK file with the app and the APK file with test cases), install them on the device/emulator, and execute test cases.You can find more details here.
Use the ADB command to run tests from a given package that doesn't have the @ScreenshotTest annotation. We need to add two parameters to the ADB command:
adb shell am instrument -w -e notAnnotation com.alexzh.testapp.ScreenshotTest -e package com.alexzh.testapp com.alexzh.testapp.test/android.support.test.runner.AndroidJUnitRunner
Running "Happy Path" test cases
Every application is growing, and if we add many test cases for every feature, we can find ourselves in a situation where we have too many test cases for a single run. We just want to run a small number of test cases to verify that the application's core functionality works properly.
In software testing, we have a "Happy Path" term. The "Happy Path" is a scenario that verifies no exceptional or error conditions for a specific feature. Usually, every project has many happy path scenarios:
- create a note with the correct data
- display weather when data is available
- and many others
Implementation details
To run only "Happy Path" scenarios, we can create a custom annotation and execute all test cases with this annotation.
To create a @HappyPath annotation, we can use the following code:
@Target(AnnotationTarget.FUNCTION)
@Retention(AnnotationRetention.RUNTIME)
annotation class HappyPath
The next step is to add this annotation to "Happy Path" scenarios, and after that, we can run such test cases using different approaches.
Run tests using Android Studio
To run tests from a given package with the @HappyPath annotation using Android Studio, we need to add two instrumentation parameters to the configuration:
- "annotation" : "com.alexzh.testapp.HappyPath"
- "package" : "com.alexzh.testapp"
Run tests using the Gradle task
To run tests from a given package which have the @HappyPath annotation, we need to add "package" and "annotation" arguments for the test runner:
./gradlew :app:connectedDebugAndroidTest -Pandroid.testInstrumentationRunnerArguments.package=com.alexzh.testapp -Pandroid.testInstrumentationRunnerArguments.annotation=com.alexzh.testapp.HappyPath
Run tests using the ADB command
To execute any instrumentation tests on a device, you need to generate the latest version of both APK files (APK file with the app and APK file with test cases), install them on the device/emulator, and execute test cases.You can find more details here.
To run tests from a given package which have the @HappyPath annotation, we need to add "package" and "annotation" parameters to the ADB command:
adb shell am instrument -w -e annotation com.alexzh.testapp.HappyPath -e package com.alexzh.testapp com.alexzh.testapp.test/android.support.test.runner.AndroidJUnitRunner
Grouping test cases by feature
When the application grows, it's possible that several features and test cases for a single feature may end up being spread across various files and packages.
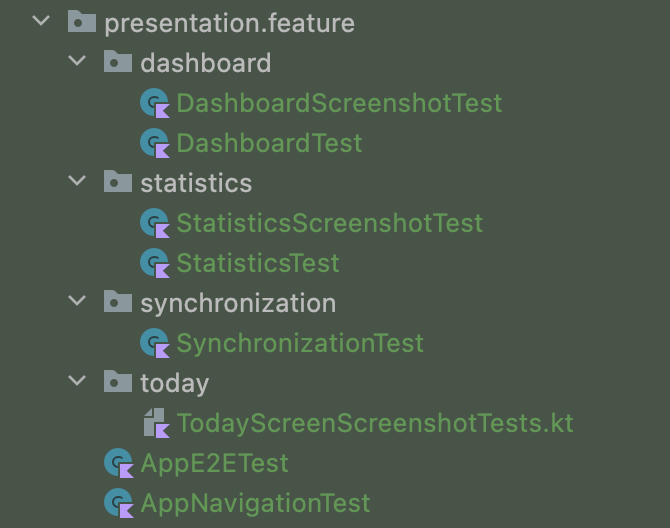
The "AppE2ETest" and "AppNavigationTest" classes include test cases for different features. Many screens in such task cases are covered in different tests. Below you can find how to create custom annotations for each feature and run test cases only for specific features.
If we want to group multiple sub-features and run them together, we can create a "Test Suite".
Implementation details
Let's imagine we have a file with test cases for different features.
class NavigationTests {

    @Test
    fun navigateToStatisticsScreen() { ... }

    @Test
    fun navigateToSynhronizationStatusScreen() { ... }

    @Test
    fun navigateToAddNoteScreen() { ... }
}
To group test cases by a specific feature, we can create custom annotations: @StatisticsFeature, @AddNoteFeature, and @SynhronizationFeature. In this case, we decide the scope for every feature; this can be small, like @AddNoteFeature, or big, like @SynhronizationFeature, which includes multiple sub-features.
We can create custom annotations and add them to different test cases to execute test cases for a specific feature. Let's take a look at an example:
@Target(AnnotationTarget.FUNCTION)
@Retention(AnnotationRetention.RUNTIME)
annotation class StatisticsFeature
The next step is to add annotations to test cases:
class NavigationTests {

    @Test @StatisticsFeature
    fun navigateToStatisticsScreen() { ... }

    @Test @SynhronizationFeature
    fun navigateToSynhronizationStatusScreen() { ... }

    @Test @AddNoteFeature
    fun navigateToAddNoteScreen() { ... }
}
We can add more than one annotation to the test case if needed.
We can run all test cases with a specific annotation with different approaches.
Run tests using Android Studio
To run tests from a given package which have the @SynhronizationFeature annotation using Android Studio, we need to add two instrumentation parameters to the configuration:
- "annotation" : "com.alexzh.testapp.SynhronizationFeature"
- "package" : "com.alexzh.testapp"
Run tests using the Gradle task
To run tests from a given package which have the @SynhronizationFeature annotation, we need to add "package" and "annotation" arguments for the test runner:
./gradlew :app:connectedDebugAndroidTest -Pandroid.testInstrumentationRunnerArguments.package=com.alexzh.testapp -Pandroid.testInstrumentationRunnerArguments.annotation=com.alexzh.testapp.SynhronizationFeature
Run tests using the ADB command
To execute any instrumentation tests on a device, you need to generate the latest version of both APK files (APK file with the app and APK file with test cases), install them on the device/emulator, and execute test cases.You can find more details here.
To run tests from a given package which have the @SynhronizationFeature annotation, we need to add "package" and "annotation" parameters to the ADB command:
adb shell am instrument -w -e annotation com.alexzh.testapp.SynhronizationFeature -e package com.alexzh.testapp com.alexzh.testapp.test/android.support.test.runner.AndroidJUnitRunner
You can also run all tests with a specific annotation and exclude test cases with another annotation if needed. You can read more about running test cases without specific annotations.
Summary
There are multiple approaches to how we can group test cases and execute specific test cases:
- locate test cases in the same test class or package
- use predefined size annotations:
@SmallTest,@MediumTest, and@LargeSize - create a "Test Suite" which includes test cases from multiple classes
- create custom annotations and execute test cases with specific annotations
- execute test cases without specific annotations
- use
@Tagif you use JUnit5
We can combine these approaches and execute required test cases without non-needed test cases for a specific feature.