Efficient UI testing series
- Introduction
- Local and Instrumentation tests in Android
- Android Studio and Android SDK tools
- UI Testing Frameworks
- Exploring "Espresso Test Recorder"
- First test case with Kakao framework
- Testing Android Fragment in isolation
- Exploring test application and first test cases
- A domain-specific language for testing
- Introducing UI tests with mocking
- Flaky tests
- Achieving efficiency in tests
Introduction
Testing is an essential part of the software development process and product release. Often, there is a situation when there are two mobile applications to test: iOS and Android versions.
Even here, we have different options:
- One application which is built for different platforms;
- Two separate apps which look similar;
- Two completely different applications.
Today I would like to concentrate only on UI testing, and we will analyze different solutions for UI testing Android application.
I want to make this article more descriptive, and, if you’d like, you can find a source code of similar test cases written in the same language, but using different frameworks.
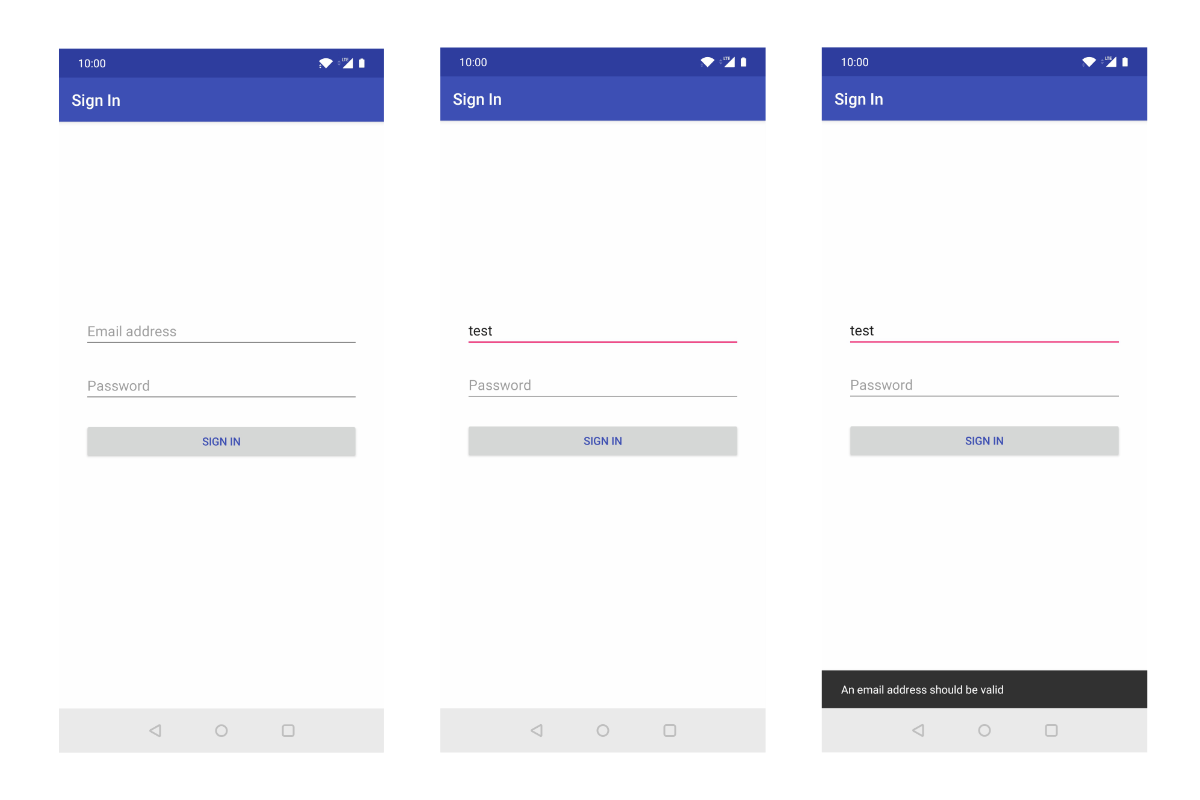
Test case:
- Open
SignInActivity; - Enter the "test" string into email input field (id:
R.id.email); - Press the "Sign In" button (id:
R.id.signIn); - "An email address should be valid" message should be displayed (string const:
R.string.error_email_should_be_valid).
Let’s visualize a login screen of the application:
Frameworks
We have different types of frameworks:
- Native frameworks (in case of Android: Espresso and UiAutomator);
- Cross-platform frameworks: (Appium, Calabash, etc.).
When we have application for different platforms, we want to create test cases which work for all platforms, including Android and iOS. However, in practice, we might have a situation where the applications are entirely different. In this case, investing in cross-platform frameworks can be wasting your time because you will try to create generic API for two separate applications. As a result, you will have one framework, one codebase, and various steps for similar actions on different platforms. In addition to this, you should answer the following question: Who will write UI test cases? If the answer is developers, they often know native testing frameworks.
So, let’s try to analyze three of the most popular frameworks for UI testing. Android application:
- Appium (cross-platform)
- Espresso (native)
- UiAutomator (native)
Appium
The Appium is an open-source mobile testing framework which supports Android and iOS. It can test any type of mobile application: native, web or hybrid. This means that we can create tests which will work on different platforms. However, in practice for testing the iOS application under the hood, it uses the XCTest and UiAitomator framework to test the Android app. The Appium frameworks interact with application use Selenium Web Driver and Node.js.
- Pros:
- Cross-language framework (you can create test cases in Java, C#, JavaScript, Python, Ruby);
- Appium has a lot of similarities to Selenium Web Driver. A lot of developers and testers have experience with Selenium, and this means that they can start working with Appium faster;
- Executing test cases for different platforms from the same code base;
- Support for testing native, hybrid, and mobile-web applications.
- Cons:
- Minimum Android SDK is 16;
- Test cases are slow;
- Test code stored separately from application code;
- Two sets of steps for the different platforms when apps are different from a UI perspective.
Note: In case of Appium framework, we start from the main Activity of the application. That's a SplashActivity which open LoginActivity when User is unauthorized.
Test case implementation:
class AppiumSignInTest {

    private lateinit var appiumDriver: AppiumDriver<AndroidElement>

    @Before
    fun setup() {
        val capabilities = DesiredCapabilities()
        capabilities.setCapability(MobileCapabilityType.PLATFORM_NAME, "Android")
        capabilities.setCapability(MobileCapabilityType.DEVICE_NAME, "emulator-5554")
        capabilities.setCapability("appPackage", "com.alex.mapnotes")
        capabilities.setCapability("appActivity", "com.alex.mapnotes.splash.SplashActivity")

        appiumDriver = AndroidDriver(URL("http://0.0.0.0:4723/wd/hub"), capabilities)
    }

    @Test
    fun shouldDisplaySinInErrorWhenEmailIsIncorrect() {
        val emailValue = "test"
        val expectedErrorMessage = "An email address should be valid"

        openSignInScreen()

        val emailInputField = appiumDriver.findElement(By.id("email"))
        emailInputField.setValue(emailValue)

        appiumDriver.hideKeyboard()

        val signInButton = appiumDriver.findElement(By.id("signIn"))
        signInButton.click()

        val snacknarError = appiumDriver.findElement(By.xpath("//*[@text='$expectedErrorMessage']"))
        assertNotNull(snacknarError)
    }

    @After
    fun tearDown() {
        appiumDriver.quit()
    }

    private fun openSignInScreen() {
        val signIn = appiumDriver.findElement(By.id("signIn"))
        signIn.click()
    }
}
Average execution time of the test scenario: 12 sec 15 ms.
Espresso
The Espresso is Google's framework for UI testing, which has a simple API and allows us to write readable UI test cases. The Espresso framework has a dependency on the Hamcrest library and supports Matchers from it, which simplifies testing complicated scenarios by introducing custom matchers and actions.
Espresso has a few additional modules:
-
espresso-web (Contains resources for WebView support);
-
espresso-idling-resource (Espresso’s mechanism for synchronization with background jobs);
-
espresso-contrib (External contributions that contain DatePicker, RecyclerView and Drawer actions, accessibility checks, and CountingIdlingResource);
-
espresso-intents (Extension to validate and stub intents for hermetic testing);
-
espresso-remote (Location of Espresso’s multi-process functionality).
-
Pros:
- Fast execution time of test cases;
- Espresso support synchronization, which means you don’t need to write additional code for waiting until activity/fragment will be loaded or finished;
- Espresso support testing components in isolation. You can execute test cases for any activity or fragment;
- Supporting Hamcrest Matchers, which might be familiar to developers;
- Can test Web components.
-
Cons:
- Test cases can be created only for the Android platform;
- Test cases can be written exclusively in Java/Kotlin;
- The application should be ready for writing efficient tests with Espresso (proper animation handling which allows you to disable all animations because it a requirement for using Espresso framework).
Note: In case of Espresso framework, we might start from any Activity from the Application.
Test case implementation:
@RunWith(AndroidJUnit4::class)
class EspressoSignInTest {

    @Rule @JvmField
    val activityRule = ActivityTestRule<SignInActivity>(SignInActivity::class.java)

    @Test
    fun shouldDisplaySinInErrorWhenEmailIsIncorrect() {
        val incorrectEmail = "test"

        onView(withId(R.id.email))
                .perform(replaceText(incorrectEmail), closeSoftKeyboard())

        onView(withId(R.id.signIn))
                .perform(click())

        onView(withText(R.string.error_email_should_be_valid))
                .check(matches(isDisplayed()))
    }
}
Average execution time of the test scenario: 0 sec 967 ms.
UiAutomator
The UiAutomator is Google's UI testing framework, which allows us to test any application installed on the device.
In addition to it, we can interact with system components (Runtime Permission Dialog, Notifications, etc.) and interact with hardware buttons.
UiAutomator is delivered with a UiAutomatorViewer. This tool helps you to explore the UI of any application. I recommend to check out the article "Efficient Testing Android app – Tools" which describes available Android tools for analyzing UI.
- Pros:
- Interaction with system components;
- Simple API of the framework.
- Cons:
- Minimum Android SDK is 18 (Android 4.3);
- Complicated API for working with lists;
- No support for working with web elements;
Note: In case of UiAutomator framework, we start from the main Activity of the application. That's a SplashActivity which open LoginActivity when User is unauthorized.
Test case implementation:
@RunWith(AndroidJUnit4::class)
class UiAutomatorSignInTest {

    companion object {
        const val LAUNCH_TIMEOUT = 2_000L
        const val APP_PACKAGE = "com.alex.mapnotes"
    }

    private val device = UiDevice.getInstance(InstrumentationRegistry.getInstrumentation())

    private fun openApp(packageName: String) {
        device.pressHome()

        // Wait for launcher
        val launcherPackage: String = device.launcherPackageName
        assertThat(launcherPackage, notNullValue())
        device.wait(
                Until.hasObject(By.pkg(launcherPackage).depth(0)),
                LAUNCH_TIMEOUT
        )

        // Start an activity
        val context = ApplicationProvider.getApplicationContext<Context>()
        val intent = context.packageManager.getLaunchIntentForPackage(packageName)
                .apply { addFlags(Intent.FLAG_ACTIVITY_CLEAR_TASK) }
        context.startActivity(intent)

        // Wait for the app to appear
        device.wait(Until.hasObject(By.pkg(APP_PACKAGE).depth(0)),
                LAUNCH_TIMEOUT)
    }

    private fun navigateToSignIn() {
        device.wait(Until.hasObject(By.res("com.alex.mapnotes:id/signIn")), LAUNCH_TIMEOUT)
        val login: UiObject2 = device.findObject(By.res("com.alex.mapnotes:id/signIn"))
        if (login.isEnabled) {
            login.click()
        }
        device.wait(Until.hasObject(By.res("com.alex.mapnotes:id/signIn")), LAUNCH_TIMEOUT)
    }

    @Test
    fun shouldDisplaySinInErrorWhenEmailIsIncorrect() {
        openApp(APP_PACKAGE)
        navigateToSignIn()

        val incorrectEmail = "test"
        val expectedErrorMessage = "An email address should be valid"

        val emailInput: UiObject2 = device.findObject(By.res("com.alex.mapnotes:id/email"))
        emailInput.text = incorrectEmail

        val signInButton: UiObject2 = device.findObject(By.res("com.alex.mapnotes:id/signIn"))
        if (signInButton.isEnabled) {
            signInButton.click()
        }

        device.wait(Until.hasObject(By.text(expectedErrorMessage)), LAUNCH_TIMEOUT)
        val errorMessage = device.findObject(By.text(expectedErrorMessage))
        assertEquals(expectedErrorMessage, errorMessage.text)
    }
}
Average execution time of the test scenario: 8 sec 743 ms.
UiAutomator & Espresso
Take a look at Espresso and UiAutomator frameworks in isolation; it’s not very honest, because we can create test cases where we can use Espresso and UiAutomator frameworks together. It gives us benefits from both frameworks. I recommend to check out the "Android testing: Espresso & UIAutomator together" article.
Summary
| Criteria | Appium | Espresso | UiAutomator |
|---|---|---|---|
| Execution Time |
Slow
(test case: 12.154 sec)
|
Fast
(test case: 0.967 sec)
|
Medium
(test case: 8.743 sec)
|
| Supported languages |
Java, Kotlin, C#, JavaScript, Python
|
Java, Kotlin | Java, Kotlin |
| Test Type | Black Box | Gray Box | Black Box |
| Setup |
Hard
separate module, capabilities
|
Easy
part of the project
|
Easy
part of the project
|