This article is a part of the "Efficient Android testing" series:
- Introduction
- Local and Instrumentation tests in Android
- Android Studio and Android SDK tools
- UI Testing Frameworks
- Exploring "Espresso Test Recorder"
- First test case with Kakao framework
- Testing Android Fragment in isolation
- Exploring test application and first test cases
- A domain-specific language for testing
- Introducing UI tests with mocking
- Flaky tests
- Achieving efficiency in tests
Today I want to talk about different types of Android test cases, examples, and how to run them from Android Studio, Gradle, and ADB commands.
Overview
In the Android world, we have different types of test cases, which allow us to test both Android-specific code and Android independent code.
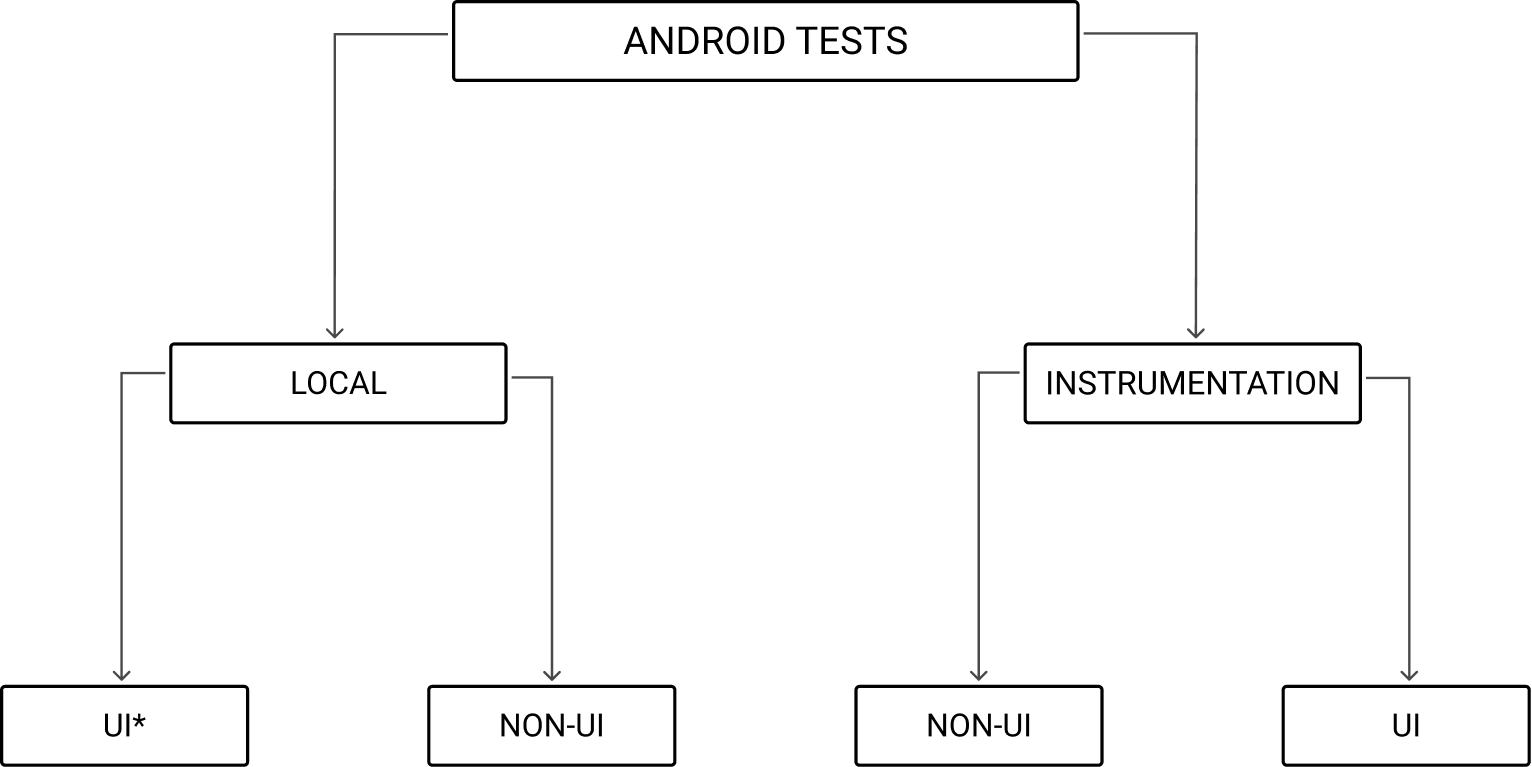
There are Local and Instrumentation test cases. The main difference between these tests is that the "local" test can be executed on JVM (Java Virtual Machine) and a specific version of JVM with Android dependencies, delivered as part of the Robolectric library, which allows us to test Android-specific code. Instrumentation test cases require an emulator or device, and we can test Android-specific code with the instrumentation test cases.
The instrumentation tests are much slower than local test cases because we spend additional time installing two applications to the device and collecting data from the device to understand each test case's state. Still, we can run test cases on many devices simultaneously. The local tests are usually executed on one version of JVM with Android dependencies; this means that we cannot check how our code works on a different Android OS version.
Local tests in details
Let's talk a bit more about local tests. We can split all local test cases into UI and non-UI tests. So, we can test the UI of the application with the Robolectric framework. Still, the current version of the Robolectric framework has many limitations, and we cannot verify all screens of the application (Robolectric has issues with testing the NavigationDrawer component).
The non-UI local testing can be done with Robolectric when we have Android dependencies in our code, like Context, Activity, etc. When our code has no Android dependencies, we can test it without the Robolectric framework, and in this case, it will be much faster.
Storing local tests in the project
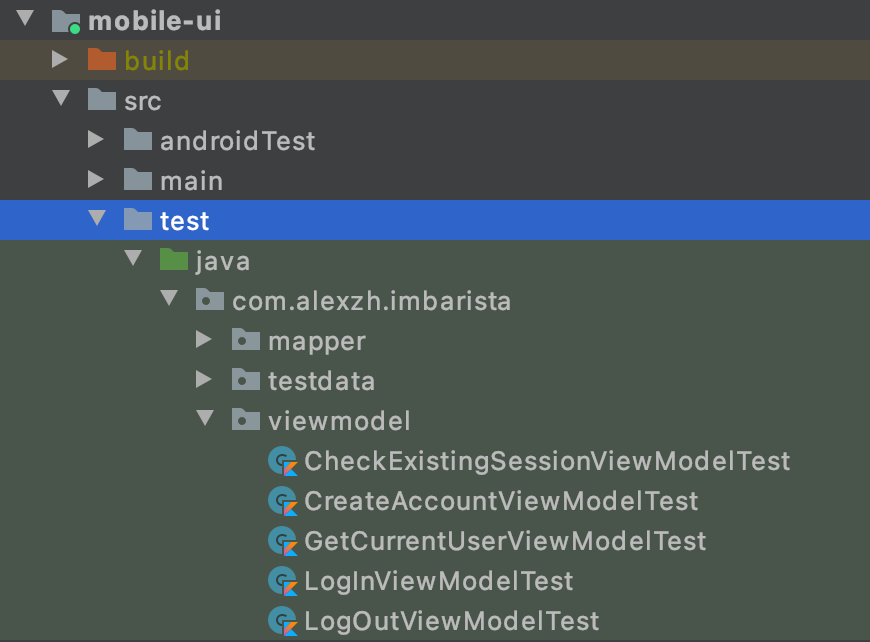
Every Android project already has a predefined place for local tests in the /module/src/test/ folder.
Running local tests
We have multiple ways of running local tests in the Andoid project. We can use any of the following options:
- Running test cases from the "Project Tree"
- Running test cases from the "File"
- Running test cases from the "Edit Configuration" window
- Running test cases using the "Gradle command"
If you are familiar with different ways of running local tests, I recommend moving to the "Local tests: Use Cases" section.
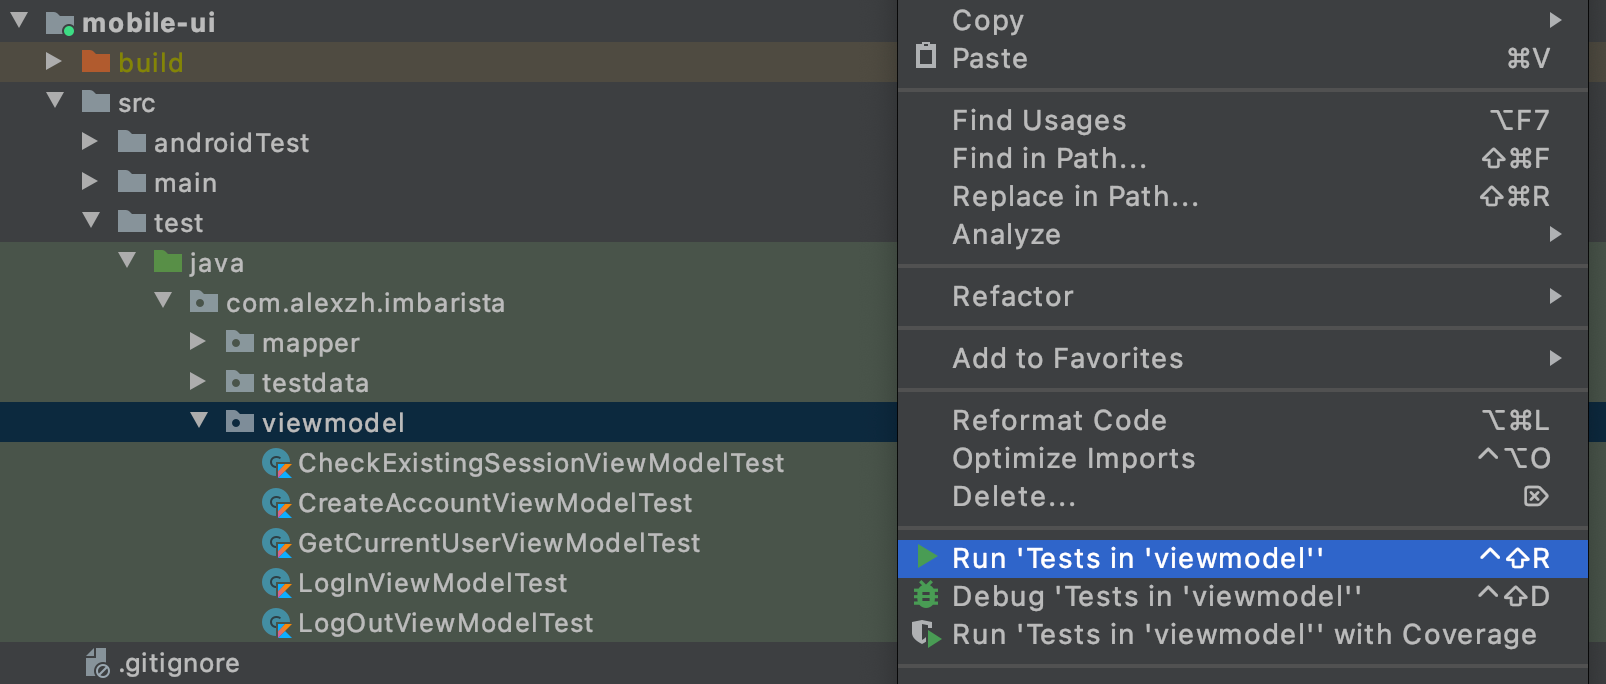
Running test cases from the "Project Tree"
We need to select a folder with the test cases which we want to execute, open the context menu, and select the “Run 'Tests in 'FOLDER''” menu item.
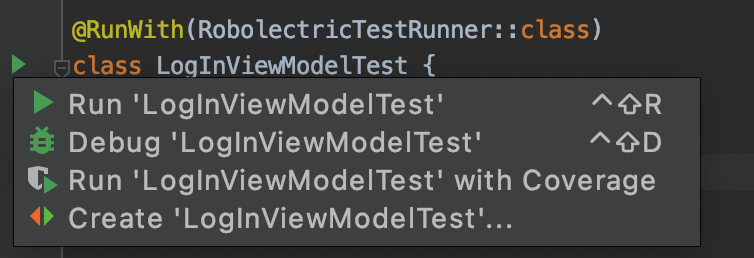
Running test cases from the "File"
The alternative option is to run a specific test case or all tests from the opened class.
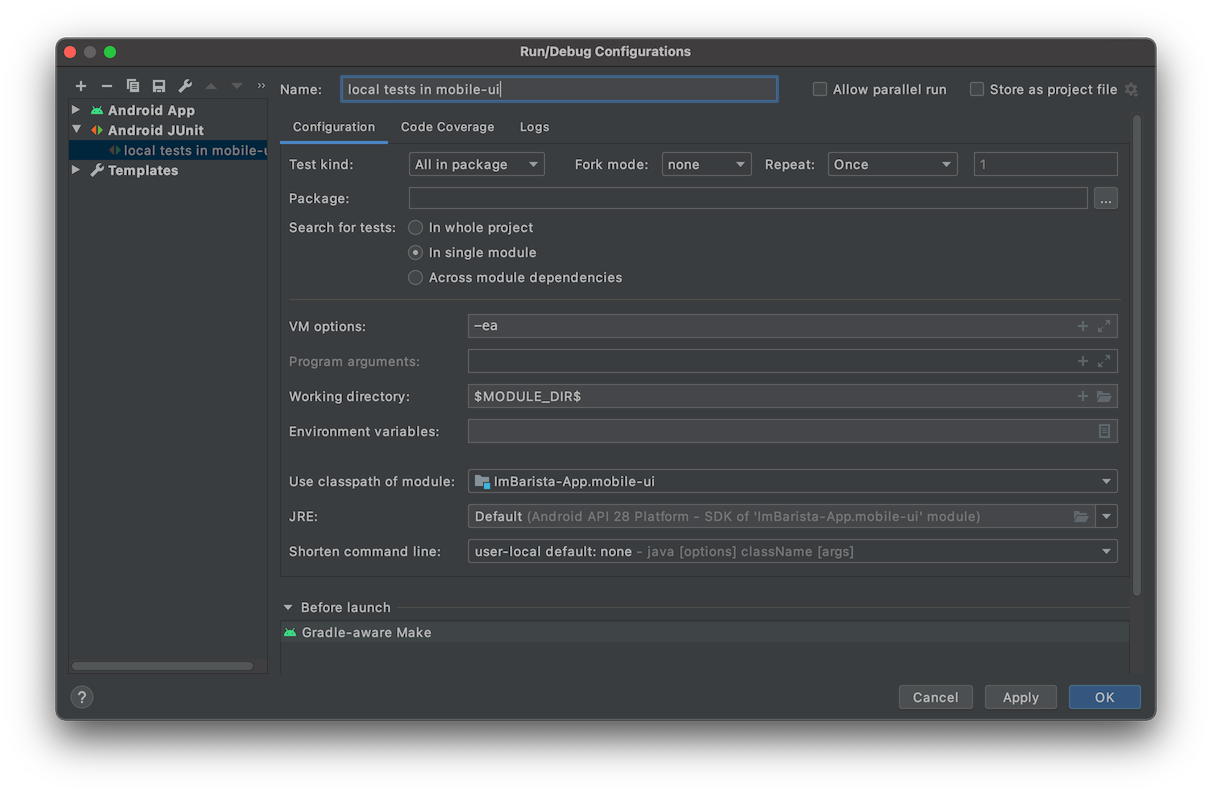
Running test cases from the "Edit Configuration" window
The "Edit Configuration" window is one of the most flexible UI options for configuration test cases to be executed because we can customize modules, packages, and specific test cases. We can open this window y selecting the "Edit Configuration" submenu in the "Run" menu, or we can show this window by an opening menu of active configuration (near the "Run" icon).
Running test cases using the "Gradle command"
We can run all local tests from any module use the following command:
./gradlew :MODULE:test
If a module supports multiple build flavors, we can use the testVariantNameUnitTest. Imagine that we have "Dev" and "Prod" flavors and run local tests for them.
// Dev
./gradlew :MODULE:testDevDebugUnitTest

// Prod
./gradlew :MODULE:testProdDebugUnitTest
We can also execute test cases from a specific file:
./gradlew :MODULE:testDebugUnitTest --tests TestClass
In addition to it, we can run a specific test case:
./gradlew :MODULE:testDebugUnitTest --tests TestClass.specificTestCase
Use Cases
Local tests are often used for verification of the business logic of the application. I want to look at different functions that can be tested with the local tests approach without the Robolectric framework.
- Prepare data to display in the UI layer (non-UI local tests)
- Show error on login screen when password is empty (UI local tests)
Use Case: Prepare data to display in the UI layer
So, let's imagine that we have a function that gets data from the repository and returns an already formatted String. The prepared template for the String value is stored in the strings.xml file. Let's assume that the ViewModel has such a function.
The content of the strings.xml file:
<resources>
    <string name="total_price">Total price: € %1$.1f</string>
</resources>
The source code of ViewModel:
class BasketViewModel(
    application: Application,
    private val basketRepository: BasketRepository
) : AndroidViewModel(application) {
    private val context = getApplication<Application>().applicationContext

    private val _totalPrice = MutableLiveData<String>()
    val totalPrice: LiveData<String>
        get() = _totalPrice

    fun calculateTotalPrice() {
        val totalPrice = basketRepository.calculateTotalPrice()
        _totalPrice.value = context.getString(
            R.string.total_price,
            totalPrice.toDouble()
        )
    }
}
As you can see, the calculateTotalPrice() function requires a Context for getting string from the strings.xml file. This means that we need a context object to test this function if we want to get a real value from the strings.xml file. However, if we want to use fake data, we can avoid the Robolectric framework in our tests.
We will use the getStatesAfter() function for getting value from the LiveData<T> object. This function uses the MockK framework.
inline fun <reified T : Any> LiveData<T>.getStatesAfter(
    func: () -> Unit
): List<T> {
    val states = mutableListOf<T>()
    val observer = mockk<Observer<T>>()
    val slot = slot<T>()

    this.observeForever(observer)

    every { observer.onChanged(capture(slot)) } answers {
        states.add(slot.captured)
    }

    func.invoke()
    return states
}
Let's start with a test case with the Robolectric framework:
@RunWith(RobolectricTestRunner::class)
class BasketViewModelTest {
    @get:Rule
    val instantExecutorRule = InstantTaskExecutorRule()

    private val basketRepository = mockk<BasketRepository>()
    private val viewModel = BasketViewModel(
        ApplicationProvider.getApplicationContext(),
        basketRepository
    )

    @Test
    fun should_postFormattedTotalPrice_when_repositoryProvidesData() {
        val totalPrice = BigDecimal(10.0)
        every { basketRepository.calculateTotalPrice() } returns totalPrice

        val state = viewModel.totalPrice.getStatesAfter {
            viewModel.calculateTotalPrice()
        }
        assertEquals(
            "Total price: € ${totalPrice.toDouble()}",
            state.first()
        )
    }
}
If we want to avoid using context inside the ViewModel class, we can move the string formatting to the View layer. In this case, our function will post a similar value as the repository. So, let's rewrite it:
class BasketViewModel(
    private val basketRepository: BasketRepository
) : ViewModel() {
    private val _totalPrice = MutableLiveData<BigDecimal>()
    val totalPrice: LiveData<BigDecimal>
        get() = _totalPrice

    fun calculateTotalPrice() {
        _totalPrice.value = basketRepository.calculateTotalPrice()
    }
}
So, let's replace test with Robolectric framework to test without Robolectric framework
class BasketViewModelTest {
    @get:Rule
    val instantExecutorRule = InstantTaskExecutorRule()

    private val basketRepository = mockk<BasketRepository>()
    private val viewModel = BasketViewModel(basketRepository)

    @Test
    fun should_postFormattedTotalPrice_when_repositoryProvidesData() {
        val totalPrice = BigDecimal(10.0)
        every { basketRepository.calculateTotalPrice() } returns totalPrice

        val state = viewModel2.totalPrice.getStatesAfter {
            viewModel2.calculateTotalPrice()
        }
        assertEquals(totalPrice, state.first())
    }
}
In this case, we can replace the AndroidViewModel within ViewModel and move the Context from ViewModel to Activity. The refactored test case is much faster because we don't need to initialize the Robolectric framework.I executed test cases 5 times, and below, you see the average value.
- Test case with Robolectric framework 1s 76ms
- Test case without Robolectric framework 5s 250ms
Note: Only the first test case with the Robolectric framework is very slow because Robolectric should be initialized in the first test case.
Use Case: Show error on login screen when password is empty
Let's take a look at the local UI test case. This test's main idea is to verify that the application shows the "Password is blank" when the password filed is active and empty.
@RunWith(RobolectricTestRunner::class)
class LoginActivityTest {
    @Test
    fun should_displayEmptyPasswordError_when_passwordIsEmpty() {
        ActivityScenario.launch(LoginActivity::class.java)

        onView(withId(R.id.emailEditText))
            .perform(replaceText("test-account@alexzh.com"))

        onView(withId(R.id.passwordEditText))
            .perform(replaceText(""))

        onView(withId(R.id.passwordInputLayout))
            .check(matches(hasDescendant(withText(R.string.error_password_is_blank))))
    }

    ...
}
As you can see, we can use the Espresso framework and run it locally without a device and emulator. However, here we have limitations, and we cannot interact with all components and do any actions, like swipe with Espresso and Robolectric.
Instrumentation tests in details
Instrumentation tests require a device or emulator for UI and non-UI tests. They are slower than local tests, but on the other hand, we can execute them on multiple devices simultaneously. Such tests can be helpful when we have device-specific or Android OS version-specific issues in the application. In this case, we can run test cases on different devices without any changes.
The non-UI instrumentation test cases are usually used for verification of Android-specific components, like a database.
Storing instrumentation tests in the project
Every Android project already has a predefined place for instrumentation tests in the /module/src/androidTest/ folder.
Running instrumentation tests
I want to start with an explanation about running instrumentation tests under the hood.
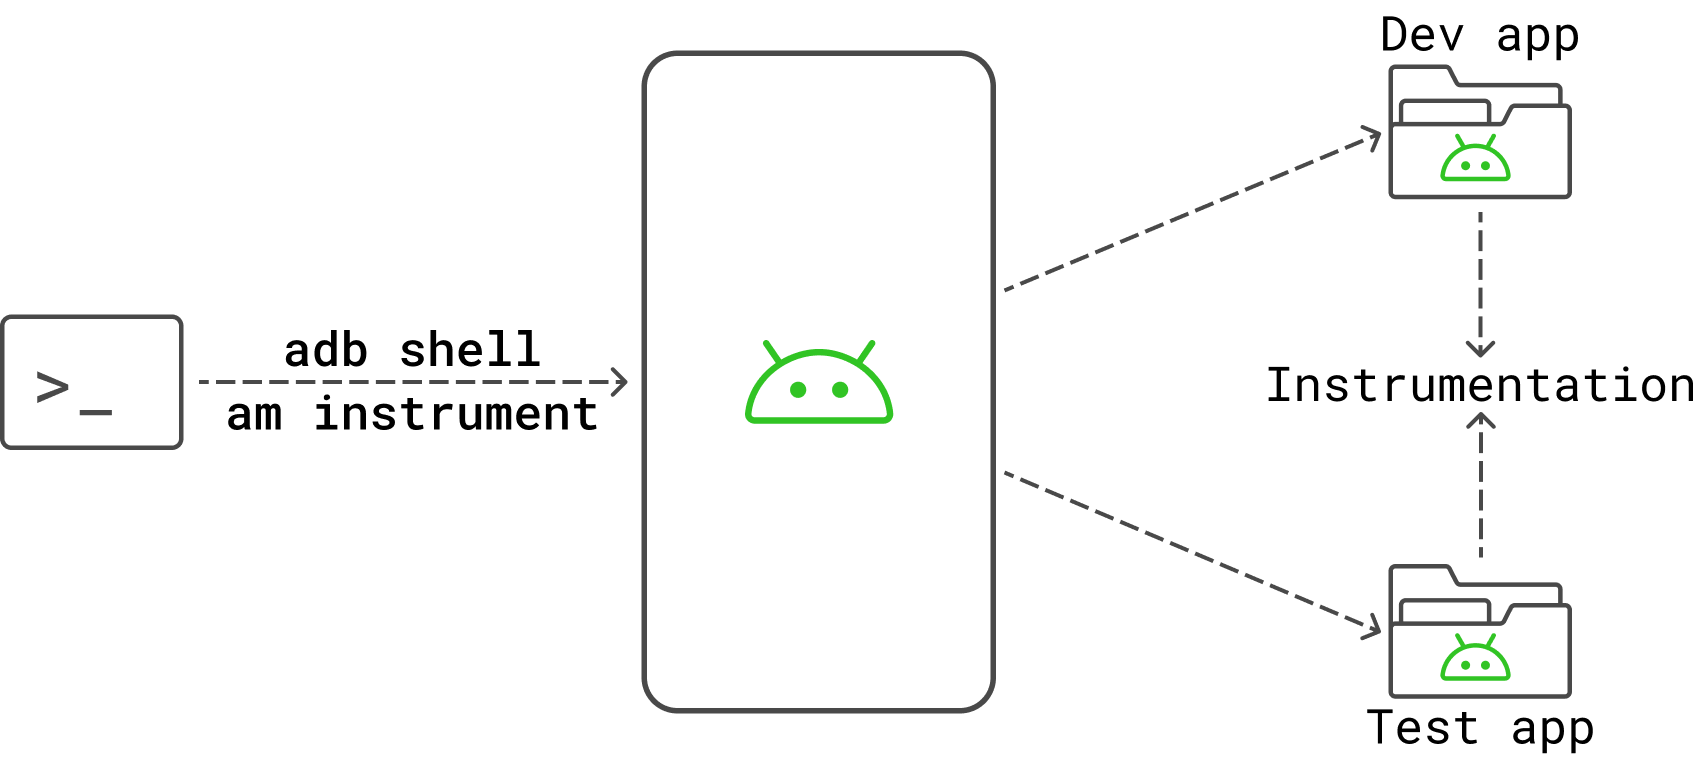
First of all, we need to generate two applications, which will be installed on a device or emulator later on. This is the application we are developing and a test application that includes all test cases that should be executed on the device or emulator. When both apps are installed on the device, the test application will interact with the dev application via Instrumentation API, which is a part of Android ROM.
We have multiple ways of running instrumentation tests in the Android project. We can use any of the following options:
- Running test cases from the "Project Tree"
- Running test cases from the "File"
- Running test cases from the "Edit Configuration" window
- Running test cases using the "Gradle command"
- Running test cases using the "ADB command"
If you are familiar with different ways of running local tests, I recommend moving to the "Instrumentation tests: Use Cases" section.
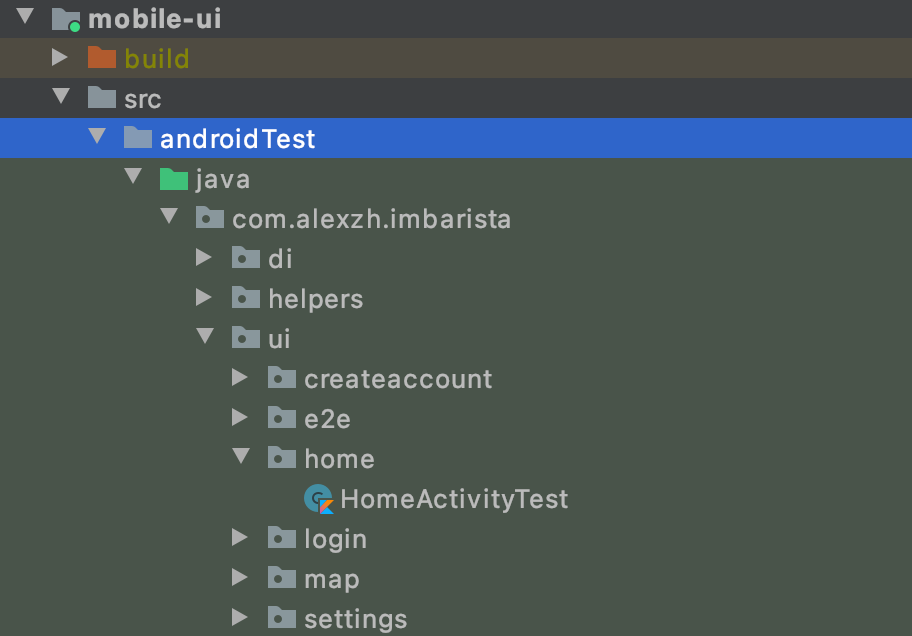
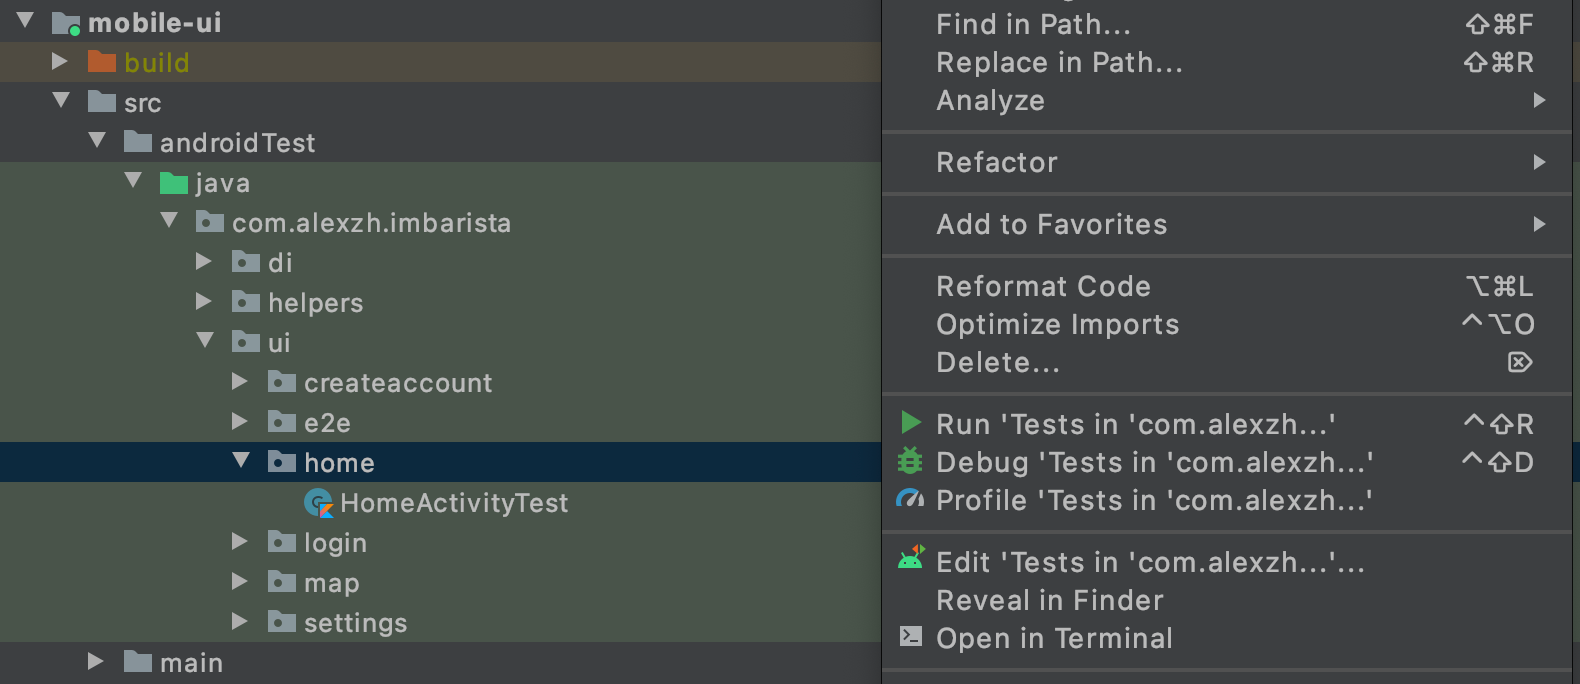
Running test cases from the "Project Tree"
We need to select a folder with the test cases which we want to execute, open the context menu, and select the “Run 'Tests in 'PACKAGE''” menu item.
Running test cases from the "File"
The alternative option is to run a specific test case or all tests from the opened class.

Running test cases from the "Edit Configuration" window
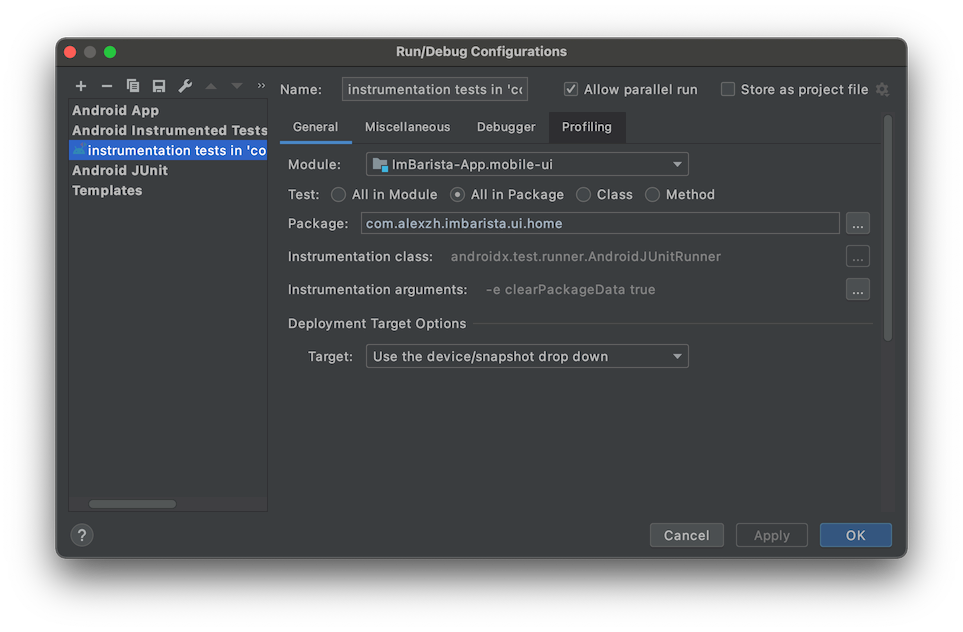
The "Edit Configuration" window is one of the most flexible UI options for configuration test cases to be executed because we can customize modules, packages, and specific test cases. We can open this window y selecting the "Edit Configuration" submenu in the "Run" menu, or we can show this window by an opening menu of active configuration (near the "Run" icon).
Running test cases using the "Gradle command"
We can run all Instrumentation tests from any module use the following command:
// full command
./gradlew :MODULE:connectedAndroidTest

// abbreviation
./gradlew :MODULE:cAT
If a module supports multiple build flavors, we can use the connectedVariantNameAndroidTest. Imagine that we have "Dev" and "Prod" flavors and run local tests for them.
// Dev
./gradlew :MODULE:connectedDevDebugAndroidTest

// Prod
./gradlew :MODULE:connectedProdDebugAndroidTest
We can also execute test cases from a specific file:
./gradlew :MODULE:connectedAndroidTest -Pandroid.testInstrumentationRunnerArguments.class=PACKAGE.CLASS
In addition to it, we can run a specific test case:
./gradlew :MODULE:connectedAndroidTest -Pandroid.testInstrumentationRunnerArguments.class=PACKAGE.CLASS.TEST
Running test cases using the "ADB command"
We can interact with an Android device or emulator using the ADB (Android Debug Bridge). As we discussed before, we need to have a "dev app" and "test app" to test them on the device.
Generate dev application:
// assembleVariantName
./gradlew :MODULE:assembleDebug
Generate test application:
// assembleVariantNameAndroidTest
./gradlew :mobile-ui:assembleDebugAndroidTest
Install dev and test applications:
// install dev app
adb install MODULE/build/outputs/apk/debug/mobile-ui-debug.apk

// install test app
adb install MODULE/build/outputs/apk/androidTest/debug/mobile-ui-debug-androidTest.apk
Run all test cases using ADB:
//  adb shell am instrument -w <test_package_name>/<runner_class>
adb shell am instrument -w PACKAGE.test/androidx.test.runner.AndroidJUnitRunner
PACKAGEis similar to package inAndroidManifest.xmlfile
Run all test cases from a specific class using ADB:
adb shell am instrument -w -e class CLASS_PATH \ PACKAGE.test/androidx.test.runner.AndroidJUnitRunner
CLASS_PATHis a path of the class to testPACKAGEis similar to package inAndroidManifest.xmlfile
Use Cases
Instrumentation test cases are often used to verify interaction with Android-specific components, like databases, User Interfaces (UI), etc. Let's take a look at different use cases, which we can verify with instrumentation test cases.
- Adding data to databases (non-UI instrumentation test)
- Show error on login screen when password is empty (UI instrumentation test)
Note: I will use the Espresso framework for UI verification.
Use Case: Adding data to databases
I want to start with a specific SQLite database in Android. A version of the SQLite database depends on the ROM installed on the device/emulation. This means that you can have a situation in which everything is working properly on one device, but on the other one, you have a problem because of the database version. Fortunately, this happens rarely, and all essential SQL commands work well on all devices.
So, let's imagine a situation where we want to store a User infomation in the database. In this example, I will use the Room library as a layer on top of the SQLite database.
Note: In this example, we will store User information in one table for simplicity.
@RunWith(AndroidJUnit4::class)
class UserDaoTest {

    private val database: ContactsDatabase by lazy {
        val context: Context = ApplicationProvider.getApplicationContext()
        Room.databaseBuilder(context, ContactsDatabase::class.java, "TEST_DATABASE")
            .allowMainThreadQueries()
            .build()
    }

    @Test
    fun should_addUserToDatabase() {
        val user = User(
            id = 1234L,
            fullName = "Test User",
            city = "FooBar",
            postcode = "1234",
            street = "FooBarBaz",
            houseNumber = "42"
        )

        database.userDao().insert(user)

        val dbUser = database.userDao().getUser(user.id)
        assertEquals(user, dbUser)
    }

    ...
}
Note: Remember to clean up the database if you use the real database in tests.
Use Case: Show error on login screen when password is empty
Let's take a look at the instrumentation UI test case. I propose to create a similar UI test case as we created with the Robolectric framework.
This test's main idea is to verify that the application shows the "Password is blank" when the password filed is active and empty.
@RunWith(AndroidJUnit4::class)
class LoginActivityTest {
    @Test
    fun should_displayEmptyPasswordError_when_passwordIsEmpty() {
        ActivityScenario.launch(LoginActivity::class.java)

        onView(withId(R.id.emailEditText))
            .perform(replaceText("test-account@alexzh.com"))

        onView(withId(R.id.passwordEditText))
            .perform(replaceText(""))

        onView(withId(R.id.passwordInputLayout))
            .check(matches(hasDescendant(withText(R.string.error_password_is_blank))))
    }

    ...
}
Note: As you can see this test case is fully similar to Robolectric test case. We can store such test case in a shared folder and have the possibility to execute them as local or instrumentation tests without code changes. Read more about this here.
Summary
So, let's summarize information about local and instrumentation test cases.
The local tests are executed on local JVM (Java Virtual Machine); this means that we don't need a specific device or emulation, but we can only verify our application on one ROM (like a particular device). These test cases are much faster than instrumentation test cases.
The instrumentation tests require a specific device or emulator, and we can execute such test cases on different devices simultaneously. They are slower than local tests because we need to install two applications on the device or emulator (the application and test application, including all test cases). In the end, we need to download test data from the device to our workstation.
I also want to mention some limitations of UI tests with the Robolectric framework. We can use basic verification, but Robolectric has a problem with gestures, navigation drawable, etc.