Today I'm talking about a TabLayout.
The TabLayout provides a horizontal layout to display tabs.
STEP 1: Add library to the project
Firstly need to add library to build.gradle file in the project.
dependencies {
    compile 'com.android.support:design:22.2.0'
}
STEP 2: Add colors and strings to the project
This project will contain static colors and strings. Better way store these data in strings.xml and colors.xml files.
Firstly need to create colors.xml in res/values folder. Source code of this file will be next:
<?xml version="1.0" encoding="utf-8"?>
<resources>
    <color name="primaryColor">#2196F3</color>
    <color name="primaryColorDark">#1976D2</color>
    <color name="cyan">#00BCD4</color>
    <color name="teal">#009688</color>
    <color name="amber">#FFC107</color>
</resources>
Next step is to update strings.xml file in /res/values folder. Need to add 3 string constants.
<string name="first">First</string>
<string name="second">Second</string>
<string name="third">Third</string>
STEP 3: Update theme for the project
Need to update theme for whole application. You can find theme in file styles.xml in /res/values folder.
<resources>
    <style name="AppTheme" parent="Theme.AppCompat.Light.NoActionBar">
        <item name="colorPrimary">@color/primaryColor</item>
        <item name="colorPrimaryDark">@color/primaryColorDark</item>
        <item name="colorAccent">@android:color/white</item>
    </style>
</resources>
STEP 4: Update layout for Activity
Activity in this application show toolbar, tab layout and fragments. Layout call activity_main.xml you can find in res/layouts folder.
<android.support.design.widget.CoordinatorLayout
    xmlns:android="http://schemas.android.com/apk/res/android"
    xmlns:app="http://schemas.android.com/apk/res-auto"
    android:layout_width="match_parent"
    android:layout_height="match_parent">

    <android.support.design.widget.AppBarLayout
        android:layout_width="match_parent"
        android:layout_height="wrap_content"
        android:theme="@style/ThemeOverlay.AppCompat.Dark.ActionBar">

        <android.support.v7.widget.Toolbar
            android:id="@+id/toolbar"
            android:layout_width="match_parent"
            android:layout_height="?attr/actionBarSize"
            android:background="?attr/colorPrimary"
            app:layout_scrollFlags="scroll|enterAlways"
            app:popupTheme="@style/ThemeOverlay.AppCompat.Light" />

        <android.support.design.widget.TabLayout
            android:id="@+id/tabLayout"
            android:layout_width="match_parent"
            android:layout_height="wrap_content" />

    </android.support.design.widget.AppBarLayout>
    <android.support.v4.view.ViewPager
        android:id="@+id/viewPager"
        android:layout_width="match_parent"
        android:layout_height="match_parent"
        app:layout_behavior="@string/appbar_scrolling_view_behavior" />
</android.support.design.widget.CoordinatorLayout>
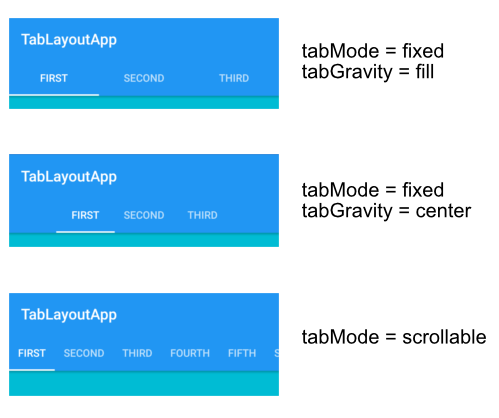
You can also have different style of tabs. For it you can change properties tabMode and tabGravity.
STEP 5: Update Activity
Need to update our activity and create required tabs. For each tab need to create fragment. We will use the almost the same fragment. Each fragment will contain different color and text. Source code of activity will be next.
public class MainActivity extends AppCompatActivity {

    @Override
    protected void onCreate(Bundle savedInstanceState) {
        super.onCreate(savedInstanceState);
        setContentView(R.layout.activity_main);

        Toolbar mToolbar = (Toolbar) findViewById(R.id.toolbar);
        TabLayout mTabLayout = (TabLayout) findViewById(R.id.tabLayout);
        ViewPager mViewPager = (ViewPager) findViewById(R.id.viewPager);

        setSupportActionBar(mToolbar);
        setupViewPager(mViewPager);
        mTabLayout.setupWithViewPager(mViewPager);
    }

    private void setupViewPager(ViewPager viewPager) {
        ViewPagerAdapter adapter = new ViewPagerAdapter(getSupportFragmentManager());
        adapter.add(getResources().getString(R.string.first), getResources().getColor(R.color.cyan));
        adapter.add(getResources().getString(R.string.second), getResources().getColor(R.color.teal));
        adapter.add(getResources().getString(R.string.third), getResources().getColor(R.color.amber));
        viewPager.setAdapter(adapter);
    }
}
STEP 6: Create Adapter for a Fragment
Need to create adapter for application. This adapter will store information about fragments and their titles.
static class ViewPagerAdapter extends FragmentPagerAdapter {
    private List<Fragment> mFragmentList = new ArrayList<>();
    private List<String> mFragmentTitleList = new ArrayList<>();

    public ViewPagerAdapter(FragmentManager manager) {
        super(manager);
    }

    @Override
    public Fragment getItem(int position) {
        return mFragmentList.get(position);
    }

    @Override
    public int getCount() {
        return mFragmentList.size();
    }

    public void add(String title, int color) {
        Fragment fragment = DummyFragment.newInstance(title, color);
        mFragmentList.add(fragment);
        mFragmentTitleList.add(title);
    }

    @Override
    public CharSequence getPageTitle(int position) {
        return mFragmentTitleList.get(position);
    }
}
STEP 7: Add layout for a Fragment
Need to create simple layout for fragment which can change color of layout and text.
<?xml version="1.0" encoding="utf-8"?>
<FrameLayout
    xmlns:android="http://schemas.android.com/apk/res/android"
    android:orientation="vertical"
    android:layout_width="match_parent"
    android:layout_height="match_parent"
    android:id="@+id/frameLayout">

    <TextView
        android:id="@+id/textView"
        android:text="item"
        android:textSize="36sp"
        android:layout_width="wrap_content"
        android:layout_height="wrap_content"
        android:layout_gravity="center" />
</FrameLayout>
STEP 8: Update a Fragment
Finally need to update fragment.
public static class DummyFragment extends Fragment {
    public static final String COLOR = "color";
    public static final String TEXT = "text";

    public static Fragment newInstance(String text, int color) {
        DummyFragment f = new DummyFragment();
        Bundle args = new Bundle();
        args.putInt(COLOR, color);
        args.putString(TEXT, text);
        f.setArguments(args);
        return f;
    }

    @Override
    public View onCreateView(LayoutInflater inflater, ViewGroup container, Bundle savedInstanceState) {
        View view = inflater.inflate(R.layout.fragment, container, false);
        FrameLayout frameLayout = (FrameLayout) view.findViewById(R.id.frameLayout);
        TextView textView = (TextView) view.findViewById(R.id.textView);
        frameLayout.setBackgroundColor(getArguments().getInt(COLOR));
        textView.setText(getArguments().getString(TEXT));
        return view;
    }
}
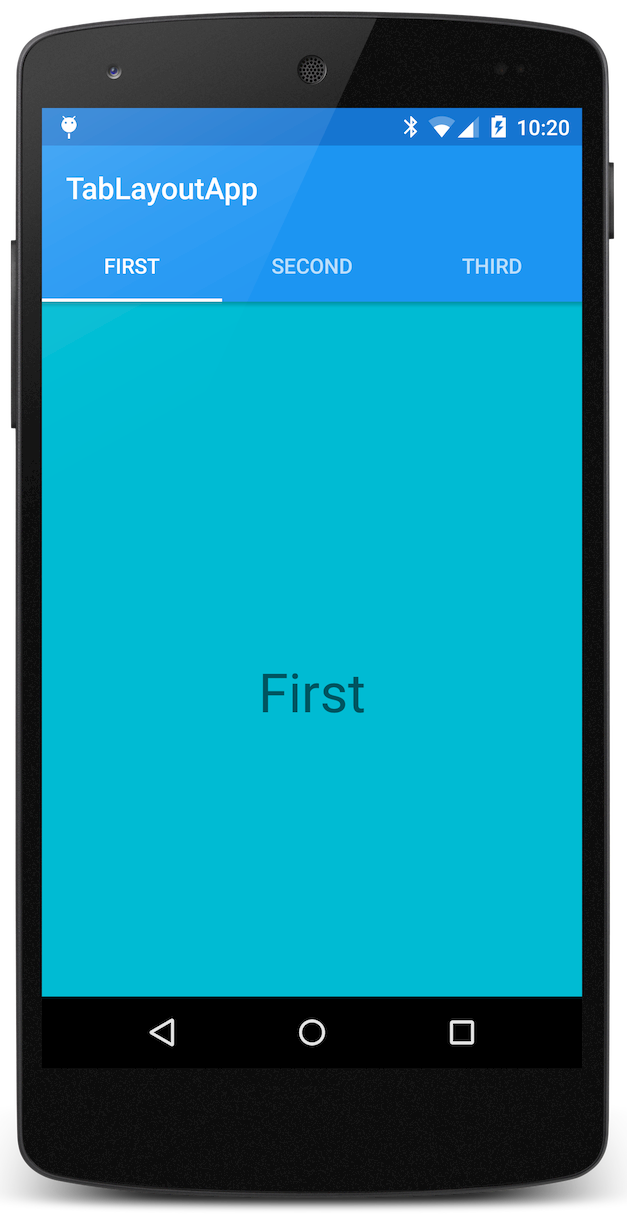
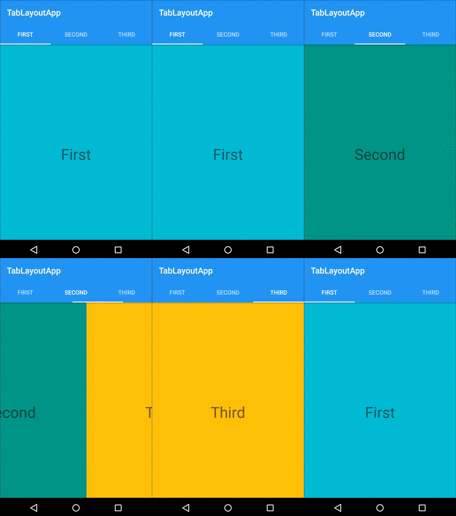
After run of project you show next application.
You can find the project on GitHub.

