
Have you ever shipped an app with a broken UI?
In today's fast-paced development environment, it is happening more often, even for teams who have manual QA and automated UI tests in place.
We often consider UI issues less important, but they can be much more important than just misalignment of a button. Many UI issues can make your application inaccessible because the text color may have not enough contrast, which leads to unreadable text. On the other side, when users see an unpolished UI, they lose trust in your brand, and bad app reviews can lead to a reduced number of downloads.
But wait... I already have UI tests.
Even if you have UI tests, this doesn't mean that they verify pixel perfectness. Many UI tests check the behavior of components, screens, or an application, but not pixel-perfectness.
Different types of UI tests verify different aspects of the application. End-To-End and UI tests with fake data focus on user behavior, but they don't check alignment between elements, color correctness for light and dark modes, and other visual details.
There is a solution - visual testing.
What is Visual Testing?
Visual tests focus on identifying pixel imperfections in your components and screens. In Android development, visual tests are implemented through screenshot comparison. This involves comparing the current state of the UI against a baseline screenshot (commonly called "golden screenshots") that represents the expected state of a component or a screen.
The screenshot comparison allows you to catch the following problems:
- Misaligned components and spacing inconsistencies
- Incorrect colors in light mode, dark mode, and custom themes
- Broken layouts for various devices (phones, tablets, foldable devices) and font sizes
- Rendering errors in Right-To-Left (RTL) and Left-to-Right (LTR) layouts, often related to locale settings
- Localization problems, such as text overflow when content in certain languages exceeds available space
- Accessibility concerns related to displaying content, such as color contrast
- Unexpected rendering problems in specific scenarios
There are multiple frameworks for screenshot testing in Android. Here are the most popular frameworks:
| Framework | Local vs Instrumentation tests | Rendering engine |
|---|---|---|
| Shot | Instrumentation tests | Device rendering |
| Roborazzi | Local tests | Robolectric Native Graphics |
| Paparazzi | Local tests | Layoutlib |
| Compose Preview Screenshot Testing | Local tests | Layoutlib |
Note: The “Layoutlib” renders @Previews in Android Studio.
A detailed framework comparison will be covered in one of the following articles.
These frameworks follow a similar workflow with two commands:
- The "record" command generates golden screenshots for your tests.
- The "verify" command compares the current UI state against the golden screenshots.
Command syntax varies between frameworks. For example, when using the Shot framework, you'll use the -Precord parameter to generate baseline images:
./gradlew :app:debugExecuteScreenshotTests -Precord
Ok, it sounds simple, but show me the test case.
First Visual Tests with Shot Framework
Let’s explore two screenshot tests for the statistics screen for the mood tracker app using the Shot framework. The tests will focus on the UI states representing Empty and Success states (data available for chart rendering).
class StatisticsScreenScreenshotTest : ScreenshotTest {
        companion object {
        val TEST_DATE = LocalDate(2024, Month.SEPTEMBER, 15)
    }

    @get:Rule
    val composeTestRule = createComposeRule()

    private val dateProvider = mockk<DateProvider>()
    private val moodHistoryRepository = mockk<MoodHistoryRepository>()

    @Before
    fun setUp() {
        initDI()
    }

    @Test
    fun statisticsScreen_noData() {
        val startDate = TEST_DATE.atStartOfMonth().atStartOfDayIn(
            defaultTimeZone
        )
        val endDate = TEST_DATE.atEndOfMonth().atEndOfDay()

        every { dateProvider.getCurrentDate() } returns TEST_DATE

        every {
            moodHistoryRepository.getAverageDayToHappiness(startDate, endDate)
        } returns flowOf(emptyList())

        every {
            moodHistoryRepository.getActivityToHappinessByDate(startDate, endDate)
        } returns flowOf(emptyList())

        composeTestRule.setContent {
            FeelTrackerAppTheme {
                StatisticsScreen(
                    viewModel = koinViewModel(),
                    onHome = { },
                    onBreathingPatternSelection = { },
                    onSettings = { }
                )
            }
        }

        compareScreenshot(
            rule = composeTestRule,
            name = "statisticsScreen_noData"
        )
    }

    @Test
    fun statisticsScreen_hasData() {
        val startDate = TEST_DATE.atStartOfMonth().atStartOfDayIn(
            defaultTimeZone
        )
        val endDate = TEST_DATE.atEndOfMonth().atEndOfDay()
        val firstDateOfTheMonth = TEST_DATE.atStartOfMonth()

        every { dateProvider.getCurrentDate() } returns StatisticsScreenScreenshotTest.TEST_DATE

        every {
            moodHistoryRepository.getAverageDayToHappiness(startDate, endDate)
        } returns averageDayToHappinessChartData(firstDateOfTheMonth)

        every {
            moodHistoryRepository.getActivityToHappinessByDate(startDate, endDate)
        } returns activityToHappinessData()

        composeTestRule.setContent {
            FeelTrackerAppTheme {
                StatisticsScreen(
                    viewModel = koinViewModel(),
                    onHome = { },
                    onBreathingPatternSelection = { },
                    onSettings = { }
                )
            }
        }

        compareScreenshot(
            rule = composeTestRule,
            name = "statisticsScreen_hasData"
        )
    }

    private fun initDI() {
        stopKoin()
        startKoin {
            allowOverride(true)
            androidContext(InstrumentationRegistry.getInstrumentation().targetContext)
            modules(
                ...
                module {
                    single { dateProvider }
                    single { moodHistoryRepository }
                }
            )
        }
    }

    private fun averageDayToHappinessChartData(startDate: LocalDate): Flow<List<MoodDayToHappiness>> {
        return flowOf(listOf(...))
    }

    private fun activityToHappinessData(): Flow<List<ActivityToHappiness>> {
        return flowOf(listOf(...))
    }
}
Important notes:
- Test class should implement the “ScreenshotTest” interface to screenshot comparison functionality
- Fixed date is needed for reproducibility of the screenshot test
- The test uses mock instances of data provider and repository to emulate different screen states. It uses the “Koin” framework.
To generate baseline (golden) screenshots, run:
./gradlew :app:debugExecuteScreenshotTests -Precord
This command saves the current state of UI as the reference point for future comparisons. Now, let's simulate the real-world scenario by changing the title of the average daily mood chart from "AVERAGE DAILY MOOD" to "DAILY MOOD" and run the verification:
./gradlew :app:debugExecuteScreenshotTests
After execution, the Shot framework generates a report that highlights the differences:
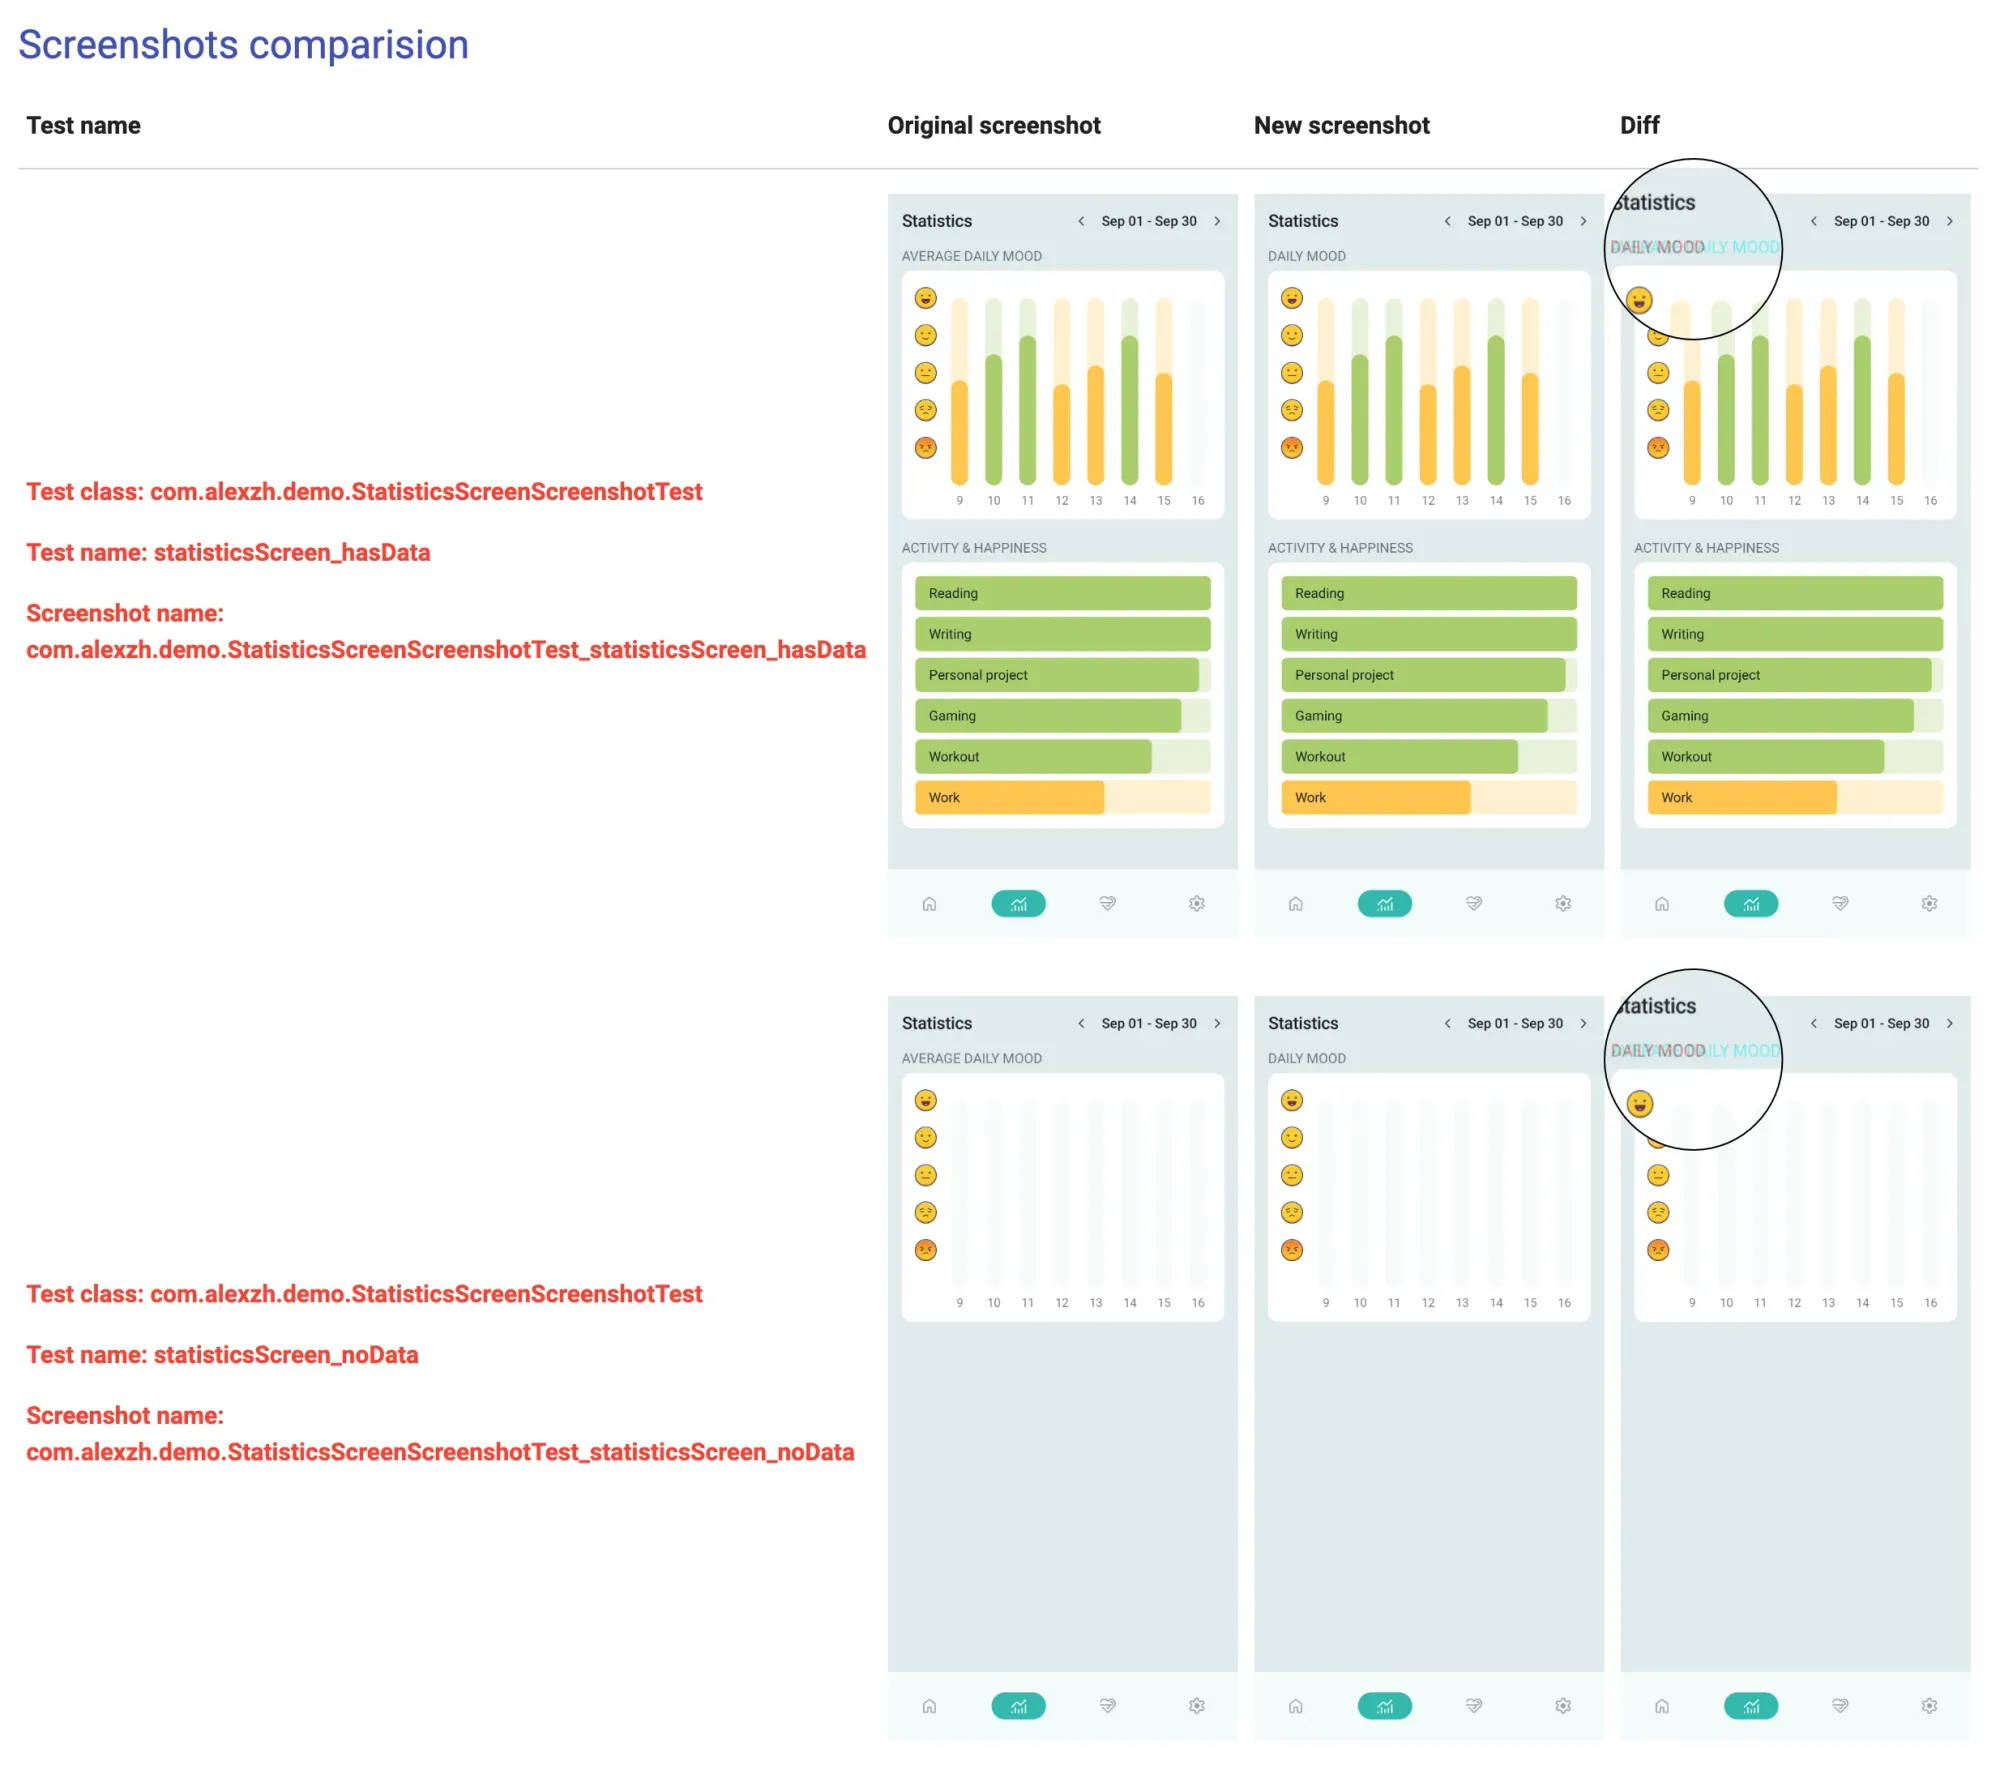
Note: This image includes the zoom effect only for demonstration purposes.
This visual feedback is significantly more efficient than manually inspecting each component and screen.
To better understand the difference between different types of UI tests and how they complement each other, check out the "Not all UI tests are the same" article.
Conclusion
Visual testing is critical for delivering applications without visual imperfections. While UI tests focus on behavior verification, they cannot check pixel perfectness of your application.
By implementing visual testing, development teams can catch visual imperfections before releasing an application. These tests will catch component misalignments, color incorrectness across various themes, visual issues on different devices, and much more.
Unpolished UI always looks unprofessional and can damage trust in your brand. By incorporating UI tests into the development process, you're not just checking pixel perfectness, but also protecting brand reputation.
Stay tuned for my upcoming articles where I'll dive deeper into framework comparisons and share best practices for integrating visual testing into Android projects.

