The article was updated on 17 February 2021. The original article was published on 6 August 2020.
Let's explore this tool with the ability to do UI debugging and analysis of the User Interface for UI testing. The "Layout Inspector" is a part of Android Studio; this means that you cannot run it as a standalone application. You can run it via the "Tools / Layout Inspector" menu.
This tool allows us to analyze different applications; however, it depends on the permissions of the device or emulator. We can analyze any app if the device has root permissions; otherwise, we can only explore debug versions of applications (usually these are apps we are developing). An Android emulator without Google Play Services delivered with ROOT permissions; this means that we can explore any application on these emulators. However, we can only analyze debug versions of apps installed on any device or emulator without ROOT permissions.
Note: Layout Inspector from this tutorial is available in Android Studio 4.1.2 or higher.
Let’s run "Layout Inspector" and take a look at the User Interface of this tool. The first step is to "Select Process" (![]() ) to analyze the UI from the "Layout Inspector" window.
) to analyze the UI from the "Layout Inspector" window.
When a snapshot of the application's UI is created, you will see the View Hierarchy, Layout Preview, and Attributes panels.
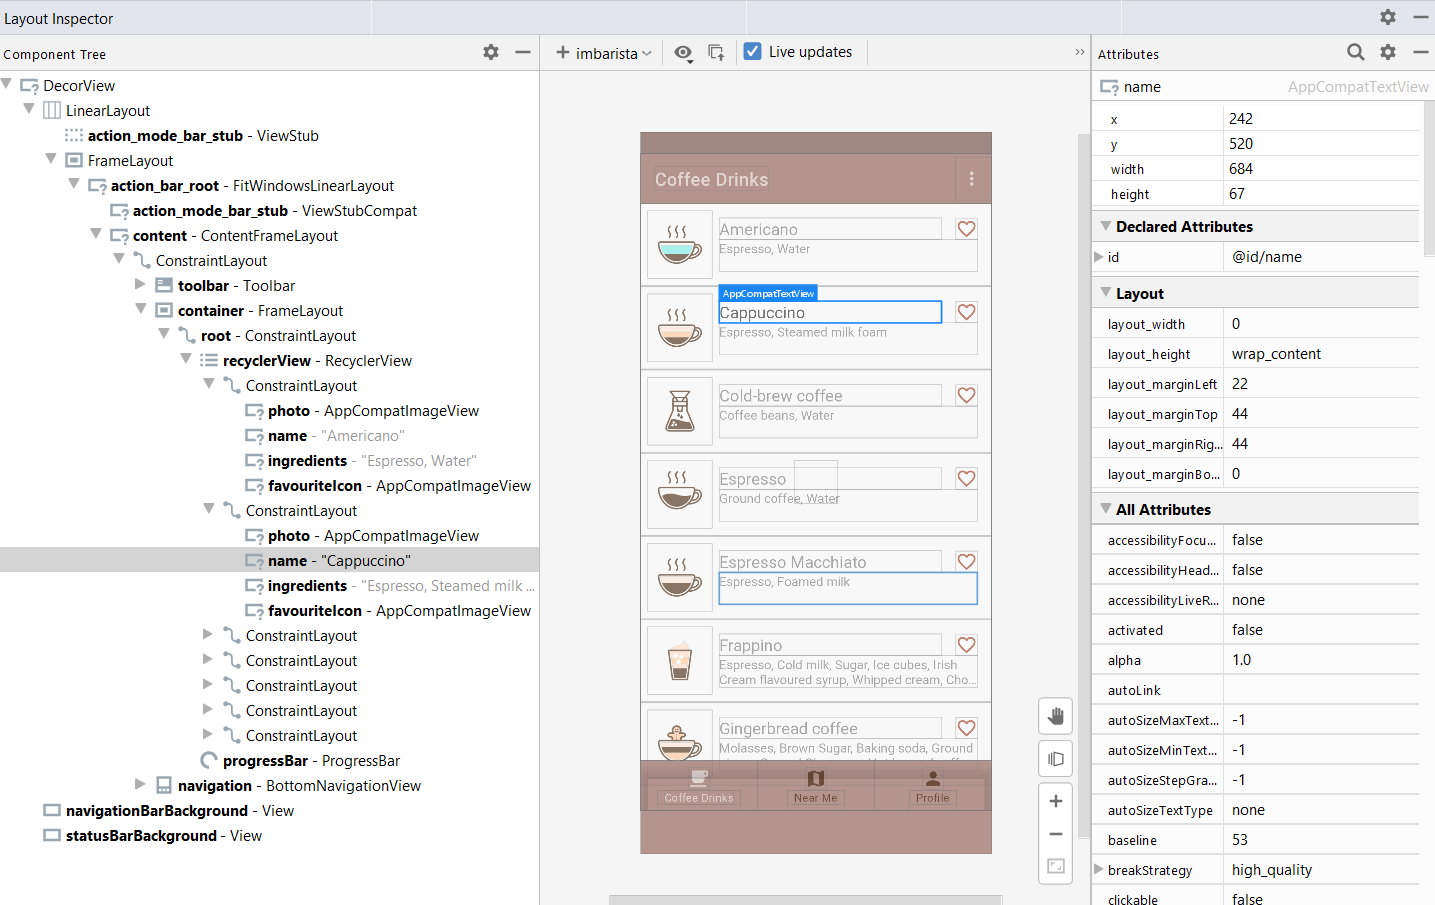
Live Update
A new version of the "Layout Inspector" has a "Live Update" feature, which helps us see real-time changes to the app's active screen. If we change the screen on the device or emulator, it will be automatically updated in the "Layout Inspector" tool. This feature is enabled by default (![]() ), but you can easily turn it off in the main window of "Layout Inspector".
), but you can easily turn it off in the main window of "Layout Inspector".
This feature speeds up the analysis of different screens because we don't need to "ask" about the new snapshot manually. However, we have one important drawback at the current version of Android Studio (4.1.2):
- There is no possibility to save a captured snapshot with/without "Live Updates" features.
Pixel Perfectness
The "Layout Inspector" is not only a tool to analyze the UI of the application. We can also use it for "Pixel Perfectness" because the "overlay" feature is available in the Layout Inspector.
So, let's take a look at this feature. The "overlay" feature allows us to compare the actual screen of the application with the design image. The "Load Overlay" (![]() ) button is available in the menu of "Layout Inspector".
) button is available in the menu of "Layout Inspector".
So, I implemented a simple login screen and created a bit of a different design of the screen in Figma, to show how it works. Let’s compare the following three images:
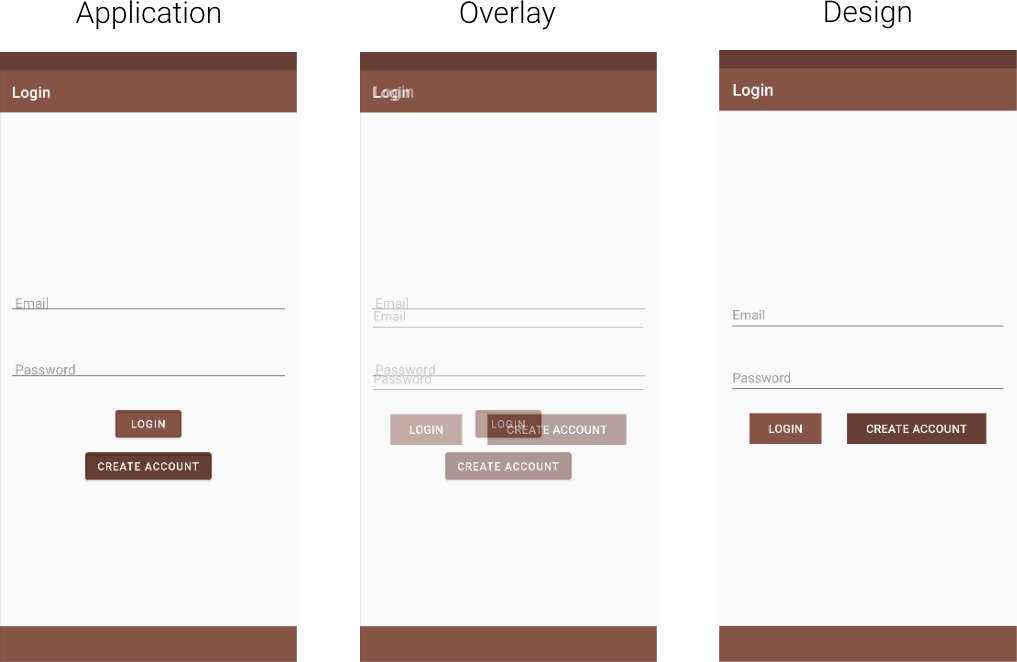
As you can see, when we take a look at the overlay, then all the Views in the screen should be arranged differently. When we load the overlay to the "Layout Inspector" we can also change the "Overlay Alpha" property, which is based near the "Load Overlay" button.
However, the current implementation of this tool has an issue:
- There is no possibility to change the position of overlay; this can be a problem if your design image has no "Status Bar" or if your phone uses a different screen ratio.
- There is no possibility to resize overlay image.
3D Visualization
In addition to all these features, we have the "3D Visualization" feature of Layout Inspector. It helps us to have a different representation of the layout for the application. We can see how many nested Views we have and how complex our UI is.
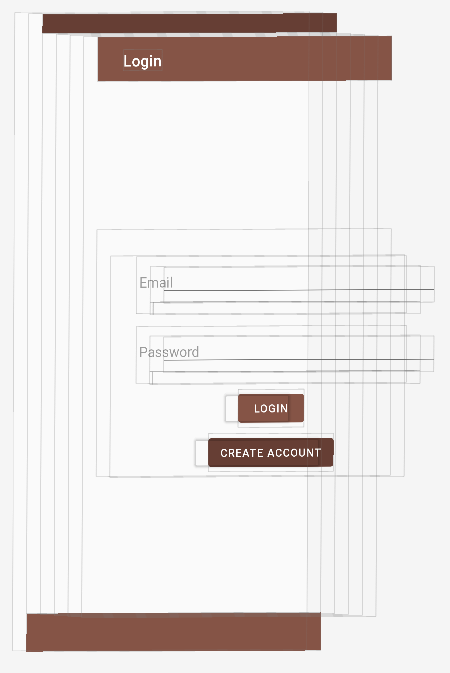
To activate the "3D visualization" mode, we use the "Rotate View" button (![]() ) at the bottom of the Inspector window.
) at the bottom of the Inspector window.
Work with Resources
Resources are an essential part of any Android application because we use many margins, strings, drawables, etc. Often they are part of the "res"; folder, and we want to reuse the applications' resources.
Analyzing Images
The Layout Inspector provides information about different types of drawables in the application.
| Vector graphics (SVG) | Type: VectorDrawable |
| Raster images (PNG) | Type: BitmapDrawable fragment_coffee_drinks.xml:35 |
| Image from a remote data source (in case of Picasso library) |
Type: PicassoDrawable |
As you can see, the current version of "Layout Inspector" works better than the previous one with raster image formats, like png. It can be helpful when you write UI tests or debug the UI of the application and you find any problem with a specific image.
Analyzing Strings
Let's take a look at the situation with text attributes for different UI components because here, the situation is a bit more complicated than we have with images. Any string in the application can be used as a part of resources of the application (usually strings.xml file) or string with other data sources (hard-coded value in layout, code, or value from a specific file, like JSON). The "Layout Inspector" tool always provided access to a string representation of value, like "Login", "Espresso", etc. However, when we use Espresso based framework for testing, we can use the resources of the application (R.string.action_login) because it simplifies the migration of tests to different languages. So, we have access to the additional "text" information when we use strings from resources (strings.xml), and analyzed components don't have internal components. Let's analyze "View Hierarchy" for MaterialButton and TextInputLayout.
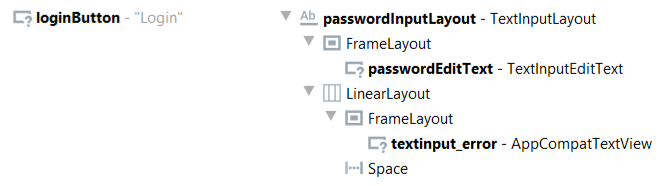
As you can see, the structure of the TextInputLayout is much more complicated than the structure of the MaterialButton. The "Layout Inspector" in the case of "Resource Id" works much better with components without an internal nested structure, because in the case of the MaterialButton we have access to additional information about "text" with link to strings.xml file, but in case of TextInputLayout, we have only access to the string value.
Analyzing Colors
The "Layout Inspector" has access to attributes that work with colors for different Views. When devs used colors from resources, we can have a link to resources and color in the following format (#FFFFFF). We can easily get access to the following properties which have links to resources:
- background
- textColor
- tint
Analyzing Margins and Paddings
We have access to margin and padding attributes using Layout Inspector; we have access to values in "dp" (Density-independent pixels). It can simplify debugging of UI of the application and verification app by QA engineers.
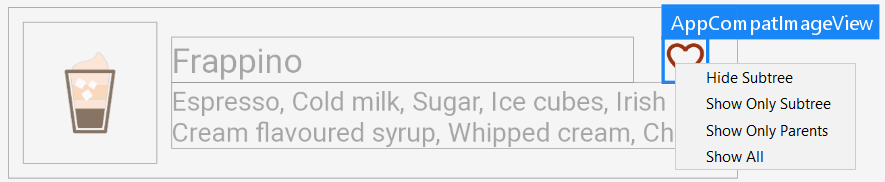
Sub-trees
The "Layout Inspector" allows us to interact with ViewTree and hide or show sub-trees; it can be helpful when we want to analyze only part of the UI. We can interact with View Tree via the "Component Tree" or "Live Preview" sections of Layout Inspector.
Missing Features
Unfortunately, we did lose a few features, like saving snapshots of screens of the application. A new version of "Layout Inspector" is already a great iteration of the previous solution, but I want to mention a few possible improvements that right now are missing:
- Configuration of attributes (We don't have the possibility to create our own list of attributes; this will be helpful for collecting data for UI tests);
- Copy attribute values (We cannot copy attribute values, but it was possible in the previous version of Layout Inspector, and it's possible in UIAutomatorViewer);
- Snapshots of the screen (We cannot create a snapshot of the screen without the "Live Updates" feature).
Summary
The current version of the "Layout Inspector" has many improvements, especially for working with resources. It can be helpful for debugging the UI of the application or collecting information before or during writing UI tests. In addition to it, we can do "Pixel Perfectness" with Android Studio without additional tools. It can be helpful for developers and QA engineers.

