This is a third article from series of articles about testing Android project.
The first article about "Unit testing" you can read here.
The second article about "Mockito and Robolectric" you can read here.
Full source code you can find on Github. The project on github contains different branches (basic version of app, unit tests for basic version of app, basic version + payment activity, mockito and robolectric tests, implementation lists (ListView, RecyclerView) in an app, espresso tests for application)
What is Espresso?
The Espresso testing framework, provided by the Android Testing Support Library, provides APIs for writing UI tests to simulate user interactions within a single target app. Espresso tests can run on devices running Android 2.2 (API level 8) and higher. A key benefit of using Espresso is that it provides automatic synchronization of test actions with the UI of the app you are testing. Espresso detects when the main thread is idle, so it is able to run your test commands at the appropriate time, improving the reliability of your tests. This capability also relieves you from having to add any timing workarounds, such as a sleep period, in your test code.
The Espresso testing framework is an instrumentation-based API and works with the AndroidJUnitRunner test runner.
Prepare for using Espresso
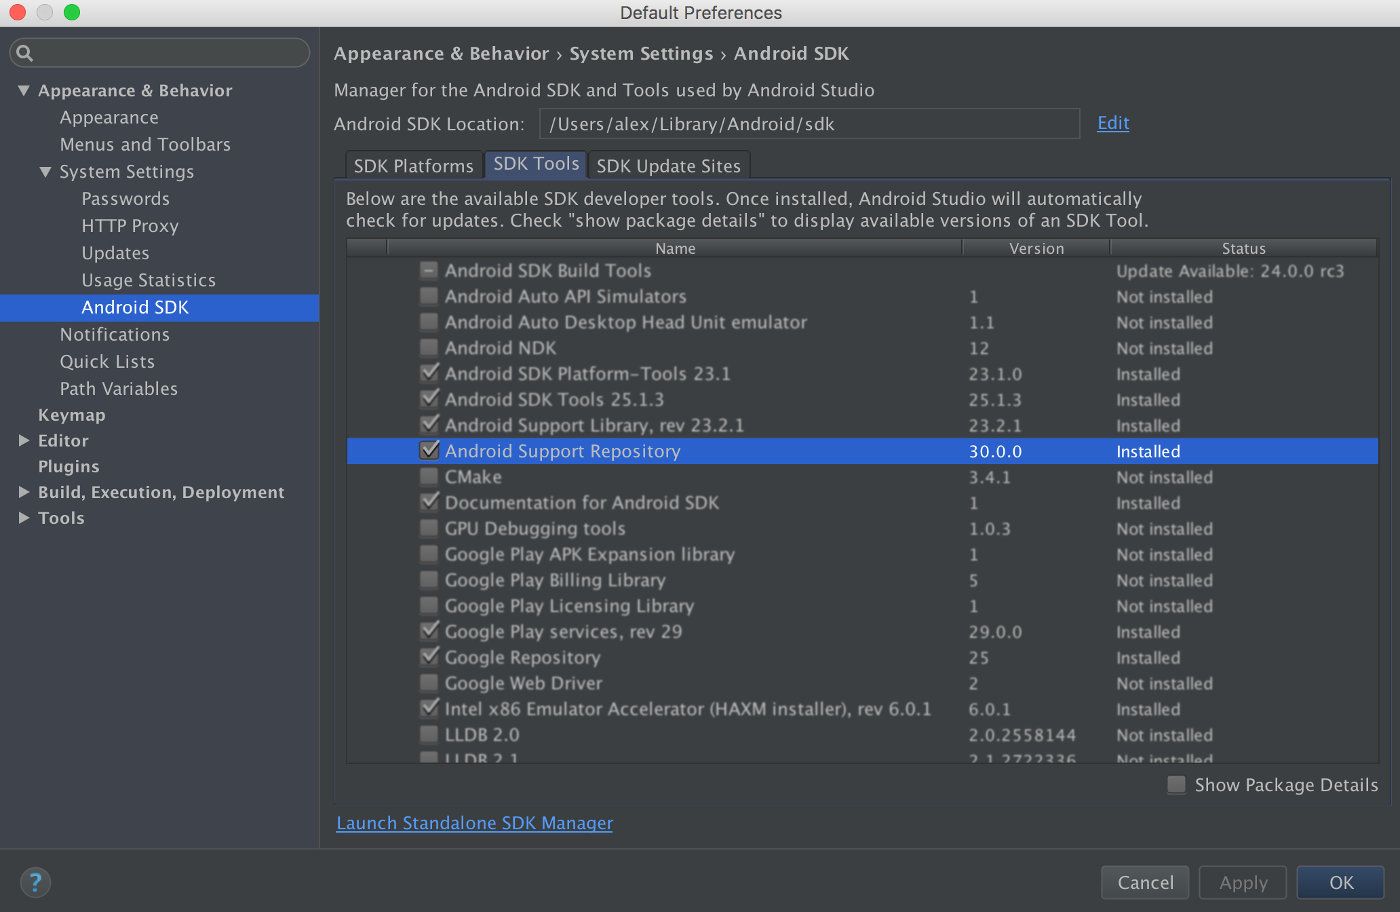
Install / Update Android Support Libraries
First of all, you need to install/update Android Support Repository>. For it, you can use SDK Manager.
Integrate Espresso to the project
After it you must add dependency for android test. You need to update a build.gradle file for it.
dependencies {
    ...
   androidTestCompile('com.android.support.test.espresso:espresso-core:2.2.2'){
        exclude group: 'com.android.support', module: 'support-annotations'
    }

    androidTestCompile('com.android.support.test:runner:0.5'){
        exclude group: 'com.android.support', module: 'support-annotations'
    }
}
You can add exclude module to dependencies for avoiding version conflicts. Next step is adding Instrumentation runner for your configuration.
android {
    defaultConfig {
        testInstrumentationRunner "android.support.test.runner.AndroidJUnitRunner"
    }
}
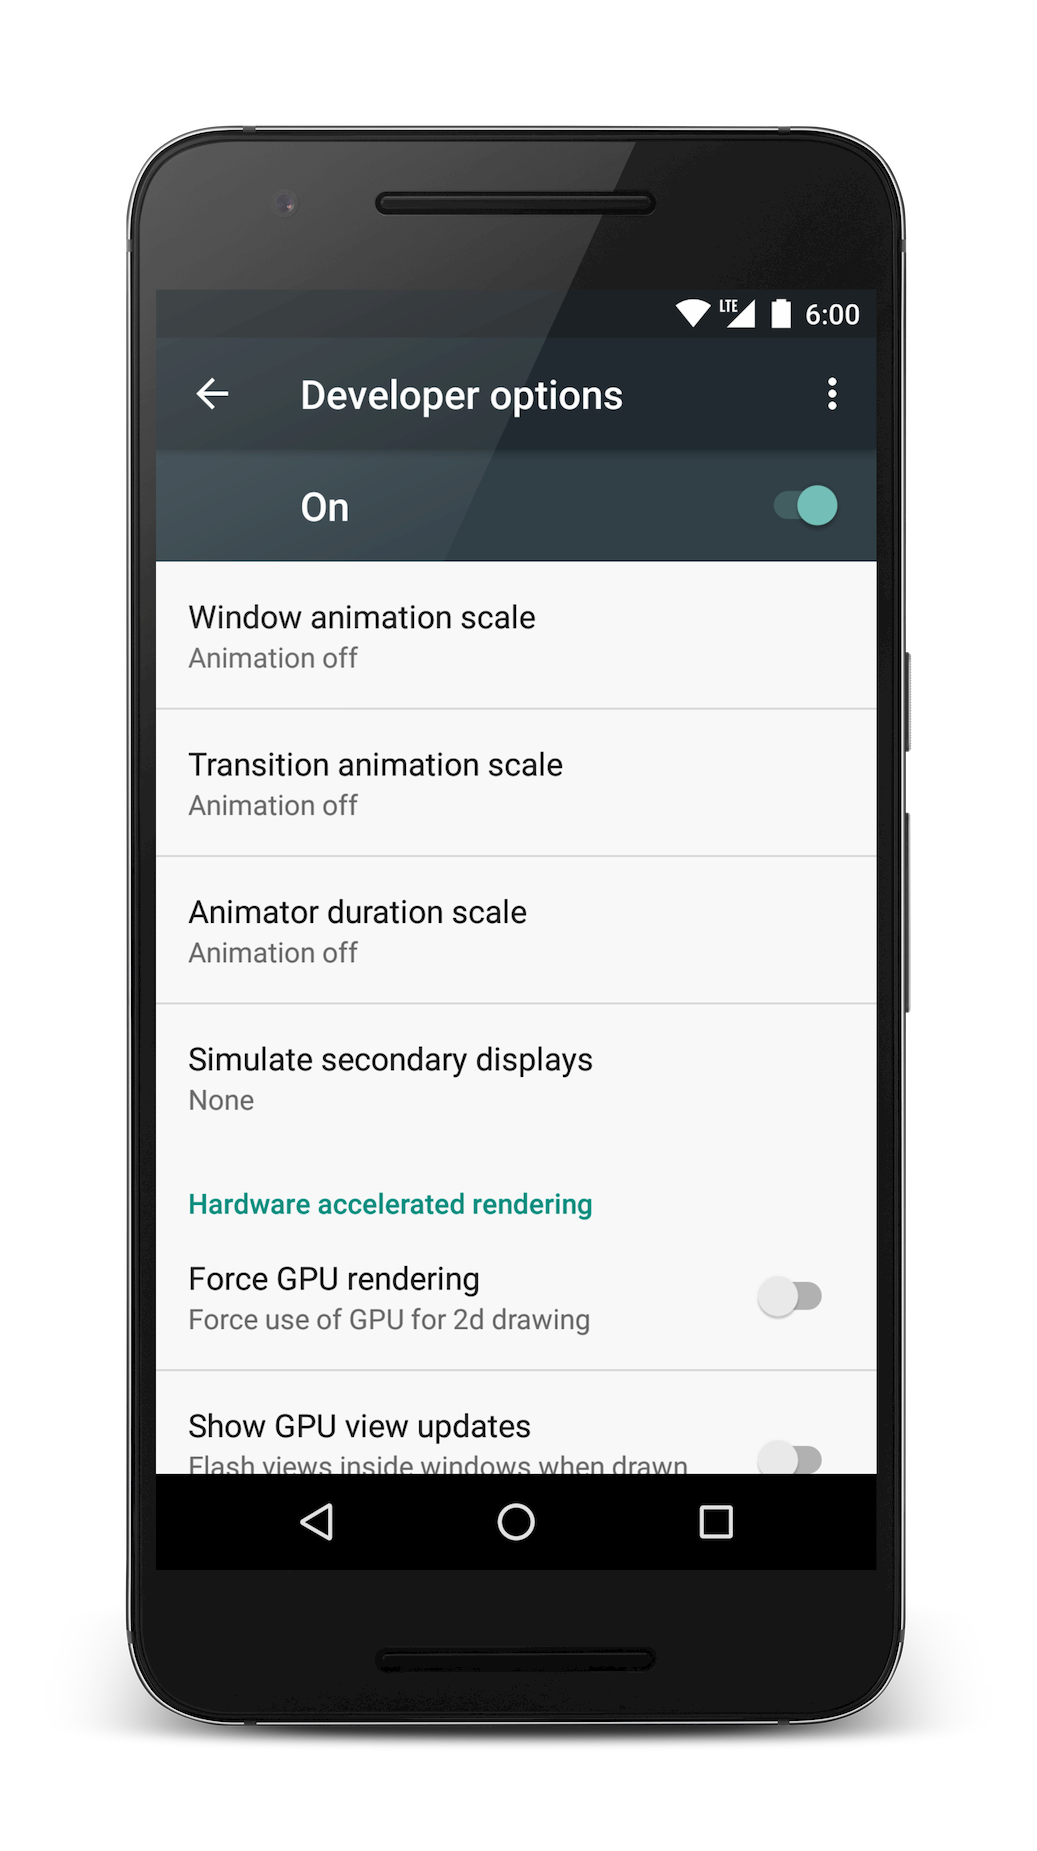
Recommendation for setting up the device/emulator
One small recommendation for avoiding flakiness it’s turning off animation on real or virtual devices.
- Window animation scale
- Transition animation scale
- Animator duration scale
You need to open "Settings -> Developer Options for changing these parameters. After it, find and turn off these animations.
Running Espresso tests
Use Android Studio
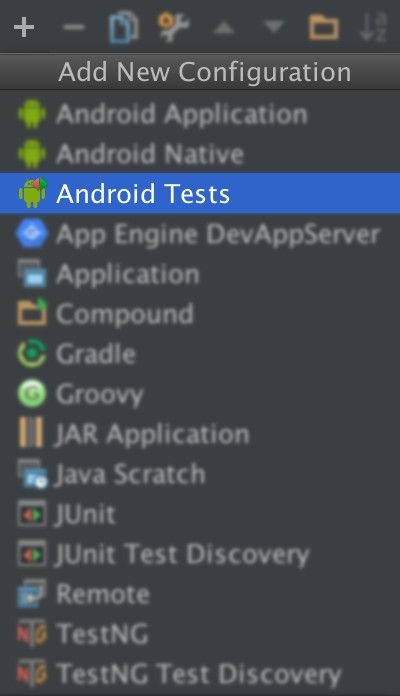
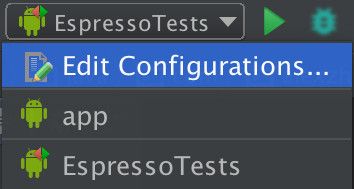
First of all, you need to create configuration for instrumentation tests. You can choose "Run/Edit Configurations ..." for it. After it, you can choose "+" icon and click to "Android Tests".
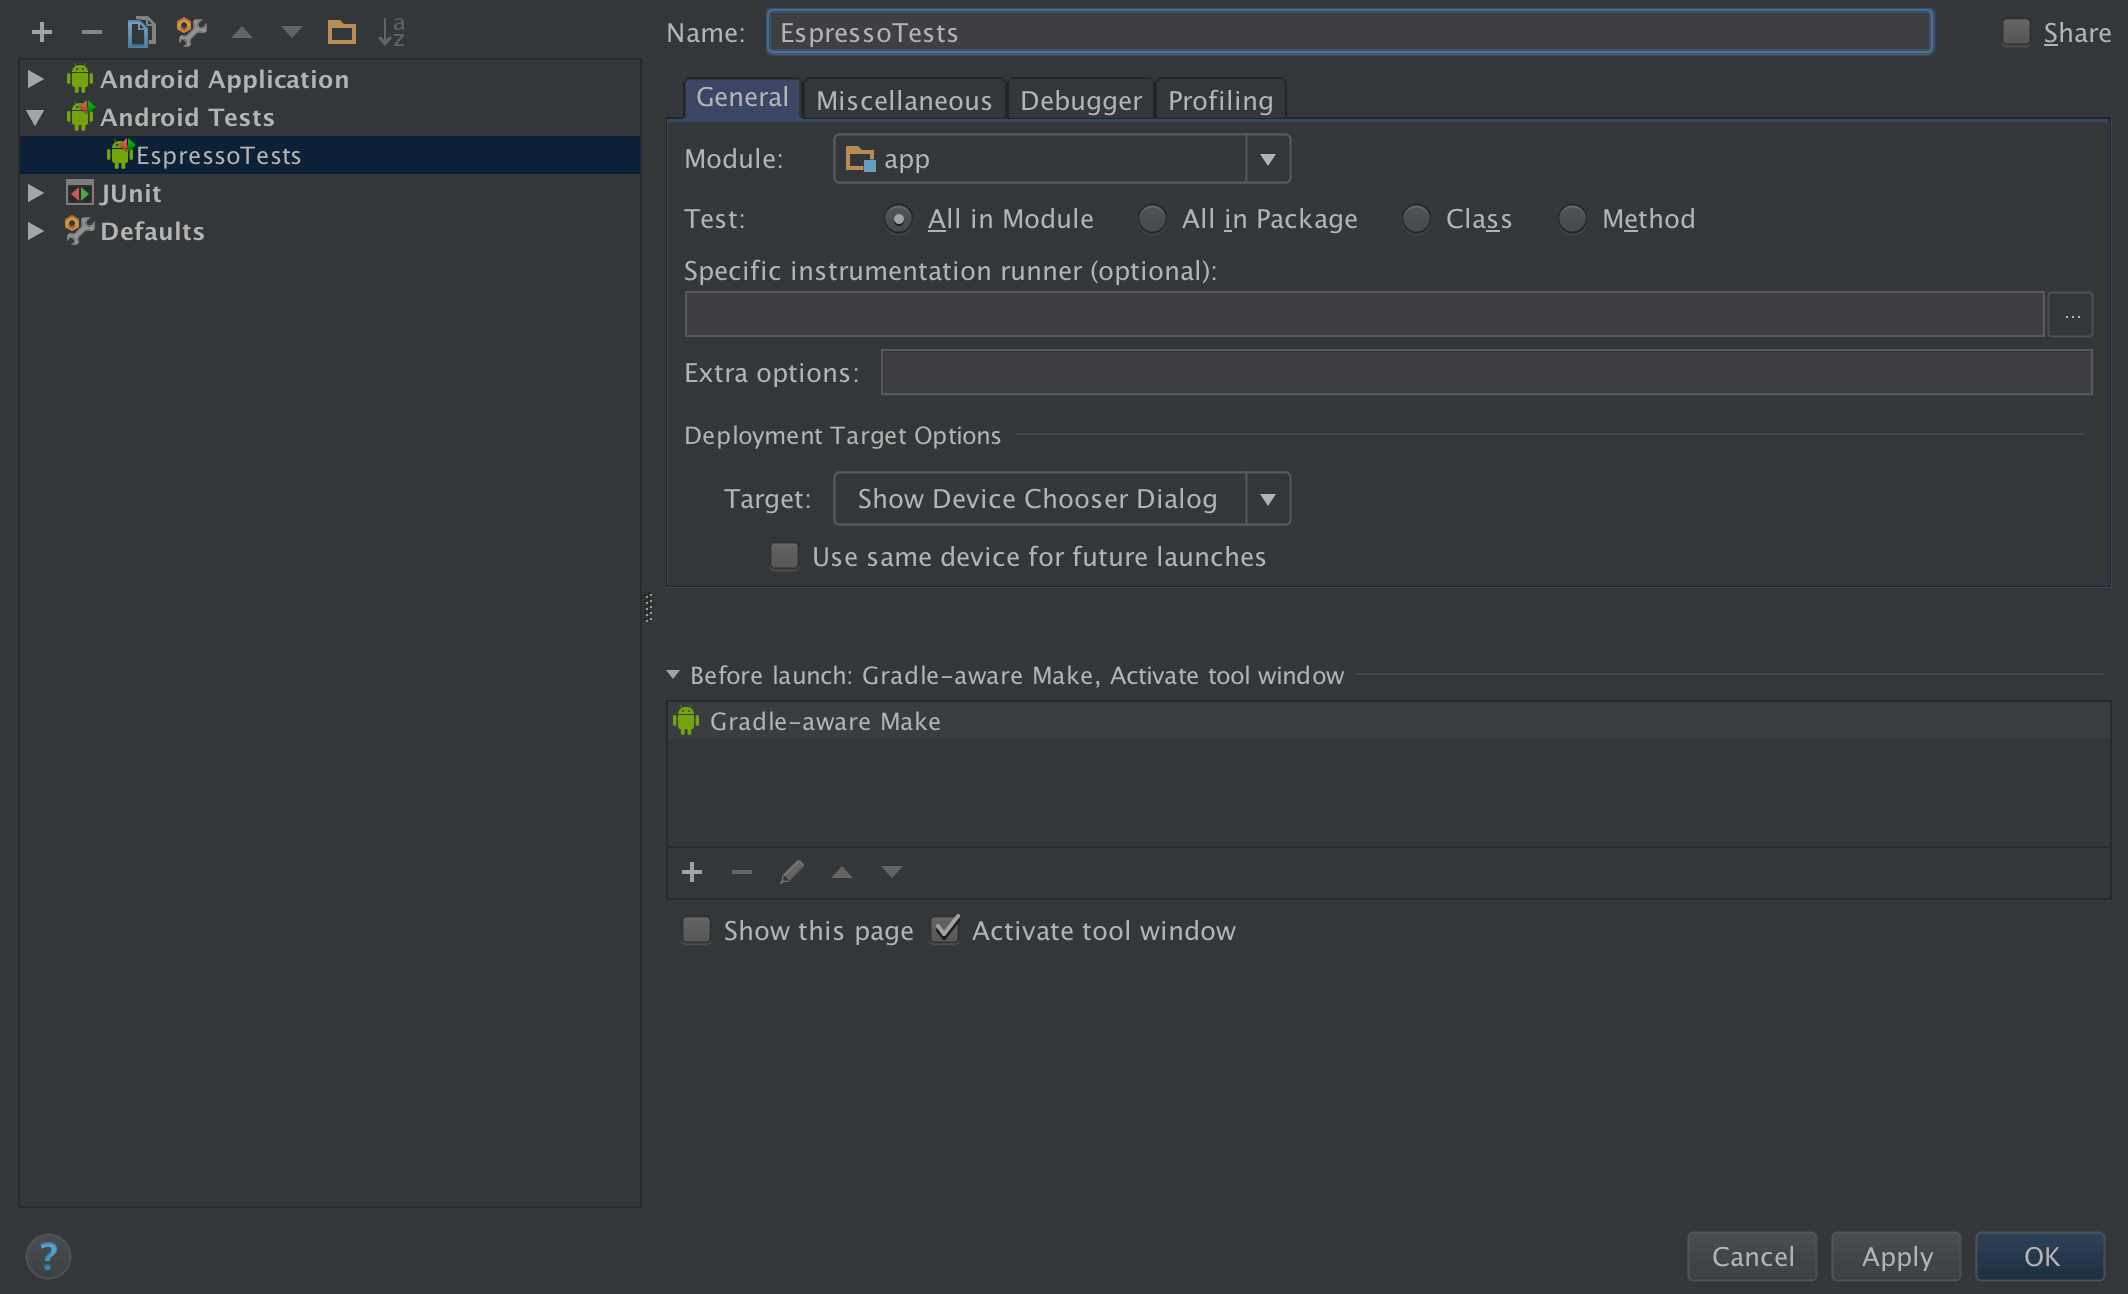
Then you need to set up module for Android tests. In my case I changed Name to "EspressoTests" and Module to "app".
After these changes you can find updated run menu and run your tests or an application.
Use gradle
If you want to run instrumentation test use gradle. You can use next command
./gradlew connectedAndroidTest or ./gradlew cAT.
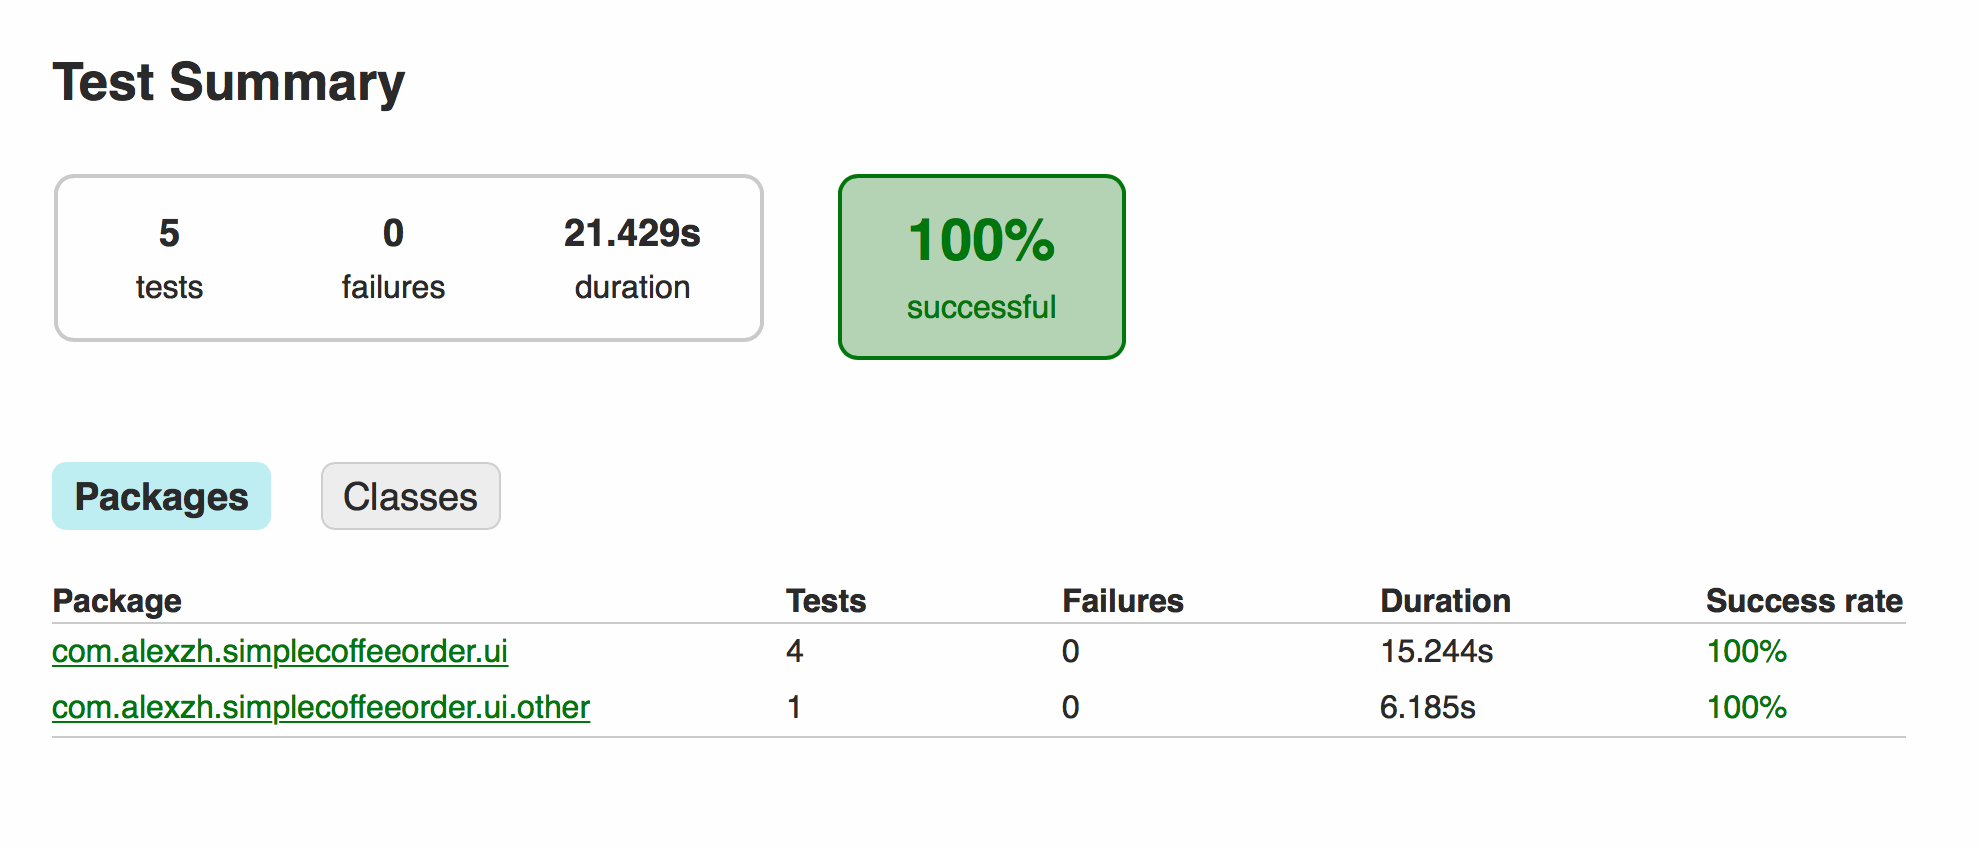
When this command has been finished you can find a report with test results inside your build folder:
{PROJECT}/{APPLICATION_MODULE}/build/reports/androidTests/connected/index.html
Writing Espresso tests
Basic Espresso components
There are general Espresso components:
- Espresso – entry point to the Espresso framework, the Espresso class allows to interact with View (via
onVieworonData); - ViewMatchers> – a collection of matches that matches
Views. You can pass one or more matchers toonViewmethod; - ViewActions – a collection of common ViewActions, like
click,longClick,swipeLeft, etc; - ViewAssertions – a collection of common
ViewAssertionsthat can be passed tocheck.
Espresso.onView(ViewMatchers.withId(R.id.coffee_increment))
    .check(ViewAssertions.matches(ViewMatchers.withText(R.string.increment_label)))
    .perform(ViewActions.click());
Basic test structure
Base idea of Espresso tests are interacting with different Views. I show how you can interact with different types of view. You can find a view using ID of the view for it or as example, when we talk about TextView, Button, etc.
Interacting with Views like Button, TextView, etc
If you want to find some view by ID, you can use the withId method onView(withId(R.id.pay)).
Or you can search view by the text onView(withText("Pay")) or onView(withText(R.string.pay)).
After it, you can do some action, as example you can click.
onView(withText(R.string.pay))
    .perform(click());
Interacting with ListView
ListView is an AdapterView. That means that ListView doesn’t allow load all items initially. Using the onView(...) method with ListView for verification is not the best idea. Fortunately, Espresso provides the onData(...) method. This method allows you load all items from AdapterView before interacting with ListView.
You can find the text and you can use next source code for it.
onData(allOf(is(instanceOf(String.class)), is("text")))
    .inAdapterView(withId(R.id.textItem))
    .perform(click());
Alternatively, you can interact with an item from the certain position of ListView.
onData(anything())
    .inAdapterView(withId(R.id.listView))
    .atPosition(3)
    .perform(click());
Interacting with Spinner
Spinner is also AdapterView like the ListView. You can use onView(...) method for verifying spinner text and for performing some actions.
However, if we talk about a selecting item from Spinner you can use onData(...) method.
onData(allOf(is(instanceOf(String.class)), is("text")))
    .perform(click());
Interactive with RecyclerView
RecyclerView is not an AdapterView, it means that you can’t use onData(...) method for RecyclerView. Fortunately, Espresso supports RecyclerView. You must add an additional dependency for it.
dependencies {
    ...

    androidTestCompile('com.android.support.test.espresso:espresso-contrib:2.2') {
        exclude group: 'com.android.support', module: 'appcompat'
        exclude group: 'com.android.support', module: 'support-v4'
        exclude group: 'com.android.support', module: 'support-annotations'
        exclude module: 'recyclerview-v7'
    }
}
Now you can use RecyclerViewActions for interaction with RecyclerView.
onView(withId(R.id.recView))
    .perform(RecyclerViewActions.actionOnItemAtPosition(2, click()));
Static imports
Espresso.onView(ViewMatchers.withId(R.id.coffee_increment))
    .check(ViewAssertions.matches(ViewMatchers.withText(R.string.increment_label)))
    .perform(ViewActions.click());
As you can see from an example above, the sentence of action is very long, however you can add some static imports and this sentence will look better.
import static android.support.test.espresso.Espresso.*;
import static android.support.test.espresso.action.ViewActions.*;
import static android.support.test.espresso.assertion.ViewAssertions.*;
import static android.support.test.espresso.matcher.ViewMatchers.*;
And to update source code
onView(withId(R.id.coffee_increment))
    .check(matches(withText(R.string.increment_label)))
    .perform(click());
As you can see after these changes source code is more compact.
Configure custom intents
Unfortunately, some activity must get additional parameter with startIntent. As example, if we have an activity that shows the detail from previous activity.
You can create configured ActivityTestRule, unfortunately, in this case you must use this rule for each test.
First of all you must add an additional dependency.
androidTestCompile('com.android.support.test.espresso:espresso-intents:2.2') {
     exclude group: 'com.android.support', module: 'support-annotations'
}
After it we can configure intent.
@Rule
public ActivityTestRule<PaymentActivity> mActivityRule =
    new ActivityTestRule<PaymentActivity>(PaymentActivity.class) {
        @Override
        protected Intent getActivityIntent() {
            Context targetContext = InstrumentationRegistry.getInstrumentation().getTargetContext();
            Intent result = new Intent(targetContext, PaymentActivity.class);
            result.putExtra(PaymentActivity.TOTAL_PRICE, 5.0f);
            return result;
        }
};

@Test
public void test() {
    ...
}
You can use next definition of ActivityTestRule and configure Intent for each test.
@Rule
public ActivityTestRule<PaymentActivity> mActivityRule =
          new ActivityTestRule<>(PaymentActivity.class, true, false);
@Test
public void test() {
    Context targetContext = InstrumentationRegistry.getInstrumentation().getTargetContext();
    Intent intent = new Intent(targetContext, MainActivity.class);
    intent.putExtra(PaymentActivity.TOTAL_PRICE, 5.0f);
    mActivityRule.launchActivity(intent);

    ...

}
Testing asynchronous code
One of key feature of Espresso is the synchronization between the test and an application.
By default, Espresso synchronize all view operations with the UI thread as well as AsyncTask. Espresso also allows use custom resources in tests. However, if your application performs long-running operations Espresso doesn't know anything about it. It can be a problem for some tests, because you can get some data from the internet.
I would like to show you how to create custom Idling Resource and use it for your tests. Before implementing custom Idling Resource class you must know some major information.
public class ServiceIdlingResource implements IdlingResource {
    private final Context mContext;
    private ResourceCallback mCallback;

    public ServiceIdlingResource(Context context) {
        this.mContext = context;
    }

    @Override
    public String getName() {
        return ServiceIdlingResource.class.getSimpleName();
    }

    @Override
    public boolean isIdleNow() {
        boolean idle = !isIntentServiceRunning();
        if (idle && mCallback != null) {
            mCallback.onTransitionToIdle();
        }
        return idle;
    }

    @Override
    public void registerIdleTransitionCallback(ResourceCallback callback) {
        this.mCallback = callback;
    }

    private boolean isIntentServiceRunning() {
        ActivityManager manager = (ActivityManager) mContext.getSystemService(Context.ACTIVITY_SERVICE);
        for (ActivityManager.RunningServiceInfo info : manager.getRunningServices(Integer.MAX_VALUE)) {
            if (CoffeeService.class.getName().equals(info.service.getClassName())) {
                return true;
            }
        }
        return false;
    }
}
The IdlingResource interface defines three methods:
public String getName()public boolean isIdleNow()public void registerIdleTransitionCallback(ResourceCallback callback)
The getName method returns string that identifies this Idling Resource. Of course, this string must be not a null.
The isIdleNow method returns the current state of the Idle Resource.
The registerIdleTransitionCallback method stores information about a callback that notifies changes of Idle Resource state.
In this small example, I use next simple service:
import android.app.IntentService;
import android.content.Intent;
import android.os.SystemClock;
import android.support.v4.content.LocalBroadcastManager;

import java.util.ArrayList;

public class CoffeeService extends IntentService {
    public final static String INTENT_GET_DATA = "com.alexzh.simplecoffeeorder.GET_DATA";
    public final static String INTENT_DATA = "data";

    public CoffeeService() {
        super("CoffeeService");
    }

    @Override
    protected void onHandleIntent(Intent intent) {
        SystemClock.sleep(3000);

        Intent replyIntent = new Intent(INTENT_GET_DATA);
        replyIntent.putExtra(INTENT_DATA, getCoffeeData());

        LocalBroadcastManager manager = LocalBroadcastManager.getInstance(this);
        manager.sendBroadcast(replyIntent);
    }


    public final static ArrayList<Coffee> getCoffeeData() {
        ArrayList<Coffee> list = new ArrayList<>();
        list.add(new Coffee("Espresso", 5.0f));
        list.add(new Coffee("Americano", 4.5f));
        list.add(new Coffee("Latte", 5.5f));
        list.add(new Coffee("Mocha", 7.5f));
        list.add(new Coffee("Cappuccino", 9.5f));
        list.add(new Coffee("Vacuum coffee", 12.0f));
        list.add(new Coffee("Café Cubano", 9.0f));
        list.add(new Coffee("Cafe Zorro", 6.0f));
        list.add(new Coffee("Guillermo", 3.0f));
        return list;
    }
}
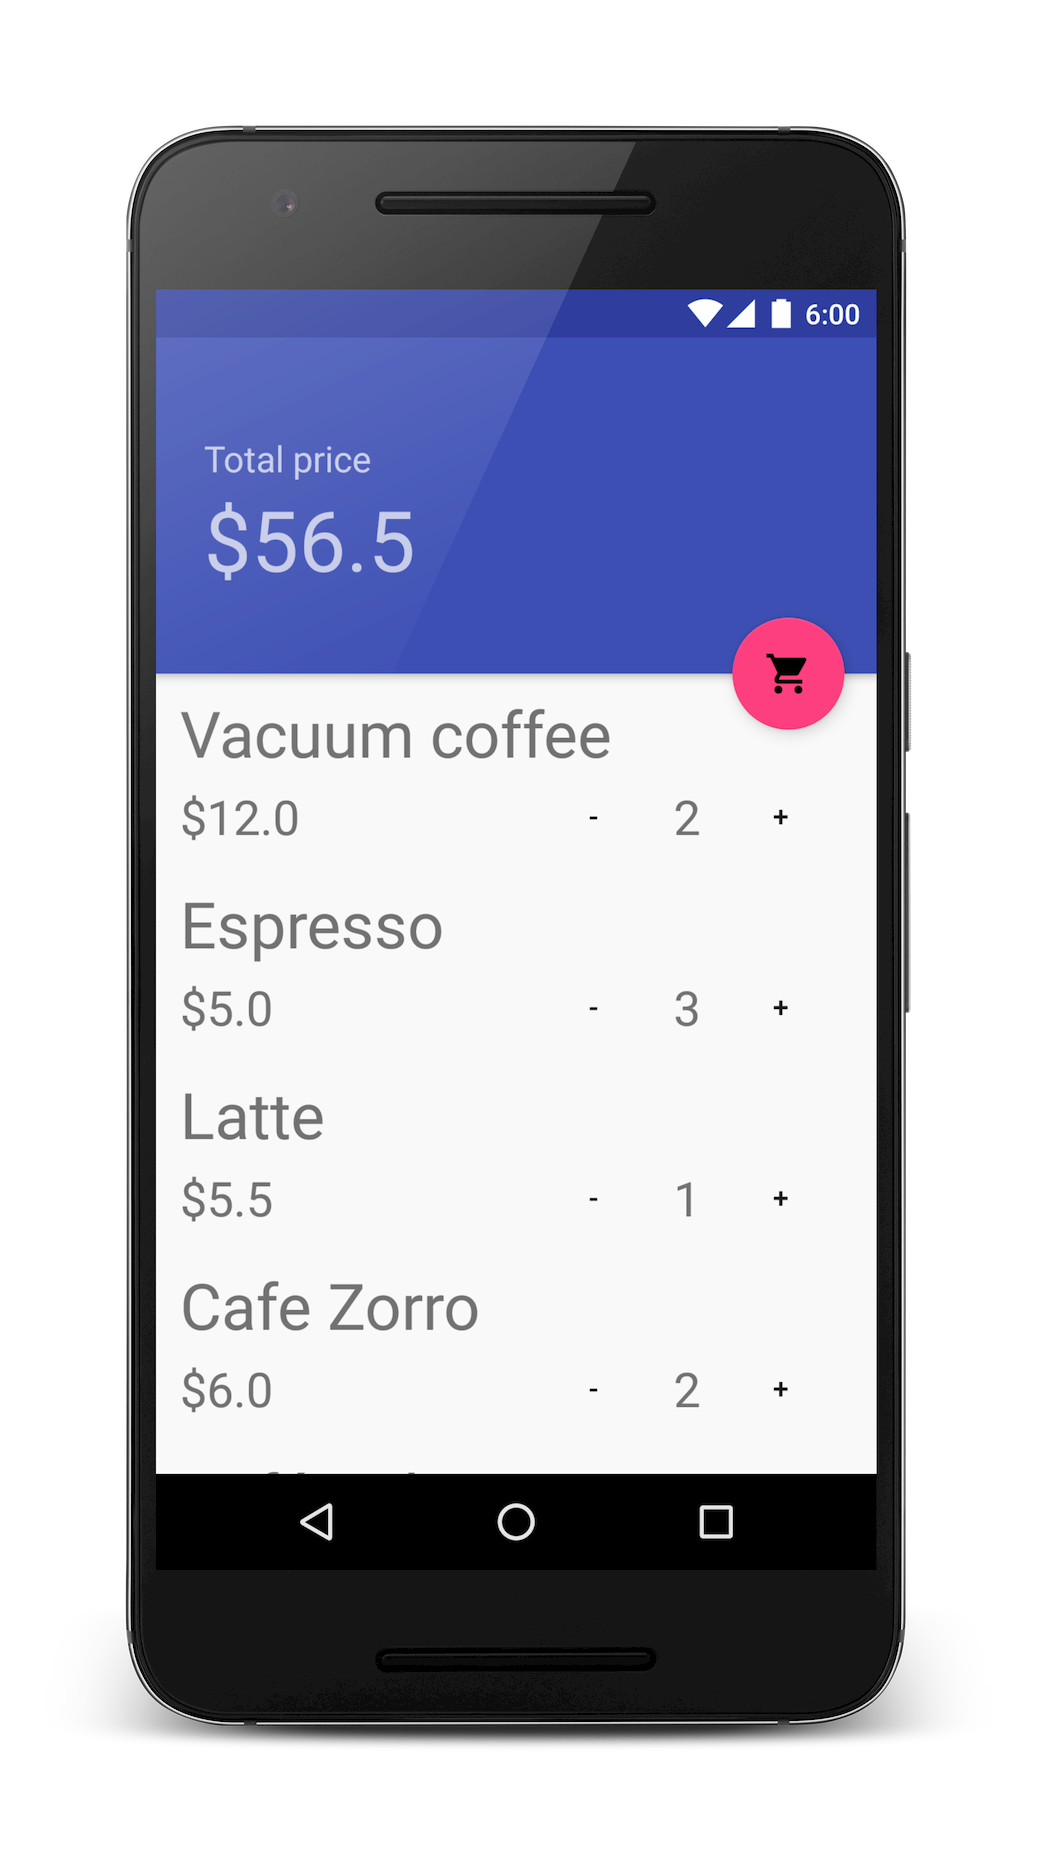
The application shows the list of different coffees with prices.
First of all we want to click to view inside the item, better way create custom action for it.
public static ViewAction clickByChildViewWithId(final int id) {
    return new ViewAction() {
        @Override
        public Matcher<View> getConstraints() {
            return null;
        }

        @Override
        public String getDescription() {
            return "Click on a child of a view with id.";
        }

        @Override
        public void perform(UiController uiController, View view) {
            View v = view.findViewById(id);
            if (v != null) {
                v.performClick();
            }
        }
    };
}
Secondly we want to check text on view inside the item, we can create additional action for it.
public static ViewAction checkTextViewByChildViewWithId(final int id, final String text) {
    return new ViewAction() {
        @Override
        public Matcher<View> getConstraints() {
            return null;
        }

        @Override
        public String getDescription() {
            return "Check a child of a view with id.";
        }

        @Override
        public void perform(UiController uiController, View view) {
            TextView v = (TextView) view.findViewById(id);
            if (v != null) {
                assertEquals(text, v.getText().toString());
           }
        }
    };
}
I also created two two simple methods for more convenient work with these actions.
clickToViewChildItem(int recyclerViewId, String item, int childId) {
    onView(withId(recyclerViewId))
        .perform(RecyclerViewActions.actionOnItem(
             hasDescendant(withText(item)),
             RecyclerChildViewActions.clickByChildViewWithId(childId)));
}

public static void checkTextViewCountForCoffee(int recyclerViewId, int childId, String coffee, String count) {
    onView(withId(recyclerViewId))
        .perform(RecyclerViewActions.actionOnItem(
             hasDescendant(withText(coffee)),
             RecyclerChildViewActions.checkTextViewByChildViewWithId(childId, count)));
}
Finally, I want to show simple espresso test for checking this activity
@RunWith(AndroidJUnit4.class)
public class MainActivityTest {
    private List<Coffee> mCoffeeList;
    private ServiceIdlingResource mServiceIdlingResource;

    @Rule
    public ActivityTestRule<MainActivity> mActivityRule =
            new ActivityTestRule<>(MainActivity.class);

    @Before
    public void setup() {
        mCoffeeList = CoffeeService.getCoffeeData();

        mServiceIdlingResource =
                new ServiceIdlingResource(mActivityRule.getActivity().getApplicationContext());
        registerIdlingResources(mServiceIdlingResource);
    }

    @Test
    public void shouldDisplayCoffeeOrderList() {
        onView(withId(R.id.recyclerView))
            .perform(RecyclerViewActions.scrollToPosition(mCoffeeList.size() - 1));

        for (Coffee coffee : mCoffeeList) {
            onView(withId(R.id.recyclerView))
                .perform(RecyclerViewActions.actionOnItem(
                    hasDescendant(withText(coffee.getName())),
                    checkTextViewByChildViewWithId(R.id.coffee_count, "0")
                ));
        }
    }

    @Test
    public void shouldOrderEspressoAndCafeZorro() {
        int coffeeCount = 0;
        float totalCoffeePrice = 0.0f;
        final String espresso = mCoffeeList.get(0).getName();
        final float espressoPrice = mCoffeeList.get(0).getPrice();

        final String coffeeZoro = mCoffeeList.get(7).getName();
        final float coffeeZoroPrice = mCoffeeList.get(7).getPrice();

        totalCoffeePrice += espressoPrice;
        changeToCoffeeOrderCountAndVerify(espresso, ++coffeeCount, totalCoffeePrice, R.id.coffee_increment);

        totalCoffeePrice += espressoPrice;
        changeToCoffeeOrderCountAndVerify(espresso, ++coffeeCount, totalCoffeePrice, R.id.coffee_increment);

        totalCoffeePrice -= espressoPrice;
        changeToCoffeeOrderCountAndVerify(espresso, --coffeeCount, totalCoffeePrice, R.id.coffee_decrement);

        totalCoffeePrice -= espressoPrice;
        changeToCoffeeOrderCountAndVerify(espresso, --coffeeCount, totalCoffeePrice, R.id.coffee_decrement);

        totalCoffeePrice += coffeeZoroPrice;
        changeToCoffeeOrderCountAndVerify(coffeeZoro, ++coffeeCount, totalCoffeePrice, R.id.coffee_increment);
    }

    @After
    public void tearDown() {
        unregisterIdlingResources(mServiceIdlingResource);
    }

    private void changeToCoffeeOrderCountAndVerify(String coffeeName, int coffeeCount, float totalCoffeePrice, int clickedViewId) {
        clickToViewChildItem(R.id.recyclerView, coffeeName, clickedViewId);
        checkTextViewCountForCoffee(R.id.recyclerView, R.id.coffee_count, coffeeName, String.valueOf(coffeeCount));
        onView(withId(R.id.total_price_toolbar)).check(matches(withText(getString(mActivityRule, R.string.price, totalCoffeePrice))));
    }
}
You can find more espresso tests here.
GitHub: Project with tests.
Resources:
Thank you for your time.
Have a nice day.