Introduction
Notifications is a powerful mechanism of Android OS and a great tool which gives benefits to Users and Developers.
Notifications are part of a system; it means that you can interact with a user when you have valuable information. It can be used as an additional part of your application because you could provide additional information even when or if the User doesn't interact with your application.

Let us explore Android history from the Notification point of view. We can see that notification was changed significantly. Initially, this component display information with small opportunity for interaction. Nowadays we can display different types of data in different ways and provide additional actions for the User. We can split all notification into different channels. Any User can control which alerts will be displayed starting with Android Oreo (API 26). It means that we as a Developers should group our notifications well. Otherwise, we can have a situation when all of them will be turn off.

Android OS can display notifications on the home screen, lock screen, wearable devices, etc.
The "Notification badge" is a feature that adds "badge" to the application icon when the app has a notification.
We will discuss all these topics in the guide. A demo app available on the GitHub repository: NotificationDemo.
Every notification in Android Oreo or later needs a channel.
Let us start with creating a channel and sending a notification with title, description and icon. Later on, we will extend an existing one with additional features.
Creating a notifications
Notification Channels
Creating a new channel
First of all, you should register channel(s) if you want to send any notification on devices with Android Oreo (8.0) or higher. We can do it using a createNotificationChannel() method from a NotificationChannel class.
private final static String APP_PACKAGE = "com.alexzh.tutorial.notificationdemo";
private final static String CITIES_CHANEL_ID = APP_PACKAGE + ".CITIES_CHANNEL";
private final static String APP_CHANEL_ID = APP_PACKAGE + ".APP_CHANNEL";

...

NotificationChannel channel = new NotificationChannel(
    chanelId,
    chanelName,
    chanelImportance);
channel.setDescription(chanelDescription);
We can improve the code a little bit when we would like to register multiple channels by adding function for creating channels, and you should remember that this API is available only for Android 8.0 (API 26).
@RequiresApi(api = Build.VERSION_CODES.O)
private NotificationChannel createAppNotificationChanel(
    final String chanelId,
    final String chanelName,
    final String chanelDescription,
    final int chanelImportance
) {
    NotificationChannel channel = new NotificationChannel(chanelId, chanelName, chanelImportance);
    channel.setDescription(chanelDescription);
    return channel;
}

@RequiresApi(api = Build.VERSION_CODES.O)
private void createNotificationChannels() {
    final List<NotificationChannel> channels = new ArrayList<>();
    channels.add(createAppNotificationChanel(
        CITIES_CHANEL_ID,
        "Cities",
        "Information about cities",
        NotificationManagerCompat.IMPORTANCE_HIGH)
    );

    channels.add(createAppNotificationChanel(
        APP_CHANEL_ID,
        "Application",
        "General app updates",
        NotificationManagerCompat.IMPORTANCE_DEFAULT)
    );

    final NotificationManager notificationManager = (NotificationManager)
            mContext.getSystemService(Context.NOTIFICATION_SERVICE);

    if (notificationManager != null) {
        notificationManager.createNotificationChannels(channels);
    }
}
After executing this code, we will register two channels (Application and Cities) for our application.
Deleting an existing notification channel
Some of the existing channels can be deprecated and not used any more; it means that we can remove them.
private final static String APP_PACKAGE = "com.alexzh.tutorial.notificationdemo";
private final static String CITIES_CHANEL_ID = APP_PACKAGE + ".CITIES_CHANNEL";

final NotificationManager notificationManager = (NotificationManager) mContext.getSystemService(Context.NOTIFICATION_SERVICE);
notificationManager.deleteNotificationChannel(CITIES_CHANEL_ID);
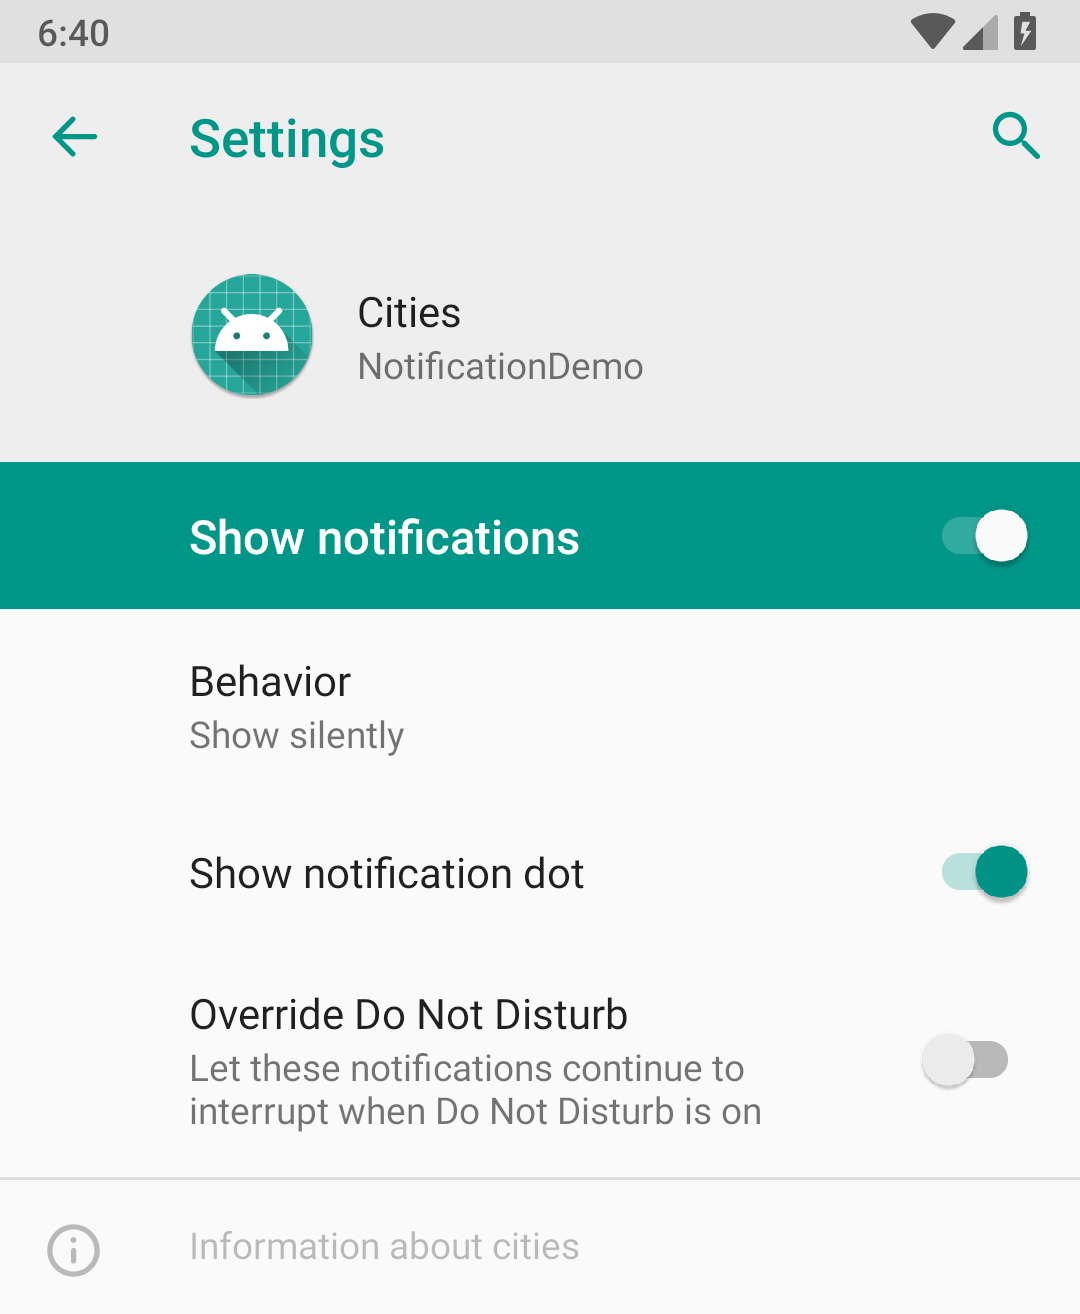
Navigate User to channel settings
We can have a situation when we would like to navigate a User to the channel settings.
private final static String APP_PACKAGE = "com.alexzh.tutorial.notificationdemo";
private final static String CITIES_CHANEL_ID = APP_PACKAGE + ".CITIES_CHANNEL";

final Intent citiesChannelIntent = new Intent(Settings.ACTION_CHANNEL_NOTIFICATION_SETTINGS);
citiesChannelIntent.putExtra(Settings.EXTRA_CHANNEL_ID, CITIES_CHANEL_ID);
citiesChannelIntent.putExtra(Settings.EXTRA_APP_PACKAGE, APP_PACKAGE);
mContext.startActivity(citiesChannelIntent);
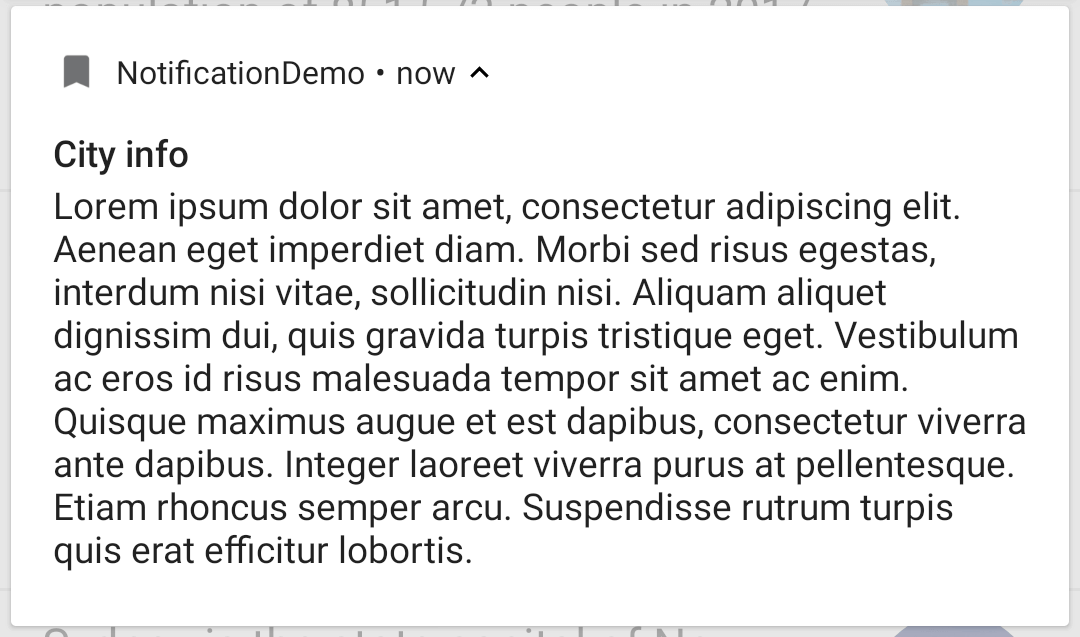
Title, Content, Image
We can start to create a notification after registering channel(s) because after it notifications can be sent on any devices.
Let us check an image with sample notification.
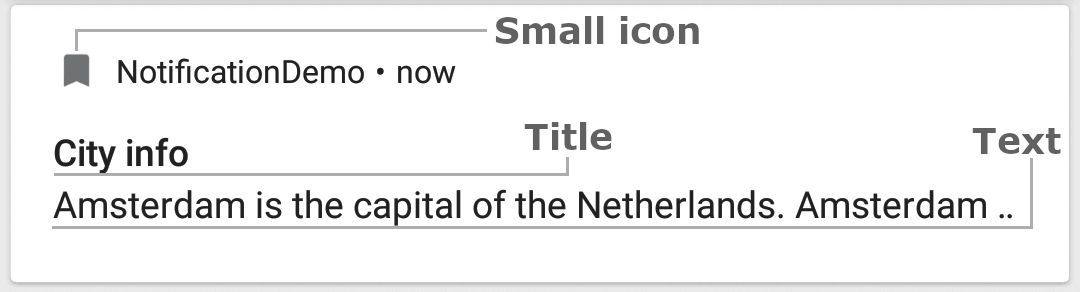
As you can see we can find the following part of the fundamental notification:
- title
- text
- icon
In addition to it we can set a priority and a style for our notification. The priority can be configured to any notification before Android 8.0 and starting with this version of OS we can set priority only for channels.
I recommend using the
NotificationCompatclass for working with Notifications because they can be sent on any device. However, we should add a new dependency.
implementation "com.android.support:support-compat:27.1.1"
We can use NotificationCompat.Builder for creating any notification.
NotificationCompat.Builder notificationBuilder = NotificationCompat.Builder(mContext, CITIES_CHANEL_ID)
    .setSmallIcon(R.drawable.ic_notification)
    .setContentTitle(mContext.getString(R.string.notification_title))
    .setContentText(info)
    .build();
In the case when you want to add a priority; you can call setPriority with one of the following keys:
- Less important:
NotificationCompat.PRIORITY_MIN(int: -2)NotificationCompat.PRIORITY_LOW(int: -1)- Important:
NotificationCompat.PRIORITY_DEFAULT(int: 0)- More important:
NotificationCompat.PRIORITY_HIGH(int: 1)NotificationCompat.PRIORITY_MAX(int: 2)
We can pass values in a range -2 .. 2 to the setPriority method.
Finally, we can send the notification:
final NotificationManager notificationManager = (NotificationManager) mContext.getSystemService(Context.NOTIFICATION_SERVICE);

if (notificationManager != null) {
    notificationManager.notify(NOTIFICATION_ID, notification);
}
Notification will be replaced if you will use the same ID for multiple notifications.
Notification Styles
Let us check different styles of notifications.
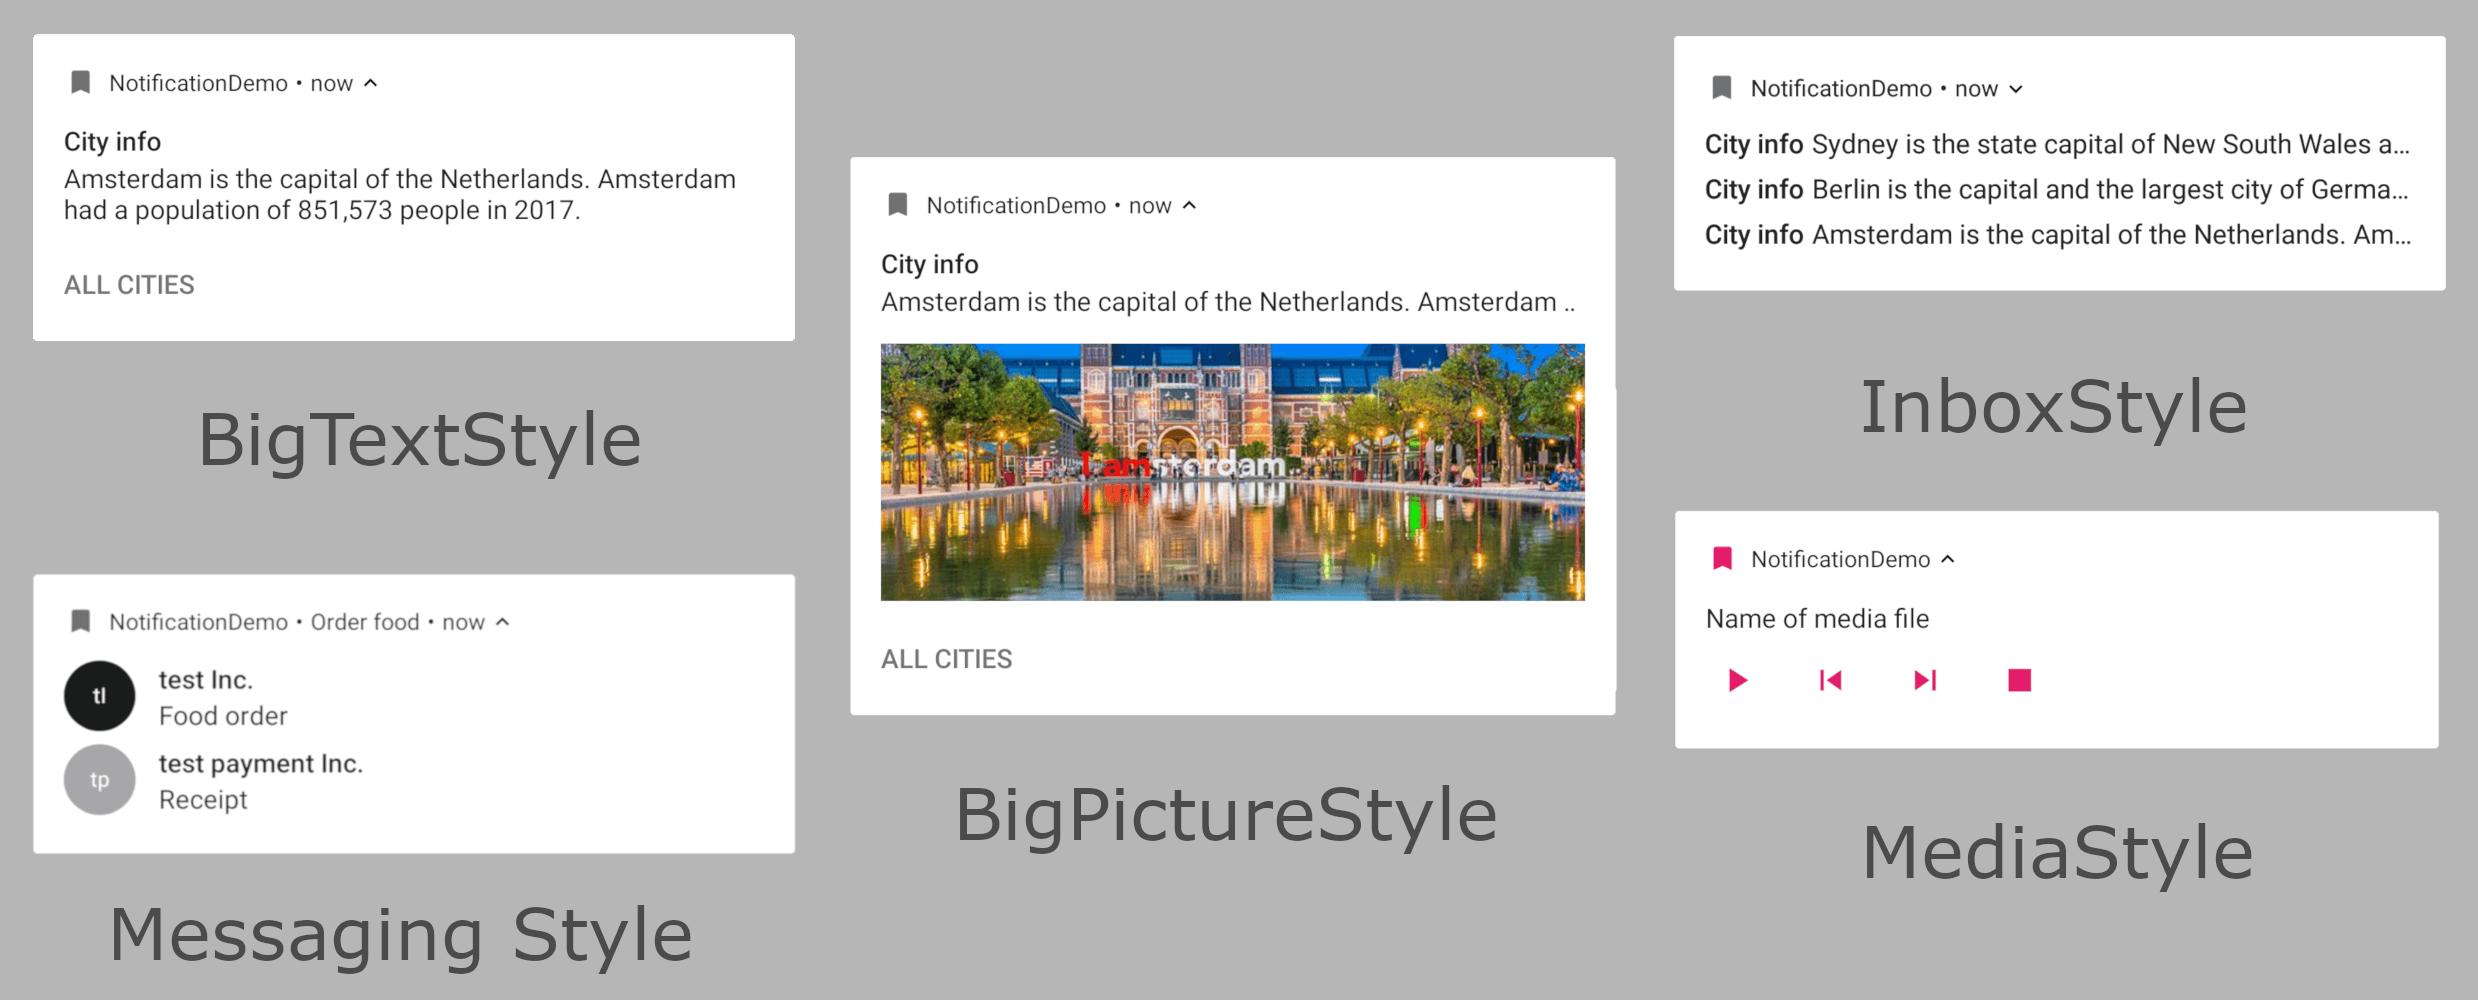
We can apply one of notification style using a setStyle method. The picture above demonstrates different styles.
BigTextStyle
The BigTextStyle uses for generating a large-format notification that usually includes a lot of text.
NotificationCompat.Builder(mContext, CITIES_CHANEL_ID)
    .setSmallIcon(R.drawable.ic_notification)
    .setContentTitle(mContext.getString(R.string.notification_title))
    .setContentText(info)
    .setStyle(new NotificationCompat.BigTextStyle())
    ...
    .build();
BigPictureStyle

The BigPictureStyle uses for generating a large-format notification that usually includes a large image.
Bitmap image = BitmapFactory.decodeResource(mContext.getResources(), R.drawable.amsterdam);
NotificationCompat.BigPictureStyle style = new NotificationCompat.BigPictureStyle().bigPicture(image);

NotificationCompat.Builder(mContext, CITIES_CHANEL_ID)
    .setSmallIcon(R.drawable.ic_notification)
    .setContentTitle(mContext.getString(R.string.notification_title))
    .setContentText(info)
    .setStyle(style)
    ...
    .build();
InboxStyle
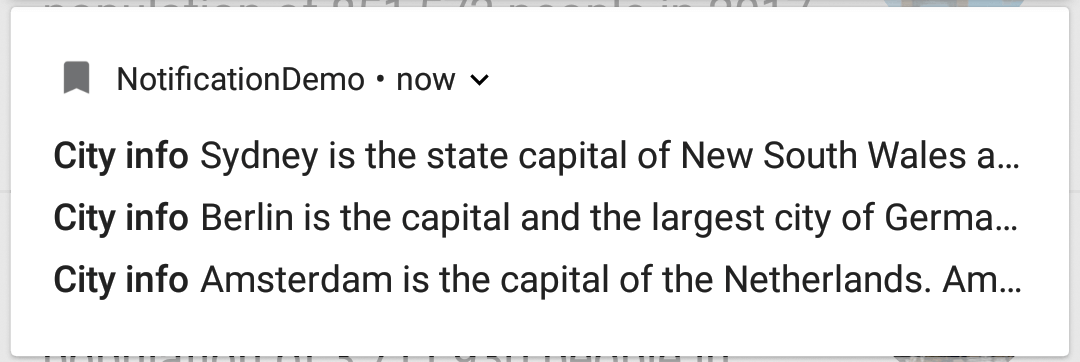
The InboxStyle uses for generating a large-format notification that includes a list of (up to 5) strings.
NotificationCompat.Builder(mContext, CITIES_CHANEL_ID)
    .setSmallIcon(R.drawable.ic_notification)
    .setContentText("5 new cities")
    .setStyle(new NotificationCompat.InboxStyle())
    ...
    .build();
MessagingStyle

The MessagingStyle uses for generating a large-format notification that includes multiple messages from different people.
NotificationCompat.MessagingStyle messagingStyle = new NotificationCompat.MessagingStyle("Alex")
    .setConversationTitle("Order food")
    .addMessage("Food order ", orderTimestamp, "test Inc.")
    .addMessage("Receipt", receiptTimestamp, "test payment Inc.");

NotificationCompat.Builder(mContext, CITIES_CHANEL_ID)
    .setSmallIcon(R.drawable.ic_notification)
    .setContentTitle(mContext.getString(R.string.action_notification))
    .setContentText(message)
    .setStyle(messagingStyle)
    ...
    .build();
MediaStyle
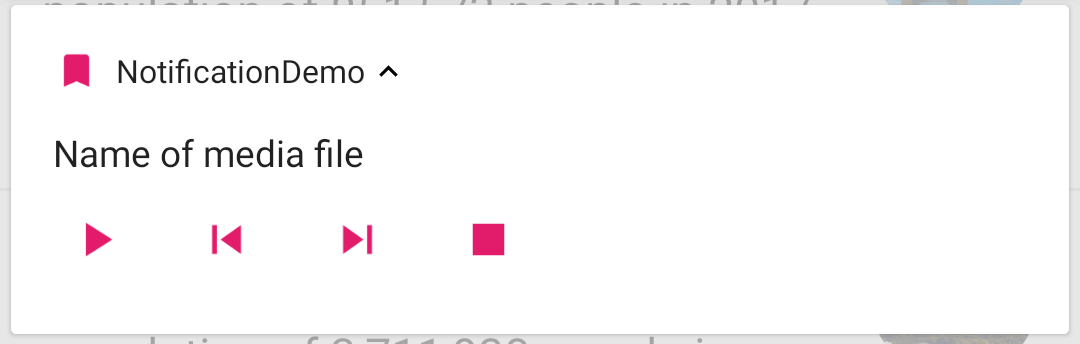
The MediaStyle uses for media playback notifications.
Notification.Action play = ...
Notification.Action stop = ...
Notification.Action nextTrack = ...
Notification.Action prevTrack = ...

NotificationCompat.Builder(mContext, CITIES_CHANEL_ID)
    .setSmallIcon(R.drawable.ic_notification)
    .setContentTitle(mContext.getString(R.string.notification_title))
    .setContentText(info)
    .setActions(play, prevTrack, nextTrack, stop)
    .setStyle(new Notification.MediaStyle())
    ...
    .build();
Notification Actions
The main problem with a current solution that we cannot interact with the notification. Let us fix this problem by adding PendingIntent.
final Intent detailCityIntent = new Intent(mContext, DetailActivity.class);
detailCityIntent.putExtra(DetailActivity.CITY_ID, city.getId());

PendingIntent detailPendingIntent = PendingIntent.getActivity(
    mContext,
    0,
    detailCityIntent,
    PendingIntent.FLAG_CANCEL_CURRENT
);

NotificationCompat.Builder notificationBuilder = NotificationCompat.Builder(mContext, CITIES_CHANEL_ID)
    .setSmallIcon(R.drawable.ic_notification)
    .setContentTitle(mContext.getString(R.string.notification_title))
    .setContentText(info)
    .setContentIntent(detailPendingIntent)
    .build();

NotificationManager notificationManager = (NotificationManager) mContext.getSystemService(Context.NOTIFICATION_SERVICE);
notificationManager.notify(NOTIFICATION_ID, notification);
PengindIntent can have one of the following flags:
FLAG_CANCEL_CURRENT- flag indicating that if the described PendingIntent already exists, the current one should be canceled before generating a new one.FLAG_NO_CREATE- flag indicating that if the described PendingIntent does not already exist, then simply return null instead of creating it.FLAG_UPDATE_CURRENT- flag indicating that if the described PendingIntent already exists, then keep it but replace its extra data with what is in this new Intent.FLAG_IMMUTABLE- flag indicating that the created PendingIntent should be immutable. This means that the additional intent argument passed to the send methods to fill in unpopulated properties of this intent will be ignored.FLAG_ONE_SHOT- flag indicating that this PendingIntent can be used only once.
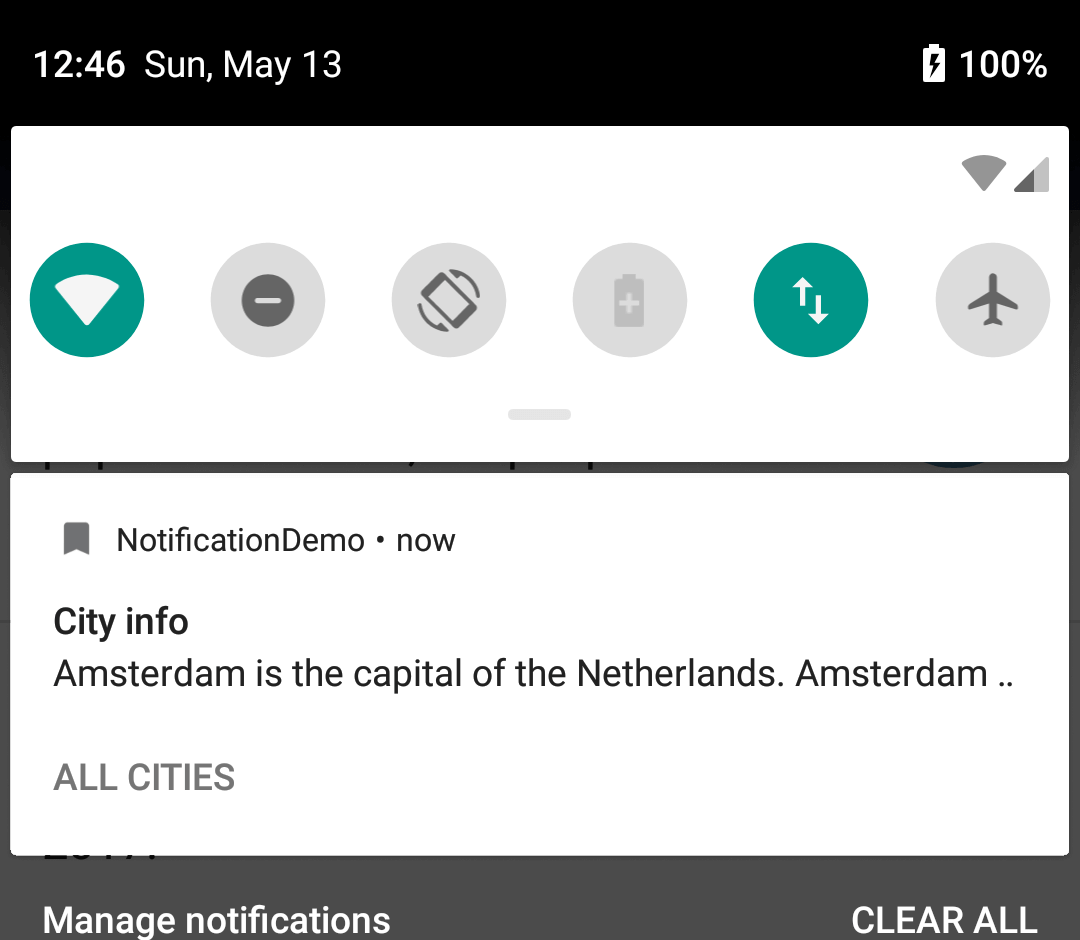
We can add actions to our notification. Let us improve our notification and add action which allows us to move to "All cities".
We should create an Action and put it into the NotificationCompat.Builder. Each action should have:
- icon
- title
- action intent
Let us create an action object.
final Intent allCitiesIntent = new Intent(mContext, MainActivity.class);
allCitiesIntent.putExtra(MainActivity.NOTIFICATION_ID_STR, MainActivity.NOTIFICATION_ID);

final PendingIntent allCitiesPendingIntent = PendingIntent.getActivity(
    mContext,
    0,
    allCitiesIntent,
    PendingIntent.FLAG_CANCEL_CURRENT
);

final NotificationCompat.Action allCitiesIntent = new NotificationCompat.Action(
    R.drawable.ic_notification,
    mContext.getString(R.string.action_all_cities),
    allCitiesPendingIntent
);
The last step is adding the action to the notification. We can use two ways of doing it by using an Action object or passing few action parameters into addAction method.
NotificationCompat.Builder notificationBuilder = NotificationCompat.Builder(mContext, CITIES_CHANEL_ID)
    ...
    .addAction(allCitiesPendingIntent)
    .build();
Another way is a passing icon, title and action intent to addAction method.
NotificationCompat.Builder(mContext, CITIES_CHANEL_ID)
        ...
        .addAction(
                R.drawable.ic_notification,
                mContext.getString(R.string.action_all_cities),
                allCitiesPendingIntent)
        .build();
Finally, we can interact with our notification and "All ciites" action.
Notification Groups
All notifications don't group by default.
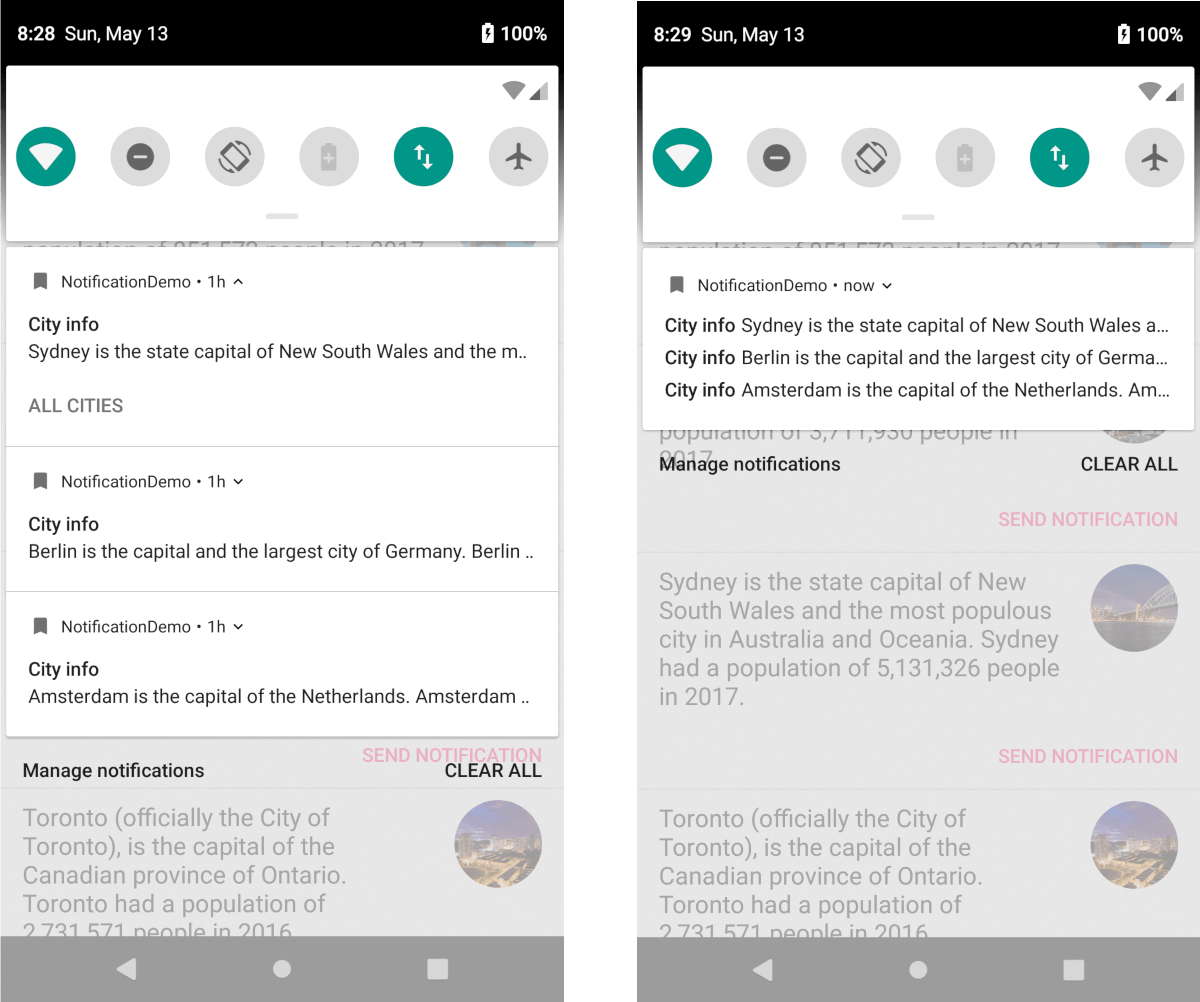
However, it is possible to group them on the application level. Let us try to do it for all notifications.
First of all, we should create a unique group key, which is a string value and update required notifications.
private final static String GROUP_KEY_CITIES = APP_CHANEL_ID + ".CITIES_GROUP";

...

NotificationCompat.Builder notificationBuilder = NotificationCompat.Builder(mContext, GROUP_KEY_CITIES)
    ...
    .setGroup(GROUP_KEY_CITIES)
    .build();
Afterwards, we should create a summary notification.
final Notification summaryNotification = new NotificationCompat.Builder(mContext, CITIES_CHANEL_ID)
    .setSmallIcon(R.drawable.ic_notification)
    .setStyle(new NotificationCompat.InboxStyle())
    .setGroup(GROUP_KEY_CITIES)
    .setGroupSummary(true)
    .build();
However, in the case when you support devices less than Android 7.0 (API 24), you should add setContentText(SUMMARY).
Notifications group automatically if we have more then four notifications from the same app.
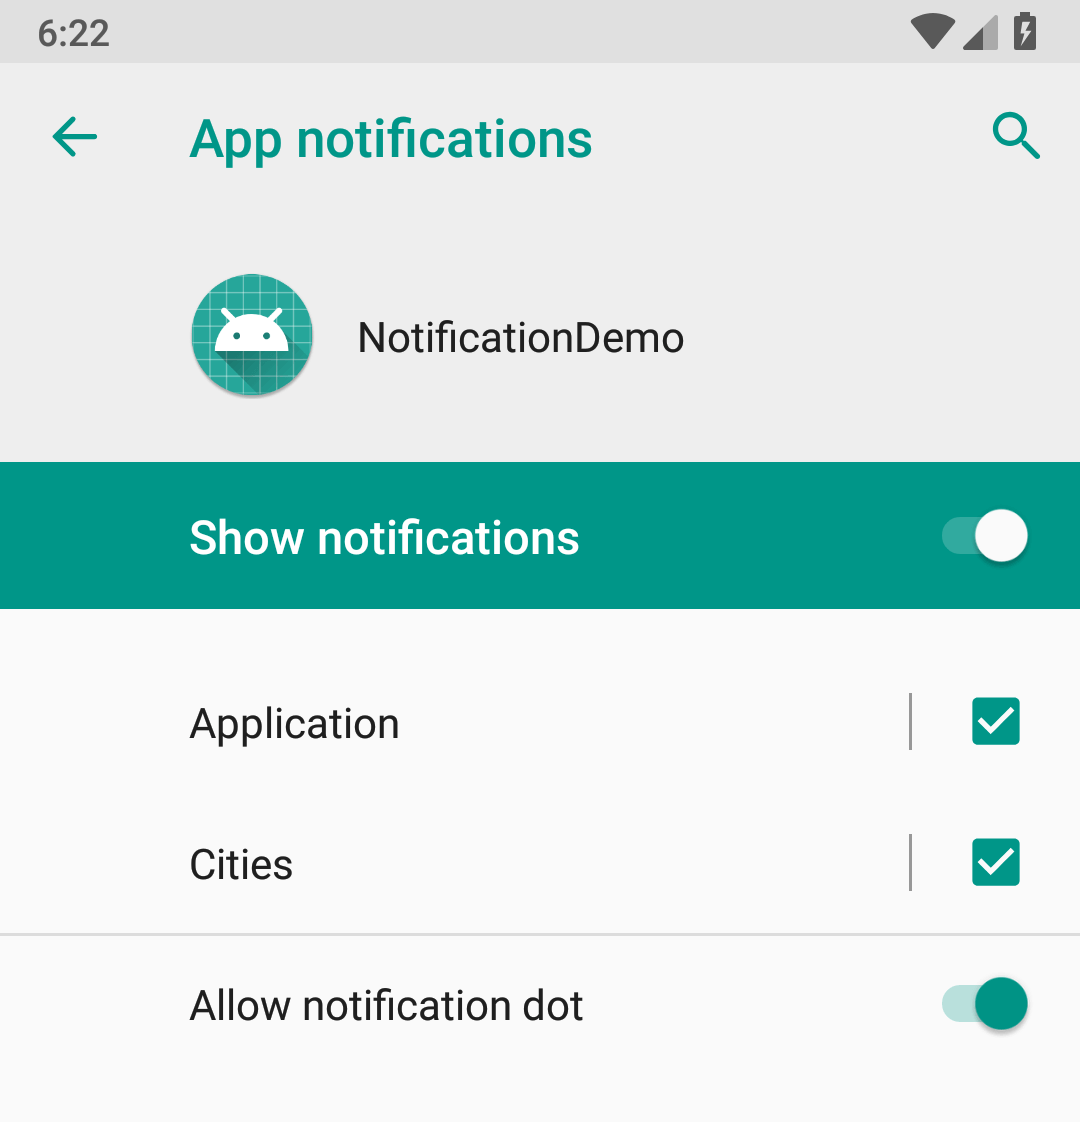
Notification Badge
Notification Badges (also known as notification Dots) appears on application launchers icon, and it allows users be informed about pending notification for the app. Users can interact with this notification in a similar way as with usual ones.
The notification badge updated when any notification is available for your application.
We as developers have additional possibilities for customisation behaviour of this feature.
Showing badge
Notification badges are connected with channels, it means that if you want to change the behaviour of the channel which was register previously, you should create a new channel.
When you don't want to show badge for a notification channel you can use a setShowBadge(boolean) method.
NotificationChannel channel = new NotificationChannel(
    chanelId,
    chanelName,
    chanelImportance
);
channel.setDescription(chanelDescription);
channel.setShowBadge(false);
Notification count
We can change a count of notification which displays on the pop-up menu with notifications. It can be useful when you send just one notification for many actions, like notification with a count of unread messages.
<pre class="EnlighterJSRAW" data-enlighter-language="java">Notification notification = new NotificationCompat.Builder(mContext, CITIES_CHANEL_ID)
    .setSmallIcon(R.drawable.ic_notification)
    .setContentTitle(mContext.getString(R.string.notification_title))
    .setContentText("5 new cities")
    .setNumber(5)
    .build();
Badge Icon Type
We can customise badge a little bit. We have few possibility for setting up the type of the icon with setBadgeIconType for the notification. However, this value can be ignored, if launcher does not support it.
Values which can be used for setBadgeIconType(int) method:
BADGE_ICON_NONE(Integer: 0)BADGE_ICON_SMALL(Integer: 1)BADGE_ICON_LARGE(Integer: 2)
Customisations of the notifications
We have many possibilities for customisation notifications and channels. I would like to show to you common possibilities as an overview.
Notification channels:
- Notification Lights - an enableLights allows you to enable notification lights if a device support it. Additionally, you can choose a light color use setLightColor.
- Notification Vibration - an enableVibration allows you to enable vibration and a setVibrationPattern allows you to change the vibration pattern.
- Notification Importance - a setImportance allows you to set importance for the current notification channel and you retrieve current importance use getImportance.
- Notification Sound - a setSound allows you to set the sound for all notification for the required channel and getSound retrieve current sound settings.
- Lock Screen Visibility - a setLockScreenVisibility allows you to set the lock screen visibility for all notifications for the current channel and you retrieve current visibility setting with getLockscreenVisibility.
- Show Badge - a canShowBadge allows you to change the possibility of showing badges for the current channel.
Notifications:
- Colorized notification - a setColorized can be used when notification should be colorized. Additionally, a setColor method allows you to set color for colorized notification.
You can set light, vibration and sound for a single notification. However, I recommend configure whole notification channel with light, vibration and sound if it is needed for you.
Best practices
- Send notification bundle when you have many notifications, it improves interaction with your app on wearable devices;
- Use unique
request codefor different notifications; it allows you to ensure that intents will be different for each notification; - Check Material design: Notification;
- Test your code (Guide: Testing Android Notifications).