Today, I’m talking about Navigation drawer.
The navigation drawer is a panel that displays the app’s main navigation options on the left edge of the screen. It is hidden most of the time, but it is revealed when the user swipes a finger from the left edge of the screen or, while at the top level of the app, the user touches the app icon in the action bar.
STEP 1: Add library to the project
Firstly need to add library to gradle file for a project.
dependencies {
    compile 'com.android.support:design:22.2.0'
}
STEP 2: Create layouts for NavigationDrawer
After it need to update layout for the main activity or fragment for our project.
<android.support.v4.widget.DrawerLayout
    xmlns:android="http://schemas.android.com/apk/res/android"
    xmlns:app="http://schemas.android.com/apk/res-auto"
    android:id="@+id/drawerLayout"
    android:layout_width="match_parent"
    android:layout_height="match_parent">

    <LinearLayout
        android:layout_width="match_parent"
        android:layout_height="match_parent"
        android:orientation="vertical">

        <include
            layout="@layout/toolbar" />

        <FrameLayout
            android:id="@+id/container"
            android:layout_width="match_parent"
            android:layout_height="match_parent"/>

    </LinearLayout>

    <android.support.design.widget.NavigationView
        android:id="@+id/navigation"
        android:layout_width="wrap_content"
        android:layout_height="match_parent"
        android:layout_gravity="start"
        app:headerLayout="@layout/drawer_header"
        app:menu="@menu/drawer" />

</android.support.v4.widget.DrawerLayout>
I strongly recommend to use toolbar for the applications. You can store toolbar in separate file, for example, toolbar.xml.
File res/layout/toolbar.xml contain next source code.
<android.support.v7.widget.Toolbar
    xmlns:android="http://schemas.android.com/apk/res/android"
    android:id="@+id/toolbar"
    android:layout_height="wrap_content"
    android:layout_width="match_parent"
    android:minHeight="?attr/actionBarSize"
    android:theme="@style/Base.ThemeOverlay.AppCompat.Dark"
    android:layout_alignParentTop="true"
    android:layout_centerHorizontal="true"
    android:background="?attr/colorPrimary" />
Component NavigationView also contains header layout and menu. Next step is creating these 2 files.
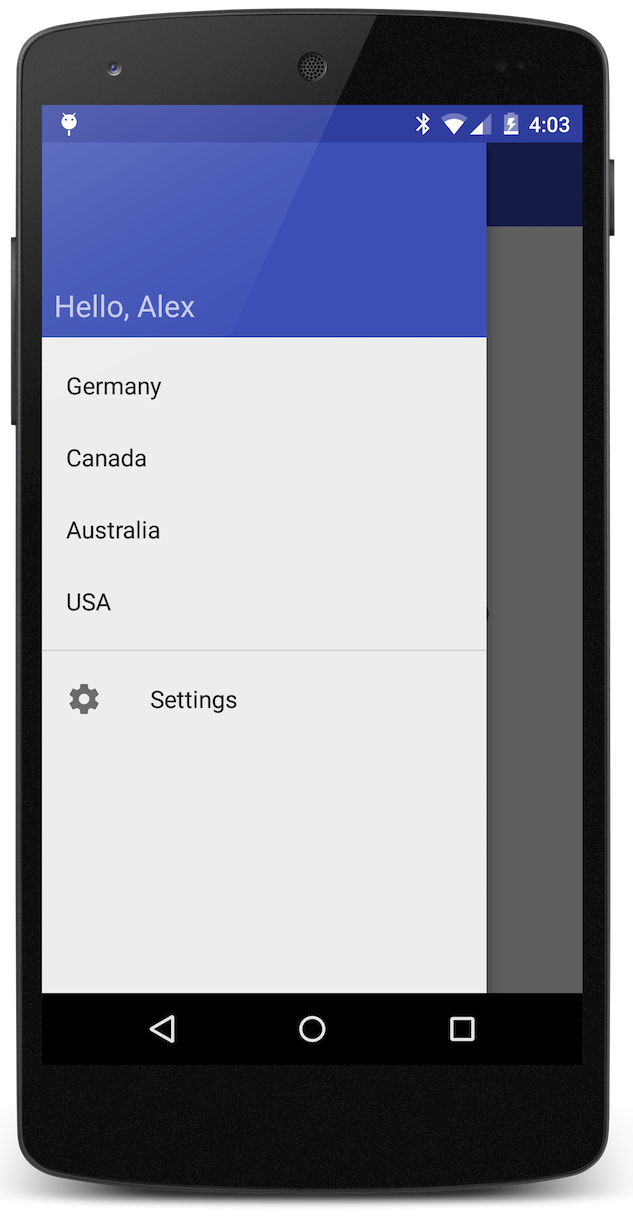
We must create header layout in the layout folder. I called this file drawer_header.xml. Source code of this file is next:
<?xml version="1.0" encoding="utf-8"?>
<RelativeLayout xmlns:android="http://schemas.android.com/apk/res/android"
    android:layout_width="match_parent"
    android:layout_height="130dp"
    android:background="?attr/colorPrimary"
    android:padding="8dp"
    android:theme="@style/ThemeOverlay.AppCompat.Dark">

    <TextView
        android:text="Hello, Alex"
        android:textSize="20sp"
        android:layout_width="match_parent"
        android:layout_height="wrap_content"
        android:layout_alignParentBottom="true"
        android:layout_alignParentLeft="true"
        android:layout_alignParentStart="true" />

</RelativeLayout>
STEP 3: Create menu for NavigationDrawer
If you want to display some item of menu separated of general menu you must create a new group in menu file. It will look like:
<menu xmlns:android="http://schemas.android.com/apk/res/android"
    xmlns:tools="http://schemas.android.com/tools"
    tools:context="com.androidrey.repositorypractice.MainActivity">

    <group android:id="@+id/general">
    	MENU_ITEM
    </group>

    <group android:id="@+id/special">
        MENU_ITEM
    </group>
</menu>
We must create menu for NavigationView. We must create menu in folder /res/menu. I called this file a drawer.xml. Source code of this file is next:
<menu xmlns:android="http://schemas.android.com/apk/res/android"
    xmlns:tools="http://schemas.android.com/tools"
    tools:context="com.alexzh.navigationdrawertutorial.MainActivity">

    <group
        android:checkableBehavior="single"
        android:id="@+id/general">
        <item
            android:id="@+id/item_germany"
            android:title="Germany" />
        <item
            android:id="@+id/item_canada"
            android:title="Canada" />
        <item
            android:id="@+id/item_australia"
            android:title="Australia" />
        <item
            android:id="@+id/item_usa"
            android:title="USA" />
    </group>

    <group android:id="@+id/special">
        <item
            android:id="@+id/item_settings"
            android:icon="@drawable/ic_settings_black_48dp"
            android:title="Settings" />
    </group>
</menu>
STEP 4: Create Fragment for MainActivity
Next step is creating fragment for main activity.
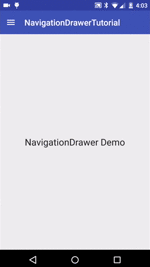
Layout for MainFragment is called fragment_main.xml. Source code of this layout is next.
<?xml version="1.0" encoding="utf-8"?>
<RelativeLayout xmlns:android="http://schemas.android.com/apk/res/android"
    android:orientation="vertical" android:layout_width="match_parent"
    android:layout_height="match_parent">

    <TextView
        android:layout_width="wrap_content"
        android:layout_height="wrap_content"
        android:textAppearance="?android:attr/textAppearanceLarge"
        android:text="NavigationDrawer Demo"
        android:id="@+id/textView"
        android:layout_centerVertical="true"
        android:layout_centerHorizontal="true" />
</RelativeLayout>
The MainFragment class contain next source code.
public class MainFragment extends Fragment {

    @Override
    public View onCreateView(LayoutInflater inflater, ViewGroup container, Bundle savedInstanceState) {
        View view = inflater.inflate(R.layout.fragment_main, container, false);
        return view;
    }
}
STEP 5: Create CountryFragment
Next step is creating fragment and layout for displaying country name.
Layout is called fragment_country and this file contains next source code.
<?xml version="1.0" encoding="utf-8"?>
<RelativeLayout xmlns:android="http://schemas.android.com/apk/res/android"
    android:orientation="vertical" android:layout_width="match_parent"
    android:layout_height="match_parent">

    <TextView
        android:layout_width="wrap_content"
        android:layout_height="wrap_content"
        android:textAppearance="?android:attr/textAppearanceLarge"
        android:text="Large Text"
        android:id="@+id/country_textView"
        android:layout_centerVertical="true"
        android:layout_centerHorizontal="true" />
</RelativeLayout>
The CountryFragment class contains next source code.
public class CountryFragment extends Fragment {

    private final static String COUNTRY = "country";

    public static Fragment newInstance(String country) {
        Fragment fragment = new CountryFragment();
        Bundle args = new Bundle();
        args.putString(COUNTRY, country);
        fragment.setArguments(args);
        return fragment;
    }

    @Override
    public View onCreateView(LayoutInflater inflater, @Nullable ViewGroup container, @Nullable Bundle savedInstanceState) {
        View view = inflater.inflate(R.layout.fragment_country, container, false);

        TextView countryTextView = (TextView) view.findViewById(R.id.country_textView);
        countryTextView.setText(getArguments().getString(COUNTRY));

        return view;
    }
}
STEP 6: Update Main Activity
After it we must update our activity.
public class MainActivity extends ActionBarActivity implements View.OnClickListener {

    private Toolbar mToolbar;
    private DrawerLayout mDrawerLayout;

    @Override
    protected void onCreate(Bundle savedInstanceState) {
        super.onCreate(savedInstanceState);
        setContentView(R.layout.activity_main);

        mDrawerLayout = (DrawerLayout) findViewById(R.id.drawerLayout);

        setUpToolbar();

        ((NavigationView)findViewById(R.id.navigation)).setNavigationItemSelectedListener(this);
        getSupportFragmentManager().beginTransaction().replace(R.id.container, new MainFragment()).commit();
    }

    private void setUpToolbar() {
        mToolbar = (Toolbar) findViewById(R.id.toolbar);
        if (mToolbar != null) {
            setSupportActionBar(mToolbar);
            getSupportActionBar().setDisplayHomeAsUpEnabled(true);

            mToolbar.setNavigationIcon(R.drawable.ic_menu_white_24dp);
            mToolbar.setNavigationOnClickListener(this);
        }
    }

    @Override
    public void onClick(View v) {
        mDrawerLayout.openDrawer(GravityCompat.START);
    }

    @Override
    public boolean onNavigationItemSelected(MenuItem menuItem) {
        menuItem.setChecked(true);

        switch (menuItem.getItemId()) {
            case R.id.item_germany:
                mCurrentSelectedPosition = 0;
                getSupportFragmentManager().beginTransaction().replace(R.id.container, CountryFragment.newInstance("Germany")).commit();
                mDrawerLayout.closeDrawers();
                return true;
            case R.id.item_canada:
                mCurrentSelectedPosition = 1;
                getSupportFragmentManager().beginTransaction().replace(R.id.container, CountryFragment.newInstance("Canada")).commit();
                mDrawerLayout.closeDrawers();
                return true;
            case R.id.item_australia:
                mCurrentSelectedPosition = 2;
                getSupportFragmentManager().beginTransaction().replace(R.id.container, CountryFragment.newInstance("Australia")).commit();
                mDrawerLayout.closeDrawers();
                return true;
            case R.id.item_usa:
                mCurrentSelectedPosition = 3;
                getSupportFragmentManager().beginTransaction().replace(R.id.container, CountryFragment.newInstance("USA")).commit();
                mDrawerLayout.closeDrawers();
                return true;
            case R.id.item_settings:
                mCurrentSelectedPosition = 4;
                mDrawerLayout.closeDrawers();
                Snackbar.make(findViewById(R.id.container), "Settings", Snackbar.LENGTH_SHORT).show();
                return true;
        }

        return false;
    }
}
STEP 7: Change orientation problem and solution
Unfortunately, after changing orientation of device selected, its checked position in NavigationDrawer would be uncheck. For fixing this problem we must save selected position in variables and set up this position after rotating a screen. For it we will use onSaveInstanceState and onRestoreInstanceState methods. To our activity we must to add next source code.
private final static String STATE_SELECTED_POSITION = "position";
private int mCurrentSelectedPosition;
In addition to it, we need to add onSaveInstanceState method:
public void onSaveInstanceState(Bundle outState) {
    super.onSaveInstanceState(outState);
    outState.putInt(STATE_SELECTED_POSITION, mCurrentSelectedPosition);
}
The onRestoreInstanceState method:
protected void onRestoreInstanceState(Bundle savedInstanceState) {
    super.onRestoreInstanceState(savedInstanceState);
    mCurrentSelectedPosition = savedInstanceState.getInt(STATE_SELECTED_POSITION, 0);
    Menu menu = mNavigationView.getMenu();
    menu.getItem(mCurrentSelectedPosition).setChecked(true);
}
Next step is changing
getSupportFragmentManager().beginTransaction().replace(R.id.container, new MainFragment()).commit();<br />
to
if (savedInstanceState != null) {
    mCurrentSelectedPosition =
    savedInstanceState.getInt(STATE_SELECTED_POSITION);
} else {
    getSupportFragmentManager().beginTransaction().replace(R.id.container, new MainFragment()).commit();
}
After these changes MainFragment will be shown just after the start but the last loaded fragment will be shown after rotation.
STEP 8: Set up theme for the project
The latest step is updating styles for whole application.
Firstly need to create file with colors. For it need to create file colors.xml in folder res/values.
Source code of this file is next:
<?xml version="1.0" encoding="utf-8"?>
<resources>
    <color name="primaryColor">#3F51B5</color>
    <color name="primaryColorDark">#303F9F</color>
</resources>
After it need to open file styles.xml in folder res/values and update style, which called AppTheme<.
<style name="AppTheme" parent="Theme.AppCompat.Light.NoActionBar">
    <item name="colorPrimary">@color/primaryColor</item>
    <item name="colorPrimaryDark">@color/primaryColorDark</item>
</style>
Now you can run application.
Full source code you can find on GitHub.