
Mastering Android Screenshot Testing
This comprehensive guide explores automated screenshot testing in Android development.
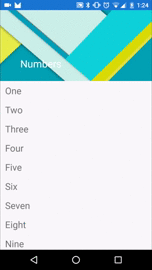
Today, I'm talking about the animated toolbar. We will use the Android design support library for implementing a toolbar.
STEP 1: ADD LIBRARIES TO THE PROJECT
Firstly need to add libraries to the gradle file for a project.
dependencies {
    compile fileTree(dir: "libs", include: ["*.jar"])
    compile "com.android.support:appcompat-v7:22.2.0"
    compile "com.android.support:design:22.2.0"
    compile "com.android.support:recyclerview-v7:22.2.0"
    compile "com.android.support:palette-v7:22.2.0"
}
STEP 2: ADD STRINGS AND ARRAY TO THE PROJECT
Next step update strings.xml file in the "/res/values" folder.
<resources>
    <string name="app_name">ToolbarAnimation</string>
    <string name="one">One</string>
    <string name="two">Two</string>
    <string name="three">Three</string>
    <string name="four">Four</string>
    <string name="five">Five</string>
    <string name="six">Six</string>
    <string name="seven">Seven</string>
    <string name="eight">Eight</string>
    <string name="nine">Nine</string>
    <string name="ten">Ten</string>
    <string name="eleven">Eleven</string>
    <string name="twelve">Twelve</string>
    <string name="numbers">Numbers</string>
    <string-array name="numbers">
        <item>@string/one</item>
        <item>@string/two</item>
        <item>@string/three</item>
        <item>@string/four</item>
        <item>@string/five</item>
        <item>@string/six</item>
        <item>@string/seven</item>
        <item>@string/eight</item>
        <item>@string/nine</item>
        <item>@string/ten</item>
        <item>@string/eleven</item>
        <item>@string/twelve</item>
    </string-array>
</resources>
STEP 4: UPDATE LAYOUT FOR MAIN ACTIVITY
After it, we need to update the layout for the main activity in the project.
<android.support.design.widget.CoordinatorLayout xmlns:android="http://schemas.android.com/apk/res/android"
    xmlns:app="http://schemas.android.com/apk/res-auto"
    android:layout_width="match_parent"
    android:layout_height="match_parent"
    android:fitsSystemWindows="true">
    <android.support.design.widget.AppBarLayout
        android:id="@+id/appbar"
        android:layout_width="match_parent"
        android:layout_height="192dp"
        android:fitsSystemWindows="true"
        android:theme="@style/ThemeOverlay.AppCompat.Dark.ActionBar">
        <android.support.design.widget.CollapsingToolbarLayout
            android:id="@+id/collapsing_toolbar"
            android:layout_width="match_parent"
            android:layout_height="match_parent"
            android:fitsSystemWindows="true"
            app:contentScrim="?attr/colorPrimary"
            app:expandedTitleMarginBottom="32dp"
            app:expandedTitleMarginEnd="64dp"
            app:expandedTitleMarginStart="48dp"
            app:layout_scrollFlags="scroll|exitUntilCollapsed">
            <ImageView
                android:id="@+id/header"
                android:layout_width="match_parent"
                android:layout_height="match_parent"
                android:background="@drawable/header"
                android:fitsSystemWindows="true"
                android:scaleType="centerCrop"
                app:layout_collapseMode="parallax" />
            <android.support.v7.widget.Toolbar
                android:id="@+id/anim_toolbar"
                android:layout_width="match_parent"
                android:layout_height="?attr/actionBarSize"
                app:layout_collapseMode="pin"
                app:popupTheme="@style/ThemeOverlay.AppCompat.Light" />
        </android.support.design.widget.CollapsingToolbarLayout>
    </android.support.design.widget.AppBarLayout>
    <android.support.v7.widget.RecyclerView
        android:id="@+id/recyclerView"
        android:layout_width="match_parent"
        android:layout_height="match_parent"
        app:layout_behavior="@string/appbar_scrolling_view_behavior" />
</android.support.design.widget.CoordinatorLayout>
In this source code, we are using CoordinatorLayout, AppBarLayout, CollapsingToolbarLayout.
CoordinatorLayout is a super-powered FrameLayout.
AppBarLayout is a vertical LinearLayout which implements many of the features of material designs app bar concept, namely scrolling gestures.
CollapsingToolbarLayout is a wrapper for Toolbar which implements a collapsing app bar. It is designed to be used as a direct child of a AppBarLayout.
STEP 5: UPDATE MAIN ACTIVITY
public class MainActivity extends AppCompatActivity {
    private Toolbar mToolbar;
    private CollapsingToolbarLayout mCollapsingToolbar;

    @Override
    protected void onCreate(Bundle savedInstanceState) {
        super.onCreate(savedInstanceState);
        setContentView(R.layout.activity_main);
        mToolbar = (Toolbar) findViewById(R.id.anim_toolbar);
        setSupportActionBar(mToolbar);
        mCollapsingToolbar = (CollapsingToolbarLayout) findViewById(R.id.collapsing_toolbar);
        mCollapsingToolbar.setTitle(getString(R.string.numbers));
        Bitmap bitmap = BitmapFactory.decodeResource(
            getResources(),
            R.drawable.header
        );
        Palette.from(bitmap).generate(new Palette.PaletteAsyncListener() {
            @Override
            public void onGenerated(Palette palette) {
                int mutedColor = palette.getLightMutedColor(R.attr.colorPrimary);
                mCollapsingToolbar.setContentScrimColor(mutedColor);
            }
        });
    }
}
STEP 6: UPDATE STYLE FOR THIS PROJECT
Firstly, we need to add a primaryColorDark to "colors.xml" in folder "/res/values/".
<?xml version="1.0" encoding="utf-8"?>
<resources><br />
    <color name="primaryColorDark">#1976D2</color>
</resources>
After it need to update style for whole application, for it need to update "styles.xml" file in folder "/res/values/".
<style name="AppTheme" parent="Theme.AppCompat.Light.NoActionBar">
    <item name="colorPrimaryDark">@color/primaryColorDark</item>
</style>
STEP 7: ADD LAYOUT FOR ITEM OF RECYCLERVIEW
I'm using the recylcerView need to use an Adapter with items. Firstly need to add a layout for an item of recycler view. We need to add layout for the item to folder "/res/layout/". In my case, this file called "item.xml", source code for this file is next:
<?xml version="1.0" encoding="utf-8"?>
<LinearLayout xmlns:android="http://schemas.android.com/apk/res/android"
    android:orientation="vertical" android:layout_width="match_parent"
    android:layout_height="match_parent">
    <TextView
        android:id="@+id/textView"
        android:textSize="22sp"
        android:layout_marginRight="12dp"
        android:layout_marginLeft="12dp"
        android:layout_marginTop="8dp"
        android:layout_marginBottom="8dp"
        android:layout_width="match_parent"
        android:layout_height="wrap_content" />
</LinearLayout>
STEP 8: ADD ADAPTER FOR RECYLCER VIEW
The next step is to create an adapter for the recycler view. It needs to create a java class. In my case, this file called RecyclerViewAdapter.java
public class RecyclerViewAdapter extends RecyclerView.Adapter<RecyclerViewAdapter.ViewHolder> {
    private String[] mList;
    public RecyclerViewAdapter(String[] list) {
        this.mList = list;
    }

    @Override
    public ViewHolder onCreateViewHolder(ViewGroup parent, int viewType) {
        LayoutInflater inflater = LayoutInflater.from(parent.getContext());
        View itemView = inflater.inflate(R.layout.item, parent, false);
        return new ViewHolder(itemView);
    }

    @Override
    public void onBindViewHolder(ViewHolder holder, int position) {
        holder.titleTextView.setText(mList[position]);
    }

    @Override
    public int getItemCount() {
        return mList.length;
    }

    public static class ViewHolder extends RecyclerView.ViewHolder {
        private TextView titleTextView;
        public ViewHolder(View itemView) {
            super(itemView);
            titleTextView = (TextView)itemView.findViewById(R.id.textView);
            itemView.setTag(itemView);
        }
    }
}
STEP 9: UPDATE MAIN ACTIVITY
The last step is to update the activity for work with the recycler view and display some information.
mRecyclerView = (RecyclerView) findViewById(R.id.recyclerView);
mGridLayoutManager = new StaggeredGridLayoutManager(1, StaggeredGridLayoutManager.VERTICAL);
mRecyclerView.setItemAnimator(new DefaultItemAnimator());
mRecyclerView.setLayoutManager(mGridLayoutManager);
mAdapter = new RecyclerViewAdapter(getResources().getStringArray(R.array.numbers));
mRecyclerView.setAdapter(mAdapter);
Full source code of main activity is next:
public class MainActivity extends AppCompatActivity {
    private Toolbar mToolbar;
    private RecyclerView mRecyclerView;
    private RecyclerViewAdapter mAdapter;
    private CollapsingToolbarLayout mCollapsingToolbar;
    private StaggeredGridLayoutManager mGridLayoutManager;

    @Override
    protected void onCreate(Bundle savedInstanceState) {
        super.onCreate(savedInstanceState);
        setContentView(R.layout.activity_main);
        mToolbar = (Toolbar) findViewById(R.id.anim_toolbar);
        setSupportActionBar(mToolbar);
        mCollapsingToolbar = (CollapsingToolbarLayout) findViewById(R.id.collapsing_toolbar);
        mCollapsingToolbar.setTitle(getString(R.string.numbers));
        mRecyclerView = (RecyclerView) findViewById(R.id.recyclerView);
        mGridLayoutManager = new StaggeredGridLayoutManager(1, StaggeredGridLayoutManager.VERTICAL);
        mRecyclerView.setItemAnimator(new DefaultItemAnimator());
        mRecyclerView.setLayoutManager(mGridLayoutManager);
        mAdapter = new RecyclerViewAdapter(getResources().getStringArray(R.array.numbers));
        mRecyclerView.setAdapter(mAdapter);
        Bitmap bitmap = BitmapFactory.decodeResource(
            getResources(),
            R.drawable.header
        );
        Palette.from(bitmap).generate(new Palette.PaletteAsyncListener() {
            @Override
            public void onGenerated(Palette palette) {
                int mutedColor = palette.getLightMutedColor(R.attr.colorPrimary);
                mCollapsingToolbar.setContentScrimColor(mutedColor);
            }
        });
    }
}
After it, you can run this application.

